リポジトリの codespace の作成について
codespace は、GitHub、Visual Studio Code、または GitHub CLI を使用して作成できます。 この記事のタブを使用して、codespace を作成するこれらの各方法の手順を表示します。
個人の GitHub アカウントで GitHub Codespaces を使用できます。無料プランとプロ プランのアカウントには毎月無料使用のクォータが含まれています。 毎月含まれているストレージとコンピューティングの使用量を超えて GitHub Codespaces を使い続けるには、支払い情報を入力して、利用限度を設定します。 「GitHub Codespaces の請求について」をご覧ください。
組織は、メンバーと外部コラボレーターが組織の費用で codespace を作成して使用できるようにすることができます。 詳しくは、「組織内の codespace を誰が所有し、支払うかの選択」をご覧ください。
組織所有のリポジトリから codespace を作成できるかどうかは、リポジトリの可視性、組織またはその親企業の設定など、いくつかの要因によって異なります。 詳しくは、「codespace の作成と削除のトラブルシューティング」をご覧ください。
新しいプロジェクトを始める場合は、テンプレートから codespace を作成して、後で GitHub でリポジトリを公開できます。詳しくは、「テンプレートから codespace を作成する」をご覧ください。
リポジトリから codespace を作成すると、codespace は特定のブランチに関連付けられます。空にすることはできません。 リポジトリごと、さらにはブランチごとに1つ以上のcodespaceを作成できます。
[コードスペース] ページで、作成したすべての使用可能なすべてのコードスペースを確認できます。 このページを表示するには、GitHub の左上隅にある を選択し、コードスペースをクリックします。 これにより、github.com/codespaces に移動します。
codespace の作成プロセス
codespace を作成すると、開発環境を作成して開発環境に接続するためのいくつかの手順が発生します。
- 手順 1: VM とストレージが codespace に割り当てられます。
- 手順 2: コンテナーが作成され、リポジトリが複製されます。
- 手順 3: codespace に接続できます。
- 手順 4: codespace では、作成後のセットアップが続行されます。
codespace を作成するときに行われることについて詳しくは、「GitHub Codespaces の詳細」をご覧ください。
codespace のライフサイクルについて詳しくは、「codespace ライフサイクルについて」をご覧ください。
codespace に Git フックを使用する場合は、devcontainer.json ライフサイクル スクリプト (例: postCreateCommand) を使用してフックを設定する必要があります。 これらは、上記の手順 4 で実行されます。 ライフサイクル スクリプトについて詳しくは、開発コンテナーの Web サイト上にある「開発コンテナー仕様」をご覧ください。 リポジトリの複製後に codespace の開発者コンテナーが作成されるため、開発者コンテナー イメージで構成された Git テンプレート ディレクトリ は codespace には適用されません。 代わりに、codespace の作成後にフックをインストールする必要があります。
VS Code の codespace で開発をする際に、コードを編集し、デバッグし、Gti のコマンドを使うことができます。 詳しい情報については、VS Code のドキュメントを参照してください。
コードスペースの作成を高速化するために、リポジトリ管理者はリポジトリの GitHub Codespaces プレビルドを有効にすることができます。 詳しくは、「GitHub Codespaces のプレビルドについて」をご覧ください。
リポジトリの codespace を作成する
-
GitHub で、リポジトリのメイン ページに移動します。
-
リポジトリ名の下で、現在のブランチの名前が付いたブランチ ドロップダウン メニューを選び、codespace を作るブランチをクリックします。
![展開されたブランチのドロップダウン メニューのスクリーンショット。さまざまなブランチが一覧表示されています。 [trunk] ドロップダウン メニューがブランチ アイコンと共に表示され、オレンジ色の枠線で囲まれています。](/assets/cb-31088/images/help/codespaces/branch-drop-down.png)
-
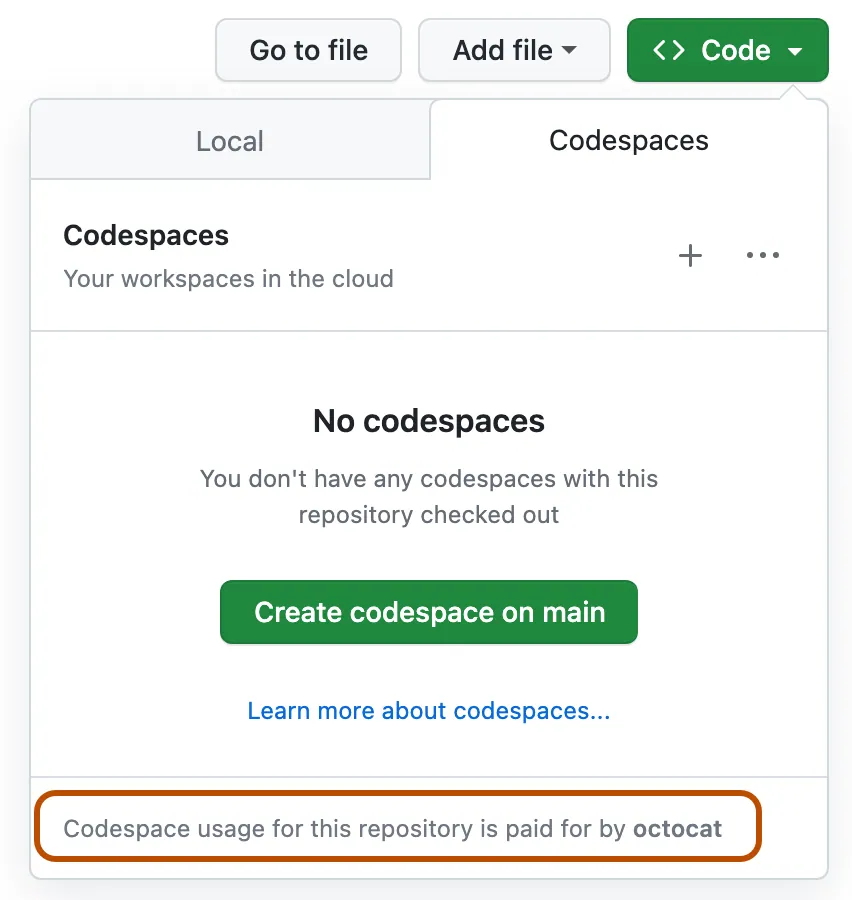
[ コード] ボタンをクリックし、 [Codespaces] タブをクリックしてください。
ダイアログの下部に、codespace の料金を支払うユーザーを示すメッセージが表示されます。

-
既定のオプションを使用するか、詳細オプションを構成した後に、codespace を作成します。
-
既定のオプションを使用する
既定のオプションを使用して codespace を作成するには、 をクリックします。
-
詳細設定オプションの構成
別のマシンの種類や特定の
devcontainer.jsonファイルなど、codespace の詳細オプションを構成するには:-
[Codespaces] タブの右上にある [] を選び、 [オプションを指定して新規作成] をクリックします。
![[Codespaces] タブのオプション ドロップダウンのスクリーンショット。[オプションを指定して新規作成] オプションが強調表示されています。](/assets/cb-69581/images/help/codespaces/default-machine-type.png)
-
codespace のオプション ページで、ドロップダウン メニューから任意のオプションを選びます。
![[ブランチ]、[開発コンテナーの構成]、[リージョン]、[マシンの種類] のボタンが表示された詳細オプション ページのスクリーンショット。](/assets/cb-66206/images/help/codespaces/advanced-options.png)
オプション ページには、Codespaces 設定での作成が推奨されるシークレットの名前も 1 つまたはそれ以上表示されます。 詳しくは、「推奨されるシークレット」をご覧ください。
Note
- オプション ページをブックマークすると、このリポジトリとブランチの codespace をすばやく作成できるようになります。
- https://github.com/codespaces/new ページでは、リポジトリとブランチの codespace をすばやく作成できます。 ブラウザーのアドレス バーに「
codespace.new」と入力すると、このページにすばやくアクセスできます。 - 開発コンテナーの構成ファイルについて詳しくは、「開発コンテナーの概要」をご覧ください。
- マシンの種類について詳しくは、「codespace のマシンの種類を変更する」をご覧ください。
- 使用可能なマシンは、数多くの要因によって、選択の幅が制限されます。 これには、Organization に対して構成されているポリシーや、リポジトリでの最低限の種類のマシン仕様が含まれます。 詳細については、「コンピューターの種類へのアクセスを制限する」および「codespace コンピューターに対して最小仕様を設定する」を参照してください。
-
[Create codespace](codespace の作成) をクリックします。
-
-
![展開されたブランチのドロップダウン メニューのスクリーンショット。さまざまなブランチが一覧表示されています。 [trunk] ドロップダウン メニューがブランチ アイコンと共に表示され、オレンジ色の枠線で囲まれています。](/assets/cb-31088/mw-1440/images/help/codespaces/branch-drop-down.webp)
![[Codespaces] タブのオプション ドロップダウンのスクリーンショット。[オプションを指定して新規作成] オプションが強調表示されています。](/assets/cb-69581/mw-1440/images/help/codespaces/default-machine-type.webp)
![[ブランチ]、[開発コンテナーの構成]、[リージョン]、[マシンの種類] のボタンが表示された詳細オプション ページのスクリーンショット。](/assets/cb-66206/mw-1440/images/help/codespaces/advanced-options.webp)
推奨されるシークレット
codespace を作成するとき、ユーザー定義のシークレットの名前が詳細オプションのページに表示されることがあります。 ユーザーが選んだ開発コンテナー構成に推奨シークレットが指定されている場合、表示されます。 詳しくは、「リポジトリに推奨シークレットを指定する」をご覧ください。

この開発環境シークレット値の入力を求められたら、入力することが推奨されています。プロジェクトで必要になる可能性が高いためです。 ただし、codespace の作成には必須ではありません。 必要に応じて、codespace 内でこのシークレットを設定できます。
推奨シークレットの値を入力すると、そのシークレットが新しい codespace で使用できるようになります。 [codespace の作成] をクリックすると、Codespaces の個人設定にもシークレットが追加されます。そのため、今後、このリポジトリで codespace を作成するとき、シークレット値を入力する必要がありません。
あるシークレットの名前が表示されているが、チェックボックスにチェックが入らず、入力用のボックスもない場合、それは、Codespaces の個人設定でその名前のシークレットを既に構成し、このリポジトリに関連付けているためです。 この名前のシークレットを作成したが、このリポジトリに関連付けていない場合、チェックボックスにチェックが入ります。チェックを入れることで、設定を更新し、関連付けを追加できます。
前に選んだシークレットの値は、github.com/settings/codespaces で、Codespaces の個人設定から変えられます。 詳しくは、「GitHub Codespaces のアカウント固有のシークレットの管理」をご覧ください。
GitHub のアカウントを GitHub Codespaces 拡張機能に接続したら、新しい codespace を作成することができます。 GitHub Codespaces 拡張機能の詳しい情報については、VS Code Marketplace に関するページを参照してください。
-
VS Code のアクティビティ バーで、[リモート エクスプローラー] アイコンをクリックします。
![アクティビティ バーのスクリーンショット。 [リモート エクスプローラー] サイド バーのアイコン (四角形の上に円が重なっている) がオレンジ色の枠線で強調表示されています。](/assets/cb-48473/images/help/codespaces/click-remote-explorer-icon-vscode.png)
Note
リモート エクスプローラーがアクティビティ バーに表示されない場合:
- コマンド パレットにアクセスします。 たとえば、Shift + Command + P (Mac) / Ctrl + Shift + P (Windows/Linux) を押します。
- 次のコマンドを入力します:
details - [コードスペース: 詳細] をクリックします。
-
[リモート エクスプローラー] サイド バーの上にマウス ポインターを合わせ、[] をクリックします。
![GitHub Codespaces の [リモート エクスプローラー] サイド バーのスクリーンショット。 プラス記号ボタンの横に [新しい codespace の作成] というヒントが表示されています。](/assets/cb-26869/images/help/codespaces/create-codespace-vscode.png)
-
テキスト ボックスに開発を行うリポジトリの名前を入力し、それを選択します。

後続のプロンプトの右側に、codespace の料金を支払うユーザーを示すメッセージが表示されます。

-
開発するブランチをクリックします。
-
開発コンテナー構成ファイルの選択を求められたら、一覧からファイルを選びます。
-
使用するマシンの種類をクリックします。
Note
使用可能なマシンは、数多くの要因によって、選択の幅が制限されます。 これには、Organization に対して構成されているポリシーや、リポジトリでの最低限の種類のマシン仕様が含まれます。 詳細については、「コンピューターの種類へのアクセスを制限する」および「codespace コンピューターに対して最小仕様を設定する」を参照してください。
![GitHub Codespaces の [リモート エクスプローラー] サイド バーのスクリーンショット。 プラス記号ボタンの横に [新しい codespace の作成] というヒントが表示されています。](/assets/cb-26869/mw-1440/images/help/codespaces/create-codespace-vscode.webp)


Note
GitHub CLI の詳細については、「GitHub CLI について」を参照してください。
新しい codespace を作成するには、gh codespace create サブコマンドを使用します。
gh codespace create
リポジトリの選択を求められます。 codespace の料金を支払うユーザーを示すメッセージが表示されます。 その場合、ブランチ、開発コンテナー構成ファイル (複数ある場合)、コンピューターの種類 (複数ある場合) を選ぶように求められます。
または、フラグを使用して、次に示すオプションの一部またはすべてを特定することもできます。
gh codespace create -r OWNER/REPO -b BRANCH --devcontainer-path PATH -m MACHINE-TYPE
この例の owner/repo をリポジトリ識別子に置き換えます。 branch を codespace で最初にチェックアウトするブランチの名前、またはコミットの完全な SHA ハッシュに置き換えます。 b フラグなしで -r フラグを使用する場合、codespace は既定のブランチから作成されます。
新しいコードスペースで使用する開発コンテナー構成ファイルへのパスに path を置き換えます。 このフラグを省略し、複数の開発コンテナー ファイルを使用できる場合は、リストから 1 つを選ぶダイアログが表示されます。 開発コンテナーの構成ファイルについて詳しくは、「開発コンテナーの概要」をご覧ください。
machine-type を使用可能なマシンの種類の有効な識別子に置き換えます。 識別子は、basicLinux32gb や standardLinux32gb のような文字列です。 使用可能なマシンの種類は、リポジトリ、個人用アカウント、場所によって異なります。 無効または使用できないマシンの種類を入力すると、使用可能な種類がエラー メッセージに表示されます。 このフラグを省略し、複数のマシンの種類を使用できる場合は、リストから 1 つを選択するダイアログが表示されます。
このコマンドのオプションについて詳しくは、GitHub CLI マニュアルを参照してください。