À propos des exécuteurs auto-hébergés pour GitHub Actions
GitHub Actions permet aux utilisateurs de votre entreprise d'améliorer leur productivité en automatisant chaque phase du workflow de développement logiciel. Pour plus d’informations, consultez « À propos de GitHub Actions pour les entreprises ».
Avec GitHub Actions, les développeurs peuvent écrire et combiner des tâches individuelles appelées actions pour créer des workflows personnalisés. Vous pouvez héberger votre propre ordinateur exécuteur pour exécuter les travaux, et cet ordinateur s’appelle un exécuteur auto-hébergé. Les exécuteurs auto-hébergés peuvent être physiques ou virtuels, et se trouver dans un conteneur, localement ou dans un cloud. Votre machine d’exécuteur se connecte à GitHub à l’aide de l’application d’exécuteur auto-hébergé de GitHub Actions. Tous les exécuteurs peuvent exécuter Linux, Windows ou macOS. Pour plus d’informations, consultez « À propos des exécuteurs auto-hébergés ».
Vous pouvez aussi utiliser des ordinateurs exécuteurs hébergés par GitHub. Les exécuteurs hébergés par GitHub ne sont pas traités dans ce guide. Pour plus d’informations, consultez « Utilisation des exécuteurs hébergés par GitHub ».
Ce guide vous montre comment appliquer une approche de gestion centralisée des exécuteurs auto-hébergés pour GitHub Actions dans votre entreprise. Dans ce guide, vous allez effectuer les tâches suivantes.
- Configurer une stratégie limitée pour restreindre les actions et les workflows réutilisables qui peuvent s’exécuter dans votre entreprise
- Déployer un exécuteur auto-hébergé pour votre entreprise
- Créer un groupe pour gérer l’accès aux exécuteurs accessibles à votre entreprise
- Éventuellement, limiter un peu plus les dépôts qui peuvent utiliser l’exécuteur
- En option, pour générer et mettre à l’échelle automatiquement des exécuteurs auto-hébergés, utilisez Actions Runner Controller (ARC). Pour plus d’informations, consultez « À propos d’Actions Runner Controller ».
Vous trouverez aussi des informations supplémentaires sur la façon de superviser et de sécuriser vos exécuteurs auto-hébergés, et de personnaliser les logiciels sur vos ordinateurs exécuteurs.
À l’issue de ce guide, les membres de votre entreprise pourront exécuter des travaux de workflow à partir de GitHub Actions sur un ordinateur exécuteur auto-hébergé.
Prérequis
-
Vous devez avoir accès à la machine que vous allez utiliser en tant qu’exécuteur auto-hébergé dans votre environnement.
-
Votre entreprise doit être propriétaire d’au moins une organisation. Pour plus d’informations, consultez « À propos des organisations » et « Création d’une organisation à partir de zéro ».
1. Configurer des stratégies pour GitHub Actions
Tout d'abord, activez GitHub Actions pour toutes les organisations et configurez une politique pour limiter les actions et les workflows réutilisables qui peuvent s'exécuter au sein de votre entreprise. Les propriétaires d’organisation ont la possibilité de restreindre davantage ces stratégies pour chaque organisation.
- Dans le coin supérieur droit de GitHub, cliquez sur votre photo de profil.
- En fonction de votre environnement, cliquez sur Votre entreprise ou sur Vos entreprises, puis cliquez sur l'entreprise que vous souhaitez consulter.
- Sur le côté gauche de la page, dans la barre latérale du compte d’entreprise, cliquez sur Stratégies.
- Sous « Stratégies », cliquez sur Actions.
- Sous « Stratégies », sélectionnez Activer pour toutes les organisations.
- Pour activer les actions locales et les workflows réutilisables, et les actions créées par GitHub, sélectionnez Autoriser les actions d’entreprise, les autres actions sélectionnées et les workflows réutilisables, puis Autoriser les actions créées par GitHub .
- Cliquez sur Enregistrer.
Vous pouvez configurer des stratégies supplémentaires pour limiter les actions accessibles aux membres de l’entreprise. Pour plus d’informations, consultez « Application de stratégies pour GitHub Actions dans votre entreprise ».
2. Déployer l’exécuteur auto-hébergé pour votre entreprise
Maintenant, ajoutez un exécuteur auto-hébergé à votre entreprise. GitHub vous guidera dans l'installation du logiciel nécessaire sur la machine du coureur. Après avoir déployé le programme d'exécution, vous pouvez vérifier la connectivité entre l'ordinateur du programme et votre entreprise.
Ajout de l’exécuteur auto-hébergé
-
Dans le coin supérieur droit de GitHub, cliquez sur votre photo de profil.
-
En fonction de votre environnement, cliquez sur Votre entreprise ou sur Vos entreprises, puis cliquez sur l'entreprise que vous souhaitez consulter.
-
Sur le côté gauche de la page, dans la barre latérale du compte d’entreprise, cliquez sur Stratégies.
-
Sous « Stratégies », cliquez sur Actions.
-
Cliquez sur l’onglet Exécuteurs.
-
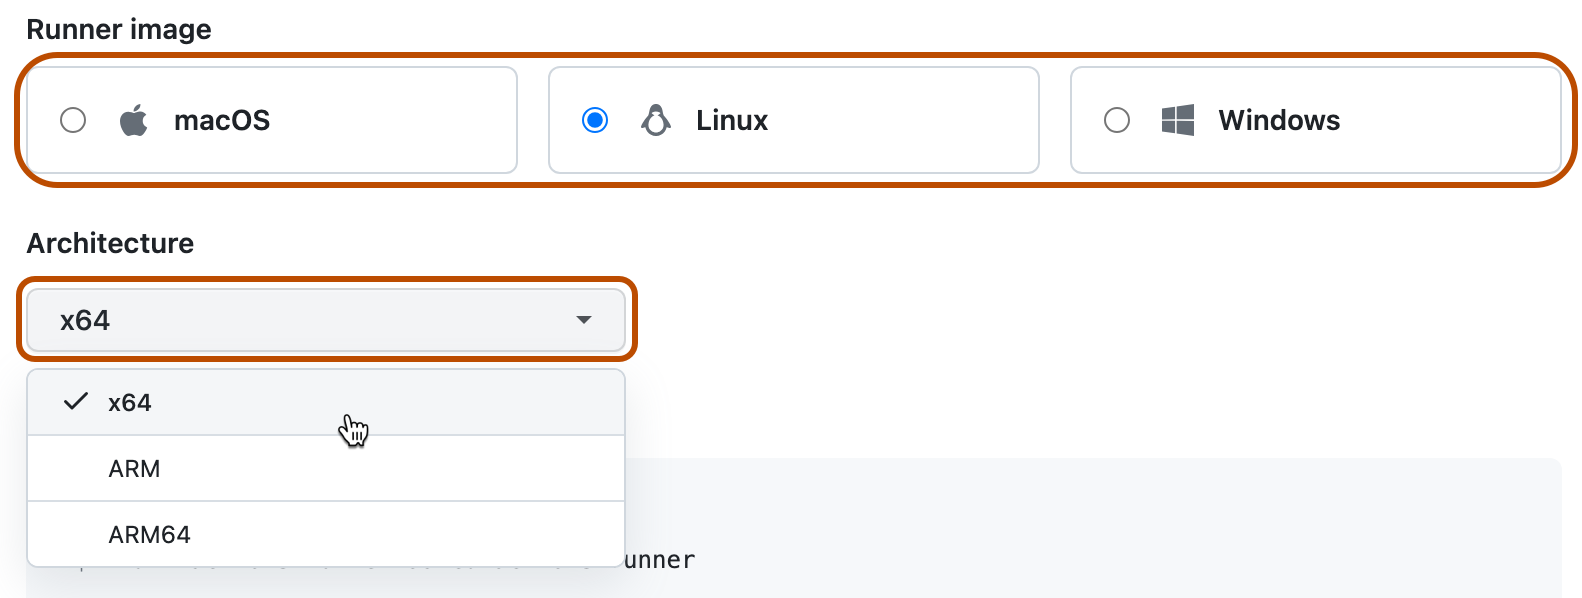
Cliquez sur Nouvel exécuteur, puis sur Nouvel exécuteur auto-hébergé. 1. Sélectionnez l’image et l’architecture du système d’exploitation de votre machine d’exécuteur auto-hébergée.
-
Des instructions vous montrent comment télécharger l’application d’exécuteur et l’installer sur votre machine d’exécuteur auto-hébergée.
Ouvrez un interpréteur de commandes sur votre machine d’exécuteur auto-hébergée et exécutez toutes les commandes shell dans l’ordre indiqué.
Note
Sur Windows, si vous souhaitez installer l’application d’exécuteur auto-hébergée en tant que service, vous devez ouvrir un interpréteur de commandes avec des privilèges d’administrateur. Nous vous recommandons également d’utiliser
C:\actions-runnercomme répertoire pour l’application de l’exécuteur auto-hébergé afin que les comptes système Windows puissent accéder au répertoire de l’exécuteur.Les instructions vous guident tout au long des tâches suivantes :
- Téléchargement et extraction de l’application d’exécuteur auto-hébergée.
- Exécution du script
configpour configurer l’application d’exécuteur auto-hébergée et l’inscrire auprès de GitHub Actions. L’URL de destination et un jeton limité dans le temps généré automatiquement sont nécessaires pour permettre au scriptconfigd’authentifier la demande. Le jeton expire au bout d’une heure.- Sur Windows, le script
configvous demande également si vous souhaitez installer l’application d’exécuteur auto-hébergée en tant que service. Pour Linux et macOS, vous pouvez installer un service une fois que vous avez terminé d’ajouter l’exécuteur. Pour plus d’informations, consultez « Configuration de l’application d’exécuteur auto-hébergé en tant que service ».
- Sur Windows, le script
- Exécution de l’application d’exécuteur auto-hébergée pour connecter la machine à GitHub Actions.

Vérification de la réussite de l’ajout de votre exécuteur autohébergé
Après avoir effectué les étapes pour ajouter un exécuteur autohébergé, l’exécuteur et son statut sont listés sous .
L’application de l’exécuteur autohébergée doit être active pour que l’exécuteur accepte les travaux. Quand l’application d’exécuteur est connectée à GitHub et qu’elle est prête à recevoir des travaux, le message suivant s’affiche sur le terminal de la machine.
√ Connected to GitHub

2019-10-24 05:45:56Z: Listening for Jobs
3. Gérer l’accès à l’exécuteur auto-hébergé en utilisant un groupe
Vous pouvez créer un groupe d’exécuteurs pour gérer l’accès à l’exécuteur que vous avez ajouté à votre entreprise. Le groupe vous permettra de choisir les organisations qui peuvent exécuter des travaux de GitHub Actions sur l’exécuteur.
GitHub ajoute tous les nouveaux coureurs à un groupe. Les exécuteurs peuvent appartenir à un seul groupe à la fois. Par défaut, GitHub ajoute les nouveaux exécuteurs au groupe « Default ».
-
Dans le coin supérieur droit de GitHub, cliquez sur votre photo de profil.
-
En fonction de votre environnement, cliquez sur Votre entreprise ou sur Vos entreprises, puis cliquez sur l'entreprise que vous souhaitez consulter.
-
Sur le côté gauche de la page, dans la barre latérale du compte d’entreprise, cliquez sur Stratégies.
-
Sous « Stratégies », cliquez sur Actions.
-
Cliquez sur l’onglet Groupes d’exécuteurs.
-
Cliquez sur Nouveau groupe d’exécuteurs.
-
Sous « Nom du groupe », tapez un nom pour votre groupe d’exécuteurs.
-
Pour choisir une stratégie pour l’accès des organisations, sous « Accès des organisations », sélectionnez la liste déroulante Accès des organisations, puis cliquez sur Organisations sélectionnées.
-
À droite de la liste déroulante contenant la stratégie d’accès des organisations, cliquez sur .
-
Sélectionnez les organisations auxquelles vous voulez accorder l’accès au groupe d’exécuteurs.
-
Si vous souhaitez autoriser les dépôts publics des organisations sélectionnées à utiliser les exécuteurs du groupe, sélectionnez Autoriser les dépôts publics.
Warning
Nous vous recommandons d’utiliser uniquement des exécuteurs auto-hébergés avec des dépôts privés. En effet, les duplications (forks) de votre dépôt public peuvent exécuter du code potentiellement dangereux sur la machine de votre exécuteur auto-hébergé en créant une demande de tirage qui exécute le code dans un workflow.
Pour plus d’informations, consultez « À propos des exécuteurs auto-hébergés ».
-
Cliquez sur Créer un groupe pour créer le groupe et appliquer la stratégie.
-
Cliquez sur l’onglet « Exécuteurs ».
-
Dans la liste des exécuteurs, cliquez sur l’exécuteur que vous avez déployé dans la section précédente.
-
Cliquez sur Modifier.
-
Cliquez sur Groupes d’exécuteurs .
-
Dans la liste des groupes d’exécuteurs, cliquez sur le nom du groupe que vous avez créé précédemment.
-
Cliquez sur Enregistrer pour déplacer l’exécuteur vers le groupe.
Vous avez maintenant déployé un exécuteur auto-hébergé qui peut exécuter des travaux de GitHub Actions dans les organisations que vous avez spécifiées.
4. Restreindre davantage l’accès à l’exécuteur auto-hébergé
Si vous le souhaitez, les propriétaires d'organisation et les utilisateurs disposant de l’autorisation « Gérer les exécuteurs d’organisation et les groupes d’exécuteurs » peuvent restreindre davantage la stratégie d’accès du groupe d’exécuteurs que vous avez créé. Par exemple, un propriétaire d’organisation peut décider d’autoriser seulement certains dépôts de l’organisation à utiliser le groupe d’exécuteurs.
Pour plus d’informations, consultez « Gestion de l’accès aux exécuteurs auto-hébergés à l’aide de groupes ».
Pour plus d’informations sur les rôles d’organisation personnalisés, consultez « À propos des rôles d'organisation personnalisés ».
5. Mettre automatiquement à l’échelle vos exécuteurs auto-hébergés
En option, vous pouvez utiliser Actions Runner Controller (ARC) pour mettre automatiquement à l'échelle les exécuteurs auto-hébergés. Actions Runner Controller (ARC) est un opérateur Kubernetes qui orchestre et met à l’échelle des exécuteurs auto-hébergés pour GitHub Actions. Pour plus d'informations, consultez Modèle d’opérateur dans la documentation de Kubernetes.
Avec ARC, vous pouvez créer des groupes identiques d’exécuteurs qui sont automatiquement mis à l’échelle en fonction du nombre de flux de travail en cours d’exécution dans votre référentiel, organisation ou entreprise. Étant donné que les exécuteurs contrôlés peuvent être éphémères et basés sur des conteneurs, les nouvelles instances de l’exécuteur peuvent effectuer un scale-up ou un scale-down rapide et propre. Pour plus d’informations sur la mise à l’échelle automatique, consultez Mise à l’échelle automatique avec des exécuteurs auto-hébergés.
Étapes suivantes
-
Vous pouvez superviser les exécuteurs auto-hébergés et résoudre les problèmes courants. Pour plus d’informations, consultez « Surveillance des exécuteurs auto-hébergés et résolution des problèmes ».
-
GitHub vous recommande d’examiner les considérations de sécurité pour les ordinateurs exécuteurs auto-hébergés. Pour plus d’informations, consultez « Durcissement de la sécurité pour GitHub Actions ».
-
Si vous utilisez GitHub Enterprise Server, vous pouvez synchroniser manuellement les dépôts sur GitHub.com contenant des actions avec votre entreprise sur GitHub Enterprise Server. Vous pouvez aussi autoriser les membres de votre entreprise à accéder automatiquement aux actions de GitHub.com à l’aide de GitHub Connect. Pour plus d'informations, consultez les documents suivants.
- « Synchronisation manuelle des actions à partir de GitHub.com » dans la documentation GitHub Enterprise Server
- « Activer l’accès automatique aux actions GitHub.com à l’aide de GitHub Connect » dans la documentation GitHub Enterprise Server
-
Vous pouvez personnaliser les logiciels disponibles sur vos ordinateurs exécuteurs auto-hébergés ou configurer vos exécuteurs pour qu’ils exécutent des logiciels similaires aux exécuteurs hébergés par GitHub. Les logiciels sur lesquels reposent les ordinateurs exécuteurs pour GitHub Actions sont open source. Pour plus d’informations, consultez les dépôts
actions/runneretactions/runner-images.