Introducción
En esta guía se muestra cómo configurar un ejemplo de proyecto de Python en En GitHub Codespaces con el cliente web de Visual Studio Code. Te guiarán en la apertura del proyecto en un codespace, y en la incorporación y modificación de una configuración predefinida de contenedor de desarrollo.
Después de completar este tutorial, podrás agregar una configuración de contenedor de desarrollo a tu propio repositorio mediante el cliente web de VS Code o la aplicación de escritorio de VS Code.
Para más información sobre los contenedores de desarrollo, consulta Introducción a los contenedores dev..
Paso 1: Abre el proyecto en un codespace
-
Inicia sesión en GitHub.com, si aún no lo has hecho.
-
Haz clic en Usar esta plantilla y luego en Abrir en un codespace.


Al crear un codespace, el proyecto se crea en una máquina virtual remota dedicada en exclusiva a ti. De manera predeterminada, el contenedor del codespace tiene muchos lenguajes de programación y tiempos de ejecución, incluido Python. También incluye un conjunto de herramientas comunes como git, wget, rsync, openssh y nano.
Puede personalizar el codespace si ajusta la cantidad de vCPU y RAM, agrega dotfiles para personalizar el entorno o modifica las herramientas y los scripts instalados. Para más información, consulta Personalizar tu codespace.
GitHub Codespaces usa un archivo llamado devcontainer.json para configurar el contenedor de desarrollo que se usa al trabajar en un codespace. Cada repositorio puede contener uno o varios archivos devcontainer.json, para proporcionarte exactamente el entorno de desarrollo que necesitas para trabajar en el código de un codespace.
Al iniciarse, GitHub Codespaces utiliza un archivo devcontainer.json, y cualquier archivo dependiente que forme parte de la configuración del contenedor de desarrollo, para instalar herramientas y entornos de ejecución y realizar otras tareas de configuración que requiera el proyecto. Para más información, consulta Introducción a los contenedores dev.
Paso 2: Agrega una configuración de contenedor de desarrollo
El contenedor de desarrollo predeterminado, o "contenedor de desarrollo", para GitHub Codespaces viene con la versión más reciente de Python, los administradores de paquetes (pip, Miniconda) y otras herramientas comunes preinstaladas. Sin embargo, recomendamos configurar tu propio contenedor de desarrollo para incluir todas las herramientas y scripts que necesita el proyecto. Esto garantizará un entorno totalmente reproducible para todos los usuarios de GitHub Codespaces en el repositorio.
Para configurar el repositorio a fin de usar un contenedor de desarrollo personalizado, deberás crear uno o varios archivos devcontainer.json. Puedes agregarlos desde una plantilla de configuración predefinida, en Visual Studio Code, o bien puedes escribir los tuyos propios. Para más información sobre las configuraciones de contenedor de desarrollo, consulta Introducción a los contenedores dev.
-
Accede a Visual Studio Code Command Palette (Mayús+Comando+P / Ctrl+Mayús+P) y, después, empieza a escribir "agregar desarrollo". Haz clic en Codespaces: agregar archivos de configuración para el contenedor de desarrollo.

-
Haz clic en Crear una nueva configuración.
-
En este ejemplo, el repositorio de plantillas desde el que creó el codespace ya contiene una configuración de contenedor de desarrollo, por lo que se muestra un mensaje que indica que el archivo de configuración ya existe. Vamos a sobrescribir el archivo de configuración existente; para ello, haz clic en Continuar.
-
Haz clic en Mostrar todas las definiciones.

-
Empieza a escribir
pythony haz clic en Python 3 en la lista. Hay otras opciones disponibles si el proyecto utiliza herramientas específicas. Por ejemplo, Python 3 y PostgreSQL.
-
Elige la versión de Python que quieres usar para el proyecto. En este caso, selecciona la versión marcada como "(default)".

-
Se muestra una lista de características adicionales. Instalaremos Coverage.py, una herramienta de cobertura de código para Python. Para instalar esta herramienta, escribe
py, seleccionaCoverage.py (via pipx)y haz clic en Aceptar.
-
Se muestra un mensaje en el que se indica que el archivo de configuración del contenedor de desarrollo ya existe. Haz clic en Sobrescribir.
Se crea un archivo
devcontainer.jsony se abre en el editor.


Detalles de la configuración personalizada del contenedor de desarrollo
Si observas en el explorador de Visual Studio Code,verás que se ha agregado un directorio .devcontainer a la raíz del repositorio del proyecto que contiene el archivo devcontainer.json. Este es el archivo de configuración principal para los codespaces creados desde este repositorio.
devcontainer.json
El archivo devcontainer.json que has agregado contendrá valores para las propiedades name, image y features. Se incluyen algunas propiedades adicionales que puedes encontrar útiles, pero se les ha quitado la marca de comentario.
El archivo tendrá un aspecto similar al siguiente, en función de la imagen que hayas elegido:
// For format details, see https://aka.ms/devcontainer.json. For config options, see the
// README at: https://github.com/devcontainers/templates/tree/main/src/python
{
  "name": "Python 3",
  // Or use a Dockerfile or Docker Compose file. More info: https://containers.dev/guide/dockerfile
  "image": "mcr.microsoft.com/devcontainers/python:0-3.11-bullseye",
  "features": {
    "ghcr.io/devcontainers-contrib/features/coverage-py:2": {}
  }

  // Features to add to the dev container. More info: https://containers.dev/features.
  // "features": {},

  // Use 'forwardPorts' to make a list of ports inside the container available locally.
  // "forwardPorts": [],

  // Use 'postCreateCommand' to run commands after the container is created.
  // "postCreateCommand": "pip3 install --user -r requirements.txt",

  // Configure tool-specific properties.
  // "customizations": {},

  // Uncomment to connect as root instead. More info: https://aka.ms/dev-containers-non-root.
  // "remoteUser": "root"
}
- name: puedes asignar el nombre que quieras al contenedor de desarrollo. Se proporciona un valor predeterminado.
- image: el nombre de una imagen en un registro de contenedor (DockerHub, GitHub Container registry o Azure Container Registry) que se usará a fin de crear el contenedor de desarrollo para el codespace.
- features: una lista de uno o varios objetos, cada uno de los cuales hace referencia a una de las características de contenedor de desarrollo disponibles. Las características son unidades autónomas y que se pueden compartir del código de instalación y la configuración del contenedor de desarrollo. Proporcionan una manera sencilla de agregar más herramientas, runtime o características de biblioteca al contenedor de desarrollo. Puede agregar características en VS Code o en el editor
devcontainer.jsonen GitHub. Para obtener más información, haz clic en la pestaña Visual Studio Code o Explorador web en Adición de características a un archivo devcontainer.json. - forwardPorts: cualquier puerto que se incluya aquí se reenviará de forma automática. Para más información, consulta Reenviar puertos en tu codespace.
- postCreateCommand: usa esta propiedad para ejecutar comandos después de crear el codespace. Se le puede dar formato de cadena (como antes), matriz u objeto. Para obtener más información, consulta la especificación de contenedores de desarrollo en el sitio web de contenedores de desarrollo.
- customizations: esta propiedad permite personalizar una herramienta o un servicio específicos cuando se usa para trabajar en un codespace. Por ejemplo, puedes configurar valores y extensiones específicas para VS Code. Para obtener más información, consulta Herramientas y servicios auxiliares en el sitio web de contenedores de desarrollo.
- remoteUser: de manera predeterminada, la ejecución se realiza como el usuario vscode, pero opcionalmente se puede establecer en root.
Para obtener una lista completa de las propiedades disponibles, consulta la especificación de contenedores de desarrollo en el sitio web de Contenedores de desarrollo.
Archivos de configuración adicionales del contenedor de desarrollo
Si conoces bien Docker, puede que quieras usar un Dockerfile o Docker Compose para configurar el entorno de codespace, además del archivo devcontainer.json. Para ello, agrega los archivos Dockerfile o compose.yaml junto con el archivo devcontainer.json. Para obtener más información, consulta Uso de imágenes, dockerfiles y Docker Compose en el sitio web de Contenedores de desarrollo.
Paso 3: Modifica tu archivo devcontainer.json
Con la configuración del contenedor de desarrollo agregada y un conocimiento básico de lo que hace cada elemento, ya puedes realizar cambios para personalizar aún más el entorno. En este ejemplo, agregarás propiedades que harán lo siguiente:
- Instalar un paquete requerido por la aplicación.
- Instalar una extensión de VS Code en este codespace.
-
En el archivo
devcontainer.json, agrega una coma después de la propiedadfeaturesy elimina las dos líneas comentadas sobre las características.JSON "features": { "ghcr.io/devcontainers-contrib/features/coverage-py:2": {} }, // Features to add to the dev container. More info: https://containers.dev/features. // "features": {},"features": { "ghcr.io/devcontainers-contrib/features/coverage-py:2": {} }, // Features to add to the dev container. More info: https://containers.dev/features. // "features": {}, -
Quitar la marca de comentario de la propiedad
postCreateCommand.JSONC // Use 'postCreateCommand' to run commands after the container is created. "postCreateCommand": "pip3 install --user -r requirements.txt",
// Use 'postCreateCommand' to run commands after the container is created. "postCreateCommand": "pip3 install --user -r requirements.txt", -
Quita la marca de comentario de la propiedad
customizationsy edítala tal como se indica a continuación para instalar la extensión "Corrector ortográfico de código" de VS Code.JSONC // Configure tool-specific properties. "customizations": { // Configure properties specific to VS Code. "vscode": { // Add the IDs of extensions you want installed when the container is created. "extensions": [ "streetsidesoftware.code-spell-checker" ] } }// Configure tool-specific properties. "customizations": { // Configure properties specific to VS Code. "vscode": { // Add the IDs of extensions you want installed when the container is created. "extensions": [ "streetsidesoftware.code-spell-checker" ] } }El archivo
devcontainer.jsonahora debería tener un aspecto similar al siguiente, dependiendo de la imagen que hayas elegido:// For format details, see https://aka.ms/devcontainer.json. For config options, see the // README at: https://github.com/devcontainers/templates/tree/main/src/python { "name": "Python 3", // Or use a Dockerfile or Docker Compose file. More info: https://containers.dev/guide/dockerfile "image": "mcr.microsoft.com/devcontainers/python:0-3.11-bullseye", "features": { "ghcr.io/devcontainers-contrib/features/coverage-py:2": {} }, // Use 'forwardPorts' to make a list of ports inside the container available locally. // "forwardPorts": [], // Use 'postCreateCommand' to run commands after the container is created. "postCreateCommand": "pip3 install --user -r requirements.txt", // Configure tool-specific properties. "customizations": { // Configure properties specific to VS Code. "vscode": { // Add the IDs of extensions you want installed when the container is created. "extensions": [ "streetsidesoftware.code-spell-checker" ] } } // Uncomment to connect as root instead. More info: https://aka.ms/dev-containers-non-root. // "remoteUser": "root" } -
Guarde los cambios.
-
Accede a VS Code Command Palette (Mayús+Comando+P / Ctrl+Mayús+P) y, después, empieza a escribir "recompilar". Haz clic en Codespaces: recompilar contenedor.

Sugerencia
En ocasiones, es posible que quieras realizar una recompilación completa para borrar la memoria caché y recompilar el contenedor con imágenes nuevas. Para más información, consulta Recompilación del contenedor en un codespace. Reconstruir dentro de tu codespace garantiza que tus cambios funcionan como se espera antes de que los confirmes los en el repositorio. Si algo falla, se te colocará en un codespace con un contenedor de recuperación desde el cual puedes volver a compilar para seguir ajustando tu contenedor.
Una vez recompilado el contenedor de desarrollo y cuando el codespace vuelva a estar disponible, se habrá ejecutado
postCreateCommand, con lo que se instalará el paquete que aparece en el archivorequirements.txt, y la extensión "Code Spell Checker" estará disponible para su uso.

Paso 4: Ejecución de la aplicación
En la sección anterior, usaste postCreateCommand para instalar un paquete para el marco web de Flask. Ahora, puede usarse para ejecutar la aplicación web.
-
En el terminal del codespace, escribe
python -m flask run.
-
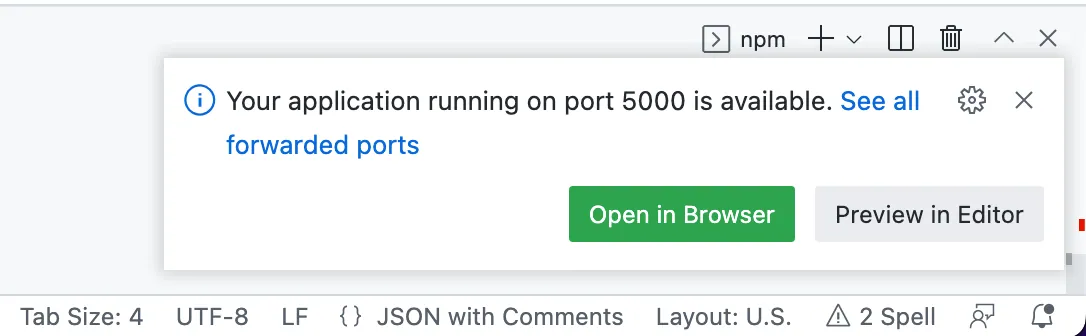
Cuando se inicie el proyecto, deberías ver un mensaje de notificación del sistema en la esquina inferior derecha de VS Code, que indicará que la aplicación está disponible en un puerto reenviado. Para ver la aplicación en ejecución, haz clic en Abrir en el explorador.


Paso 5: Confirma tus cambios
Una vez que hayas hecho cambios a tu codespace, ya sea de código nuevo o de cambios de configuración, necesitarás confirmar tus cambios. La confirmación de los cambios de configuración en tu repositorio garantiza que cualquiera que cree un codespace desde este repositorio tendrá la misma configuración. Cualquier personalización que realices, como agregar extensiones de VS Code, estará disponible para todos los usuarios.
En este tutorial, has creado un codespace a partir de un repositorio de plantillas, por lo que el código del codespace aún no se almacena en un repositorio. Puede crear un repositorio publicando la rama actual en el GitHub.
Para más información, consulta Utilizar el control de código fuente en tu codespace.
Pasos siguientes
Ahora deberías poder agregar una configuración de contenedor de desarrollo personalizada a tu propio proyecto de Python.
Aquí tienes algunos recursos adicionales para situaciones más avanzadas.