Note
GitHub Codespaces is not available on subdomains of GHE.com, such as octocorp.ghe.com.
About creating a codespace for a repository
You can create a codespace on GitHub, in Visual Studio Code, or by using GitHub CLI. Use the tabs in this article to display instructions for each of these ways of creating a codespace.
You can use GitHub Codespaces on your personal GitHub account, with the quota of free use included each month for accounts on the Free and Pro plans. You can continue using GitHub Codespaces beyond your monthly included storage and compute usage by providing payment details and setting a spending limit. See About billing for GitHub Codespaces.
Organizations can enable members and outside collaborators to create and use codespaces at the organization's expense. For more information, see Choosing who owns and pays for codespaces in your organization.
Your ability to create codespaces from organization-owned repositories depends on several factors, including the repository's visibility and the settings of the organization or its parent enterprise. For more information, see Troubleshooting creation and deletion of codespaces.
Note
If you have a managed user account, you cannot create codespaces for your personal repositories, unless the repository is a fork of an organization-owned repository and you are allowed to use GitHub Codespaces at the organization's expense. For more information, see About Enterprise Managed Users.
If you're starting a new project, you might want to create a codespace from a template and publish to a repository on GitHub later. For more information, see Creating a codespace from a template.
If you create a codespace from a repository, the codespace will be associated with a specific branch, which cannot be empty. You can create more than one codespace per repository or even per branch.
You can see every available codespace that you have created on the "Your codespaces" page. To display this page, in the top-left corner of GitHub, select , then click Codespaces. This takes you to github.com/codespaces.
The codespace creation process
When you create a codespace, a number of steps happen to create and connect you to your development environment:
- Step 1: VM and storage are assigned to your codespace.
- Step 2: Container is created and your repository is cloned.
- Step 3: You can connect to the codespace.
- Step 4: Codespace continues with post-creation setup.
For more information on what happens when you create a codespace, see Deep dive into GitHub Codespaces.
For more information on the lifecycle of a codespace, see Understanding the codespace lifecycle.
If you want to use Git hooks for your codespace, then you should set up hooks using the devcontainer.json lifecycle scripts, such as postCreateCommand. These get executed during step 4, above. For information about the lifecycle scripts, see the dev containers specification on the Development Containers website. Since the dev container for your codespace is created after the repository is cloned, any git template directory configured in the dev container image will not apply to your codespace. Hooks must instead be installed after the codespace is created.
You can edit code, debug, and use Git commands while developing in a codespace with VS Code. For more information, see the VS Code documentation.
To speed up codespace creation, repository administrators can enable GitHub Codespaces prebuilds for a repository. For more information, see About GitHub Codespaces prebuilds.
Creating a codespace for a repository
-
On GitHub, navigate to the main page of the repository.
-
Under the repository name, select the branch dropdown menu, which is labeled with the name of the current branch, then click the branch you want to create a codespace for.

-
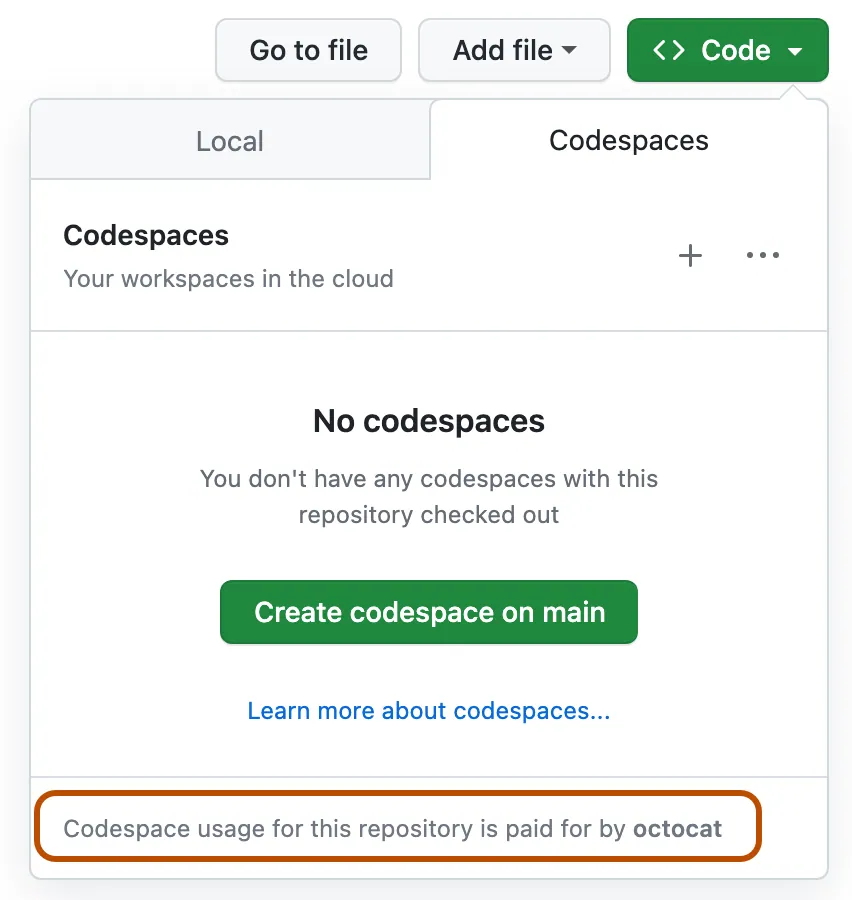
Click the Code button, then click the Codespaces tab.
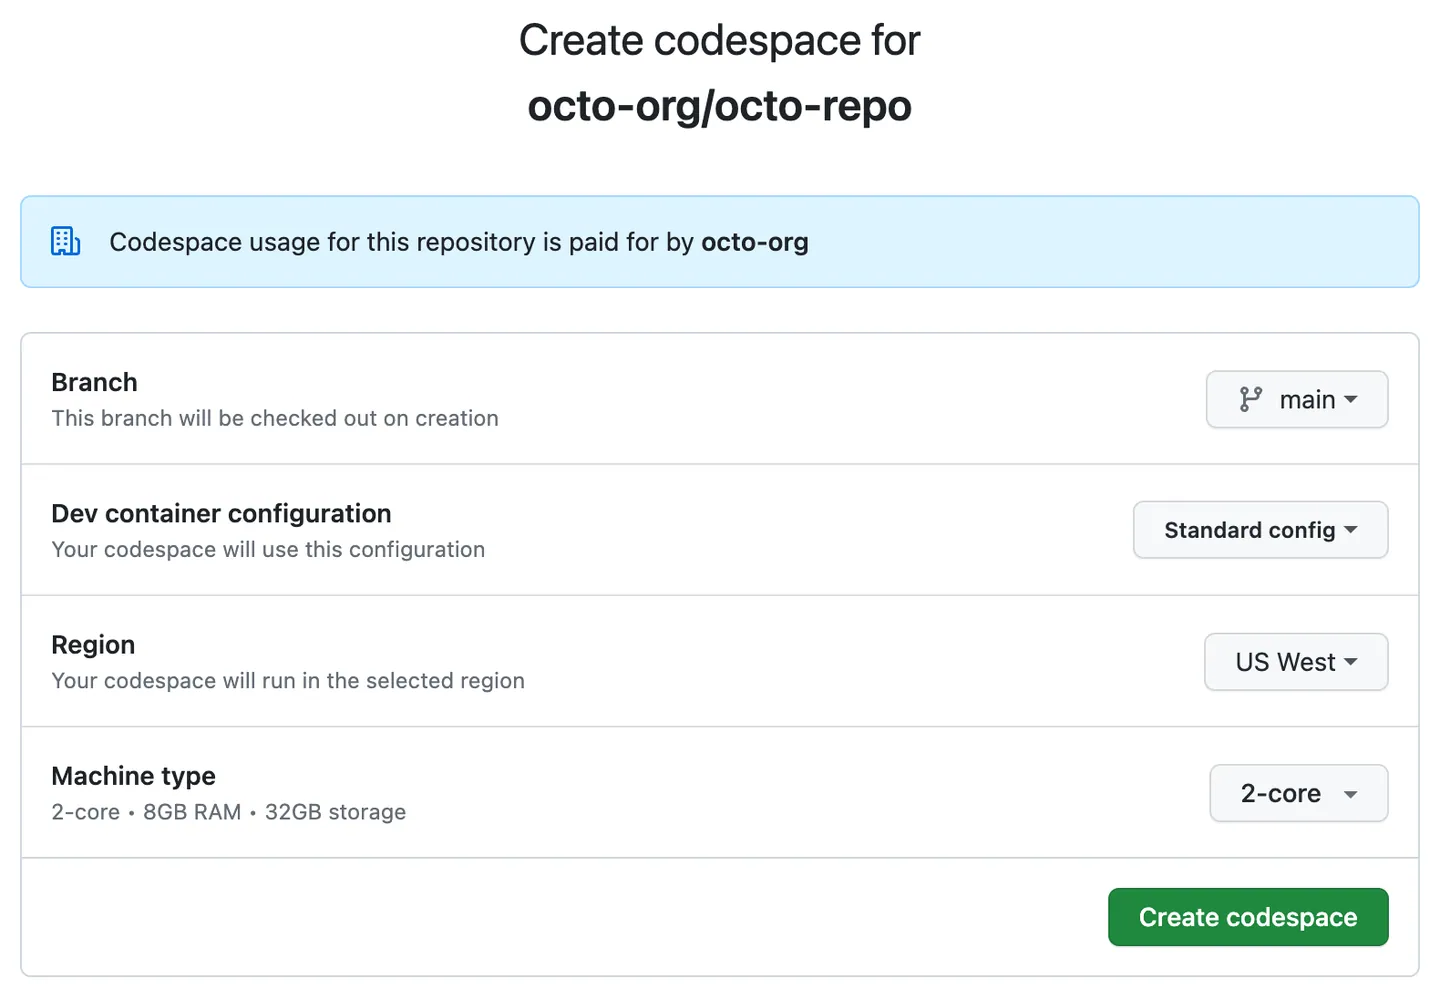
A message is displayed at the bottom of the dialog telling you who will pay for the codespace.

-
Create your codespace, either using the default options, or after configuring advanced options:
-
Use the default options
To create a codespace using the default options, click .
-
Configure advanced options
To configure advanced options for your codespace, such as a different machine type or a particular
devcontainer.jsonfile:-
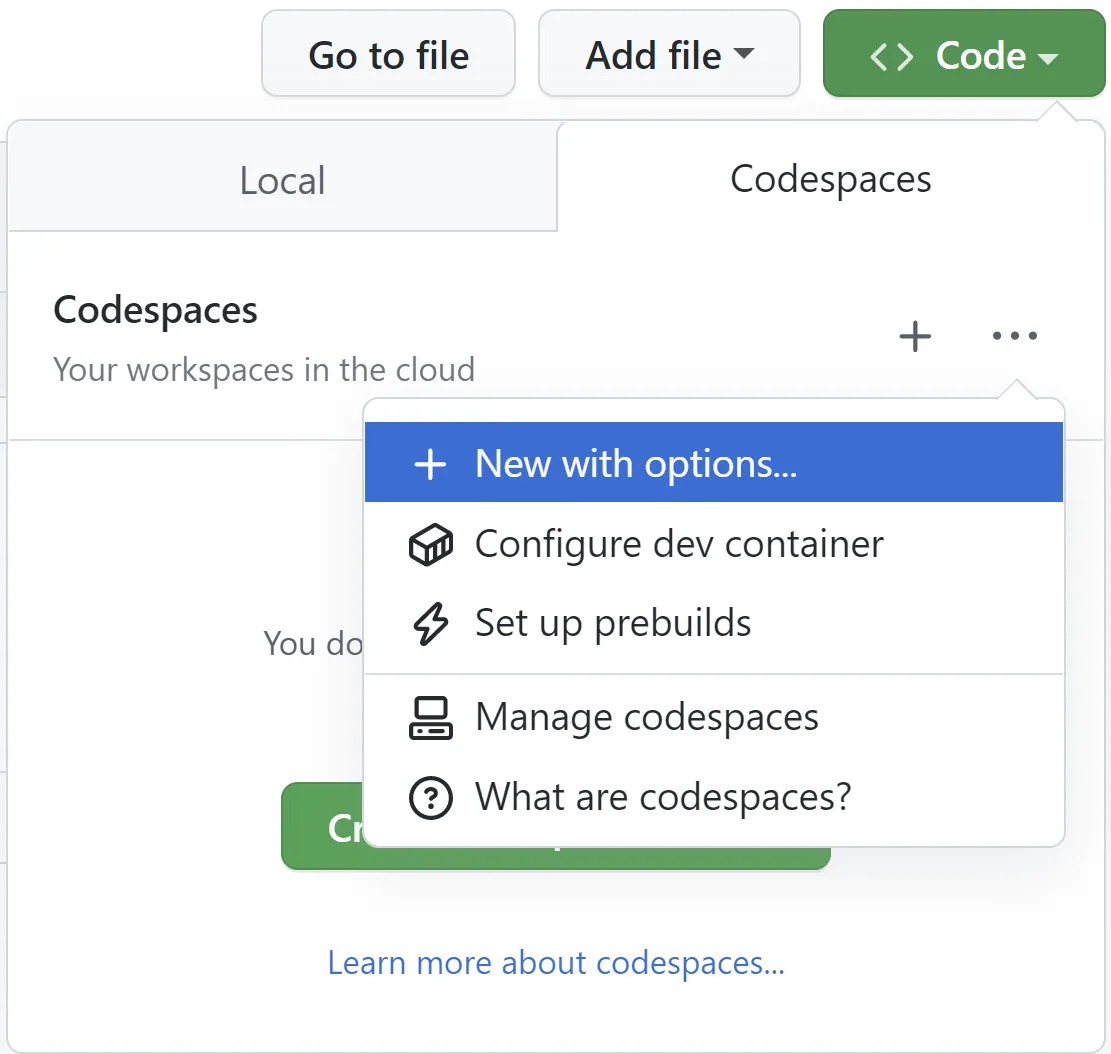
At the top right of the Codespaces tab, select and click New with options.

-
On the options page for your codespace, choose your preferred options from the dropdown menus.

The options page may also display the names of one or more secrets that it's recommended you create in your Codespaces settings. For more information, see Recommended secrets.
Note
- You can bookmark the options page to give you a quick way to create a codespace for this repository and branch.
- The https://github.com/codespaces/new page provides a quick way to create a codespace for any repository and branch. You can get to this page quickly by typing
codespace.newinto your browser's address bar. - For more information about dev container configuration files, see Introduction to dev containers.
- For more information about machine types, see Changing the machine type for your codespace.
- Your choice of available machine types may be limited by a number of factors. These can include a policy configured for your organization, or a minimum machine type specification for your repository. For more information, see Restricting access to machine types and Setting a minimum specification for codespace machines.
-
Click Create codespace.
-
-

Recommended secrets
The names of user-defined secrets may be displayed on the advanced options page when you create a codespace. This will happen if recommended secrets have been specified in the dev container configuration you have selected. For more information, see Specifying recommended secrets for a repository.

Entering values for these development environment secrets, when you're prompted to do so, is recommended because it's likely your project will need values for these secrets. However, supplying values is not required for you to create a codespace. You can set these secrets within the codespace if you prefer.
If you enter a value for a recommended secret, the secret will be available in the new codespace. When you click Create codespace, the secret is also added to your personal settings for Codespaces, so you will not need to enter a value for the secret in future when you create a codespace for this repository.
If the name of a secret is shown with a checkbox that is unavailable for selection, and no input box, this is because you already have a secret of this name configured in your personal settings for Codespaces, and you have associated it with this repository. If you've created a secret of this name but have not associated it with this repository, the checkbox will be available to select and by doing so you can update your settings to add the association.
If you want to change the value of a preselected secret you can do so from your personal settings for Codespaces at github.com/settings/codespaces. For more information, see Managing your account-specific secrets for GitHub Codespaces.
After you connect your account on GitHub to the GitHub Codespaces extension, you can create a new codespace. For more information about the GitHub Codespaces extension, see the VS Code Marketplace.
-
In VS Code, in the Activity Bar, click the Remote Explorer icon.

Note
If the Remote Explorer is not displayed in the Activity Bar:
- Access the Command Palette. For example, by pressing Shift+Command+P (Mac) / Ctrl+Shift+P (Windows/Linux).
- Type:
details. - Click Codespaces: Details.
-
Hover over the "Remote Explorer" side bar and click .

-
In the text box, type the name of the repository you want to develop in, then select it.

A message is displayed at the right side of subsequent prompts telling you who will pay for the codespace.

-
Click the branch you want to develop on.
-
If prompted to choose a dev container configuration file, choose a file from the list.
-
Click the machine type you want to use.
Note
Your choice of available machine types may be limited by a number of factors. These can include a policy configured for your organization, or a minimum machine type specification for your repository. For more information, see Restricting access to machine types and Setting a minimum specification for codespace machines.


Note
To learn more about GitHub CLI, see About GitHub CLI.
To create a new codespace, use the gh codespace create subcommand.
gh codespace create
You are prompted to choose a repository. A message is displayed telling you who will pay for the codespace. You are then prompted to choose a branch, a dev container configuration file (if more than one is available), and a machine type (if more than one is available).
Alternatively, you can use flags to specify some or all of the options:
gh codespace create -r OWNER/REPO -b BRANCH --devcontainer-path PATH -m MACHINE-TYPE
In this example, replace owner/repo with the repository identifier. Replace branch with the name of the branch, or the full SHA hash of the commit, that you want to be initially checked out in the codespace. If you use the -r flag without the b flag, the codespace is created from the default branch.
Replace path with the path to the dev container configuration file you want to use for the new codespace. If you omit this flag and more than one dev container file is available you will be prompted to choose one from a list. For more information about the dev container configuration file, see Introduction to dev containers.
Replace machine-type with a valid identifier for an available machine type. Identifiers are strings such as: basicLinux32gb and standardLinux32gb. The type of machines that are available depends on the repository, your personal account, and your location. If you enter an invalid or unavailable machine type, the available types are shown in the error message. If you omit this flag and more than one machine type is available you will be prompted to choose one from a list.
For full details of the options for this command, see the GitHub CLI manual.