Acerca de las confirmaciones
De forma similar al guardar un archivo que se editó, una confirmación registra los cambios en uno o más archivos en tu rama. Git asigna una ID única a cada comentario, a la cual se le llama SHA o hash, la cual identifica:
- Los cambios específicos
- Cuando se realizaron los cambios
- Quién creó los cambios
Cuando realizas una confirmación, debes incluir un mensaje de confirmación que describa brevemente los cambios. También puedes agregar un coautor en cualquier confirmación en la que colabores.
Si las confirmaciones que haces en GitHub Desktop se asocian con la cuenta incorrecta de GitHub, actualiza la dirección de correo electrónico en tu configuración de Git utilizando GitHub Desktop. Para más información, consulta Configurar Git para GitHub Desktop.
Los administradores del repositorio pueden habilitar conjuntos de reglas para que una rama aplique convenciones específicas al confirmar. Por ejemplo, un conjunto de reglas puede requerir que se firme una confirmación o que se haga referencia a un número de incidencia al principio de un mensaje de confirmación. GitHub Desktop mostrará una advertencia y evitará la confirmación si no sigue los conjuntos de reglas. Para más información, consulta Acerca de los conjuntos de reglas.
Elegir una rama y realizar cambios
-
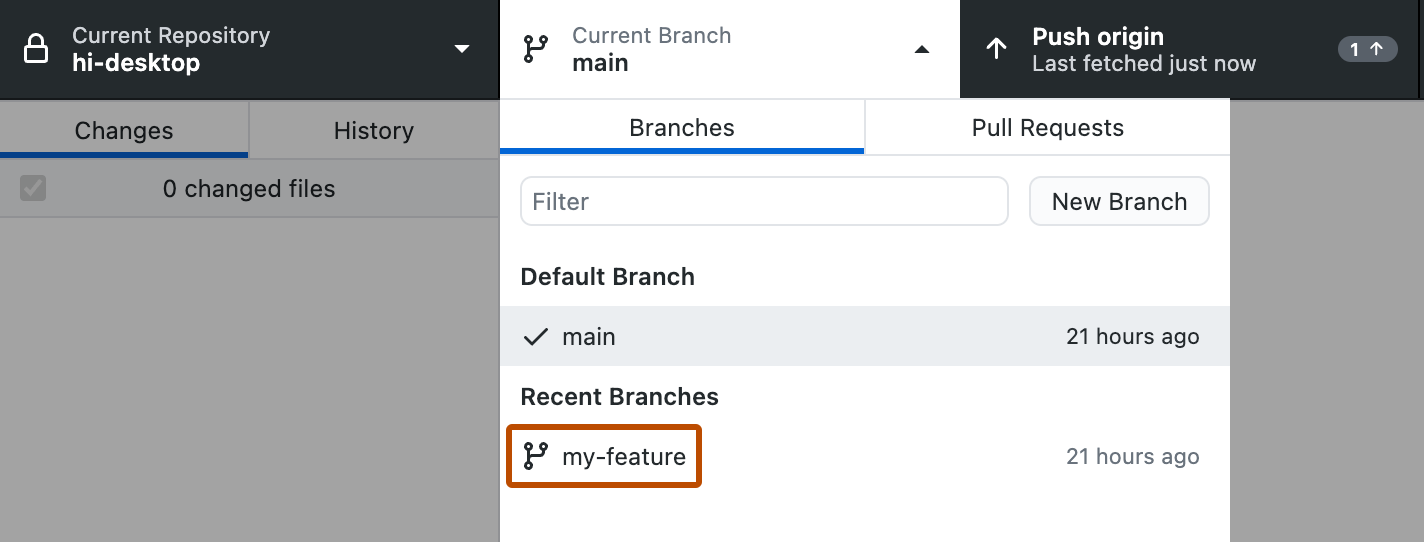
Crea una rama o selecciona una existente; para ello, haz clic en Rama actual en la barra de herramientas y selecciona la rama de la lista.
-
Con el editor de texto que prefieras, como Visual Studio Code, haz los cambios necesarios en los archivos del proyecto.

Elige cómo mostrar los diffs
Puedes cambiar la forma en la que se muestran los diffs en GitHub Desktop para que satisfagan tus necesidades de revisión.
Para cambiar la forma en la que ves los diffs, en la esquina superior derecha de la vista del diff, haz clic en .
- Para cambiar cómo se muestra toda la diferencia, en "Diff display" (Pantalla de diferencias), seleccione Unified (Unificada) o Split (Dividida). La vista unificada te muestra los cambios de forma linea, mientras que la vista dividida te muestra el contenido antiguo en la parte izquierda y el nuevo en la derecha.
- A fin de ocultar los cambios de espacios en blanco para que se pueda centrar en cambios más sustanciales, seleccione Hide Whitespace Changes (Ocultar los cambios de espacios en blanco).

Sugerencia
El tamaño de tabulación predeterminado que se usa para mostrar diferencias es de 8. Puedes personalizarlo en el panel Appearance del cuadro de diálogo Settings.
Sugerencia
El tamaño de tabulación predeterminado que se usa para mostrar diferencias es de 8. Puedes personalizarlo en el panel Apprearance del cuadro de diálogo Options.
Si necesitas ver más del archivo que lo que te muestra GitHub Desktop predeterminadamente, puedes expandir el diff.
- Para ver las siguientes líneas abajo o arriba de los cambios resaltados, haz clic en la flecha de arriba o de abajo de los números de línea.
- Para ver todo el archivo, haga clic con el botón derecho en la vista de diferencias y haga clic en Expand Whole File (Expandir todo el archivo).

Seleccionar cambios para incluirlos en una confirmación
A medida que realizas cambios en los archivos en tu editor de texto y que los guardas localmente, también verás los cambios en GitHub Desktop.
En la pestaña "Cambios" de la barra lateral de la izquierda:
-
El icono rojo indica archivos eliminados.
-
El icono amarillo indica archivos modificados.
-
El icono verde indica archivos agregados.
-
Para acceder a los cambios acumulados, haga clic en Stashed Changes (Cambios acumulados).
-
Para agregar todos los cambios en todos los archivos en una única confirmación, mantenga activada la casilla de la parte superior de la lista.

-
Para agregar todos los cambios en uno o más archivos a una confirmación única, desactive las casillas situadas junto a los archivos que no quiera incluir y deje seleccionados solamente los que quiera incluir en la confirmación. Puede alternar la casilla con las teclas
SpacebaroEnterdespués de seleccionar un archivo.

Crear una confirmación parcial
Si un archivo contiene varios cambios pero solo quieres que algunos de ellos se incluyan en una confirmación, puedes crear una confirmación parcial. El resto de los cambios permanecerán intactos, por lo que puedes realizar confirmaciones y modificaciones adicionales. Esto permite realizar confirmaciones separadas, significativas, como mantener cambios de interrupción de línea en una confirmación separada desde cambios en el código o la prosa.
Para excluir de tu confirmación las líneas que cambiaron, da clic en una o más de ellas para que las azules desaparezcan. Las líneas que aún se resalten en azul se incluirán en la confirmación.

Descartar cambios
Si retiraste la confirmación de los cambios que no quieres mantener, puedes descartarlos. Esto eliminará los cambios de los archivos en tu computadora. Puedes descartar todos los cambios que dejaste de confirmar en uno o más archivos, o puedes descartar las líneas específicas que agregaste.
Los cambios que descartas se guardan en un archivo con fecha en la sección de basura. Puedes recuperar los cambios que descartaste antes de que se vacíe la basura.
Descartar cambios en uno o más archivos
-
En la lista de archivos cambiados, selecciona los archivos en los que deseas descartar los cambios desde la última confirmación. Para seleccionar varios archivos, haga clic en
shifty después en el rango de archivos de los que quiera descartar los cambios. -
Haga clic en Discard Changes (Descartar cambios) o en Discard Selected Changes (Descartar los cambios seleccionados) para descartar los cambios realizados en uno o más archivos, o en Discard All Changes (Descartar todos los cambios) para descartar los cambios realizados en todos los archivos desde la última confirmación.

-
Para confirmar los cambios, en la ventana "Confirmar cambios de descarte", revisa los archivos afectados y haz clic en Descartar cambios.

Descartar los cambios en una o más líneas
Puedes descartar una o más líneas que hayan cambiado y que se hayan dejado de confirmar.
Nota:
El descarte de líneas sencillas está deshabilitado en los grupos de cambios que agregan y eliminan líneas.
Para descartar una línea agregada, en la lista de líneas que han cambiado, haz clic con el botón derecho sobre la que quieras descartar y selecciona Descartar línea agregada.

Para descartar un grupo de líneas que han cambiado, haz clic con el botón derecho en la barra vertical situada a la derecha de los números de las líneas que quieras descartar y, luego, selecciona Descartar líneas agregadas.

Escribir un mensaje de confirmación y subir los cambios
Una vez que estés satisfecho con los cambios que elegiste incluir en tu confirmación, escribe tu mensaje de confirmación y sube los cambios. Si has colaborado en una confirmación, también puedes contribuir en una confirmación de más de un autor.
Nota:
Predeterminadamente, GitHub Desktop cargará la etiqueta que creaste a tu repositorio con la confirmación asociada. Para más información, consulta Administración de etiquetas GitHub Desktop.
-
En la parte inferior de la lista de cambios, junto a la imagen de perfil, describe la confirmación:
- Si tienes acceso a GitHub Copilot y usas GitHub Desktop en beta, puedes crear automáticamente un mensaje de confirmación y detalles en función de los cambios realizados. Haz clic en .
- Como alternativa, escribe tu propio mensaje de confirmación breve y significativo en el campo Resumen. También puedes añadir más información sobre el cambio en el campo Description (Descripción).

-
De manera opcional, para atribuir una confirmación a otro autor, haz clic en el icono de coautores y escribe el nombre de usuario que deseas incluir.

-
En el campo Descripción, haz clic en Confirmar en RAMA.
-
Si la rama a la que intentas comprometerte está protegida, Desktop te avisará.
- Para mover los cambios, haga clic en switch branches (cambiar ramas).
- Para confirmar los cambios en la rama protegida, haz clic en Confirmar en RAMA.
Para más información sobre las ramas protegidas, consulta Acerca de las ramas protegidas.
-
Para insertar los cambios locales en el repositorio remoto, en la barra del repositorio, haz clic en Insertar origen.

-
Si tienes una solicitud de incorporación de cambios basada en la rama en la que estás trabajando, GitHub Desktop mostrará el estado de las comprobaciones que se han ejecutado para la solicitud junto a la sección "Rama actual" de la barra del repositorio. Para más información sobre las comprobaciones, consulta Visualización y ejecución repetida de comprobaciones en GitHub Desktop.
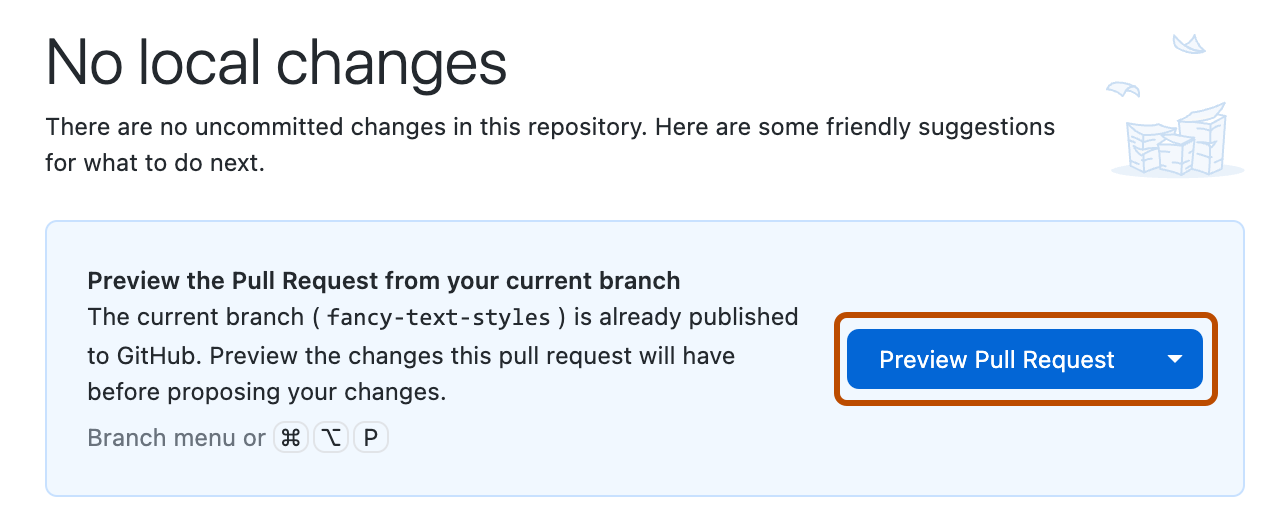
Si no se ha creado una solicitud de incorporación de cambios para la rama actual, GitHub Desktop te ofrecerá la opción de obtener una vista previa de los cambios y crear una. Para más información, consulta Creación de un problema o una solicitud de incorporación de cambios desde GitHub Desktop.


Administración del historial de confirmaciones
Si necesitas deshacer una confirmación o revisar el historial de confirmaciones (para facilitar que un revisor siga los cambios), GitHub Desktop proporciona una serie de opciones para administrar el historial de confirmaciones. Para más información, consulta Opciones para administrar confirmaciones en GitHub Desktop.