Puedes crear plantillas de incidencias predeterminadas y un archivo de configuración predeterminado para este tipo de plantillas para tu organización o cuenta personal. Para más información, consulta Creación de un archivo predeterminado de mantenimiento de la comunidad.
Crear plantillas de reporte de problemas
-
En GitHub, navegue hasta la página principal del repositorio.
-
En el nombre del repositorio, haz clic en Configuración. Si no puedes ver la pestaña "Configuración", selecciona el menú desplegable y, a continuación, haz clic en Configuración.

-
En la sección "Características", en Incidencias, haz clic en Configurar plantillas. Es posible que tengas que habilitar Problemas y actualizar la página para poder ver el botón.


-
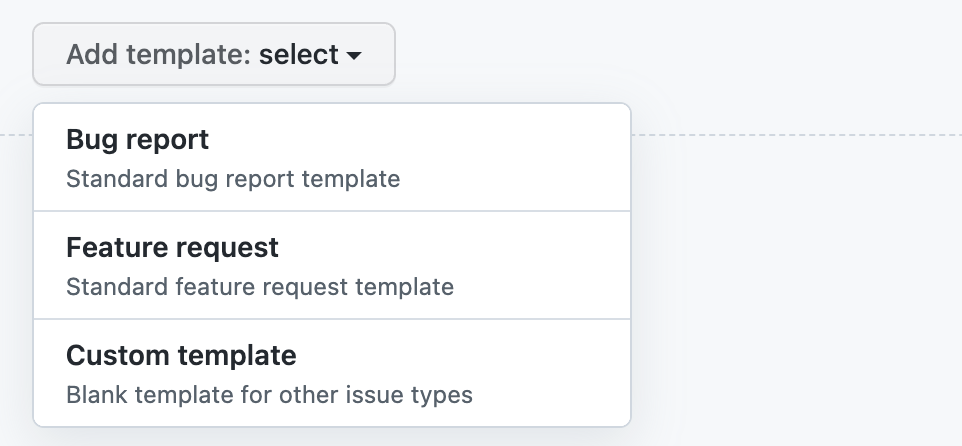
Usa el menú desplegable Agregar plantilla y haz clic en el tipo de plantilla que deseas crear.
-
Para obtener una vista previa de la plantilla o editarla antes de confirmarla en el repositorio, haz clic en Vista previa y edición.
-
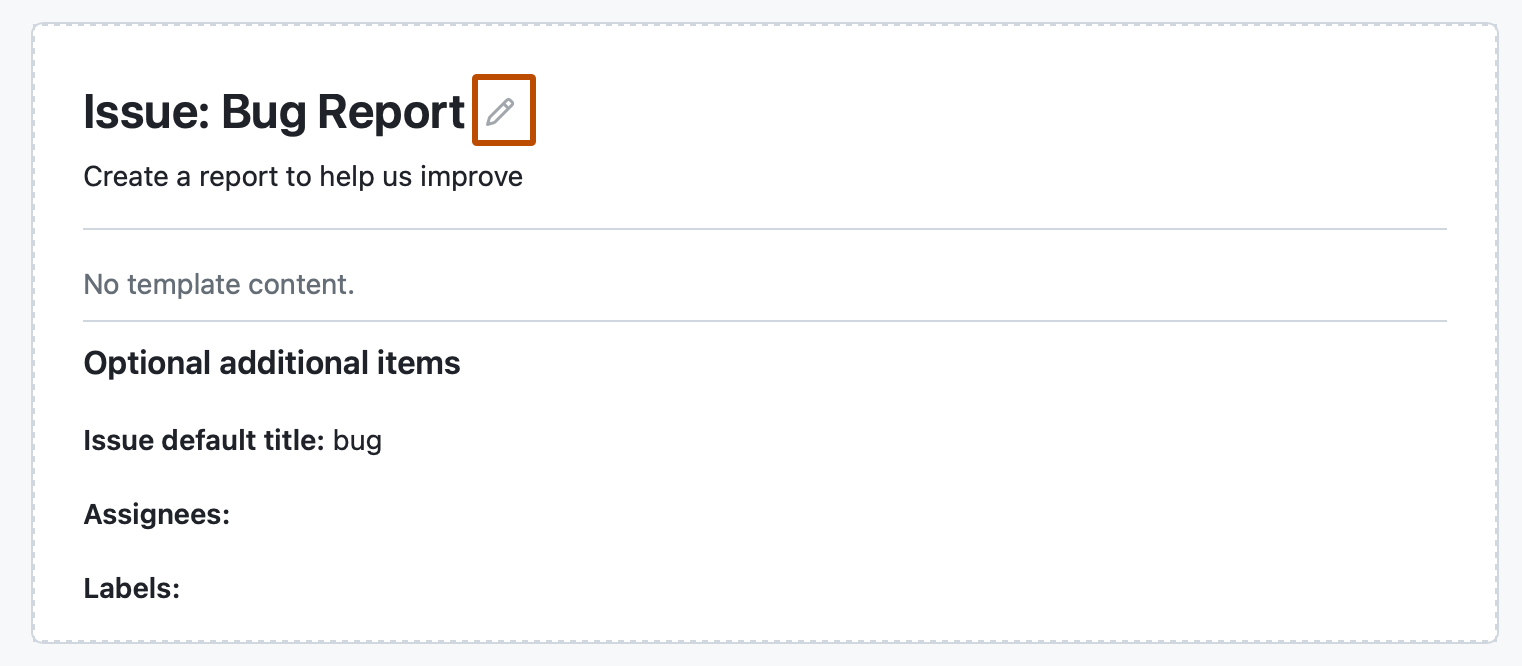
Para editar la plantilla, haz clic en y escribe en los campos para editar el contenido.
-
Para establecer automáticamente un título de incidencia predeterminado, asignar la incidencia a personas con acceso de lectura al repositorio o aplicar etiquetas a las incidencias planteadas desde la plantilla, utilice los campos de "Información adicional opcional". También puede agregar estos detalles en la plantilla de incidencia con
title,labelsoassigneesen un texto preliminar de YAML. -
Cuando haya terminado de editar y ver la vista previa de la plantilla, haga clic en Proponer cambios en la esquina superior derecha de la página.
-
En el campo "Confirmar mensaje", escribe un mensaje de confirmación que describa los cambios.
-
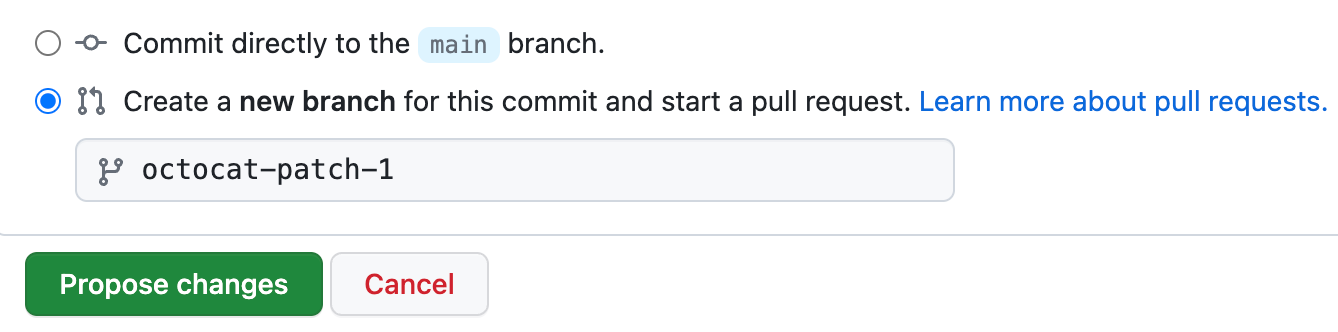
Debajo de los campos del mensaje de confirmación, selecciona si deseas confirmar la plantilla directamente en la rama predeterminada o crear una nueva rama y abrir una solicitud de incorporación de cambios. Para obtener más información sobre solicitudes de incorporación de cambios, consulta Acerca de las solicitudes de incorporación de cambios.
-
Haga clic en Confirmar cambios. Una vez que estos cambios se fusionen en la rama predeterminada, la plantilla estará disponible para que la usen los colaboradores cuando abran nuevas propuestas en el repositorio.


Crear formatos de propuestas
Nota:
Los formularios de propuesta se encuentran actualmente en versión preliminar pública y están sujeto a cambios.
Con los formatos de propuestas, puedes crear plantillas de propuestas que tengan campos de formato web personalizables. Puedes fomentar que los contribuyentes incluyan información específica y estructurada si utilizas formatos de propuestas en tu repositorio. Los formatos de propuesta se escriben en YAML utilizando el modelado de formatos de GitHub. Para más información, consulta Sintaxis para el modelado de formato de GitHub. Si no tienes experiencia con YAML y quieres obtener más información, consulta Aprende YAML en Y minutos.
Para usar un formulario de incidencia en el repositorio, debe crear un archivo y agregarlo a la carpeta .github/ISSUE_TEMPLATE del repositorio.
Aquí tienes un ejemplo de un archivo de confguración de un formato de propuesta.
name: Bug Report
description: File a bug report.
title: "[Bug]: "
labels: ["bug", "triage"]
projects: ["octo-org/1", "octo-org/44"]
assignees:
  - octocat
body:
  - type: markdown
    attributes:
      value: |
        Thanks for taking the time to fill out this bug report!
  - type: input
    id: contact
    attributes:
      label: Contact Details
      description: How can we get in touch with you if we need more info?
      placeholder: ex. email@example.com
    validations:
      required: false
  - type: textarea
    id: what-happened
    attributes:
      label: What happened?
      description: Also tell us, what did you expect to happen?
      placeholder: Tell us what you see!
      value: "A bug happened!"
    validations:
      required: true
  - type: dropdown
    id: version
    attributes:
      label: Version
      description: What version of our software are you running?
      options:
        - 1.0.2 (Default)
        - 1.0.3 (Edge)
      default: 0
    validations:
      required: true
  - type: dropdown
    id: browsers
    attributes:
      label: What browsers are you seeing the problem on?
      multiple: true
      options:
        - Firefox
        - Chrome
        - Safari
        - Microsoft Edge
  - type: textarea
    id: logs
    attributes:
      label: Relevant log output
      description: Please copy and paste any relevant log output. This will be automatically formatted into code, so no need for backticks.
      render: shell
  - type: checkboxes
    id: terms
    attributes:
      label: Code of Conduct
      description: By submitting this issue, you agree to follow our [Code of Conduct](https://example.com).
      options:
        - label: I agree to follow this project's Code of Conduct
          required: true
Aquí está la versión interpretada de un formato de propuesta.

- Elige un repositorio en donde quieras crear un formato de propuesta. Puedes utilizar un repositorio existente al cual tengas acceso de escritura o puedes crear un repositorio nuevo. Para más información sobre cómo crear un repositorio, consulta Crear un repositorio nuevo.
- En el repositorio, cree un archivo denominado
.github/ISSUE_TEMPLATE/FORM-NAME.ymly reemplaceFORM-NAMEpor el nombre del formulario de incidencia. Para obtener más información sobre cómo crear nuevos archivos en GitHub, consulta Crear nuevos archivos. - En el campo del archivo nuevo, teclea el contenido de tu formato de propuesta. Para más información, consulta Sintaxis para formularios de incidencias.
- Confirma tu archivo en la rama predeterminada de tu repositorio. Para más información, consulta Crear nuevos archivos.
Configurar el selector de plantillas
Puede personalizar el selector de plantillas de incidencia que ven los usuarios al crear una incidencia en el repositorio si agrega un archivo config.yml a la carpeta .github/ISSUE_TEMPLATE.
Puede animar a los colaboradores a usar plantillas de incidencia si establece blank_issues_enabled en false. Si establece blank_issues_enabled en true, los usuarios tendrán la opción de abrir una incidencia en blanco.
Nota:
Si has usado el flujo de trabajo heredado para crear manualmente un archivo issue_template.md en la carpeta .github y habilitas las propuestas en blanco en el archivo config.yml, se utilizará la plantilla de issue_template.md cuando los usuarios decidan abrir una propuesta en blanco. Si inhabilitas los reportes de problemas en blanco, la plantilla nunca se utilizará.
Si prefieres recibir determinados informes fuera de GitHub, puedes dirigir a los usuarios a sitios externos con contact_links.
Este es un archivo config.yml de ejemplo.
blank_issues_enabled: false
contact_links:
  - name: GitHub Community Support
    url: https://github.com/orgs/community/discussions
    about: Please ask and answer questions here.
  - name: GitHub Security Bug Bounty
    url: https://bounty.github.com/
    about: Please report security vulnerabilities here.
Tu archivo de configuración personalizará el selector de plantilla cuando el archivo se combina en la rama predeterminada del repositorio.
-
En GitHub, navegue hasta la página principal del repositorio.
-
Encima de la lista de archivos, selecciona el menú desplegable Add file y, a continuación, haz clic en Create new file.
Como alternativa, puedes hacer clic en en la vista de árbol de archivos a la izquierda.

-
En el campo del nombre de archivo, escriba
.github/ISSUE_TEMPLATE/config.yml. -
Teclea el contenido de tu archivo de configuración en el cuerpo del nuevo archivo.
-
Haga clic en Confirmar cambios.
-
En el campo de "Mensaje de confirmación", escriba un mensaje de confirmación corto y significativo que describa la modificación que hizo en el archivo. Puedes atribuir el cambio a mas de un autor en el mensaje del mismo. Para más información, consulta Crear una confirmación con distintos autores.
-
Debajo de los campos para el mensaje de confirmación, decide si deseas agregar tu confirmación a la rama actual o a una rama nueva. Debajo de los campos del mensaje de confirmación, decide si deseas agregar tu confirmación a la rama actual o a una nueva rama. Si tu rama actual es la rama predeterminada, debes elegir crear una nueva rama para tu confirmación y después crear una solicitud de extracción. Para más información, consulta Crear una solicitud de incorporación de cambios.
-
Haz clic en Confirmar cambios o Proponer cambios.


Cambiar el orden de las plantillas
Puede configurar el orden en el que aparecerán las plantillas de problemas en el selector de plantillas realizando cambios en los nombres de archivo de las plantillas. Las plantillas de .github/ISSUE_TEMPLATE se enumeran alfanuméricamente y se agrupan por tipo de archivo, con archivos YAML que aparecen antes de los archivos Markdown.
Para controlar el orden de las plantillas, debe añadir un prefijo de número a los nombres de archivo. Por ejemplo, 1-bug.yml, 2-feature-request.yml y 3-epic.yml.
Si tiene 10 o más plantillas, la ordenación alfanumérica significa que 11-bug.yml se colocará entre 1-feature.yml y 2-support.yml. Puede mantener el orden previsto añadiendo un prefijo a los nombres de archivo numéricos con un 0 adicional. Por ejemplo, 01-feature.yml, 02-support.yml y 11-bug.yml.