Informationen zu Commits
Ähnlich wie beim Speichern einer Datei, die bearbeitet wurde, zeichnet ein Commit Änderungen an einer oder mehreren Dateien in Ihrem Branch auf. Git weist jedem Commit eine eindeutige ID zu, die als SHA oder Hash bezeichnet wird. Damit wird Folgendes identifiziert:
- Die jeweiligen Änderungen
- Der Zeitpunkt der Änderungen
- Wer die Änderungen vorgenommen hat
Wenn Du einen Commit durchführst, musst Du eine Commit-Mitteilung hinzufügen, in der die Änderungen kurz beschrieben werden. Du kannst außerdem Mitautor*innen zu allen Commits hinzufügen, an denen du mitarbeitest.
Wenn die Commits, die du in GitHub Desktop vornimmst, mit dem falschen Konto auf GitHub verknüpft sind, aktualisiere die E-Mail-Adresse in deiner Git-Konfiguration mithilfe von GitHub Desktop. Weitere Informationen findest du unter Git für GitHub Desktop konfigurieren.
Repositoryadministratoren können Regelsätze für einen Branch aktivieren, um bestimmte Konventionen beim Commit zu erzwingen. Ein Regelsatz kann z. B. erfordern, dass ein Commit signiert wird, oder eine Issue-nummer verlangen, auf die zu Beginn einer Commit-Nachricht verwiesen wird. GitHub Desktop zeigt eine Warnung an und verhindert das Commit, wenn ein Commit nicht den Regelsätzen entspricht. Weitere Informationen finden Sie unter Informationen zu Regelsätzen.
Branch auswählen und Änderungen vornehmen
-
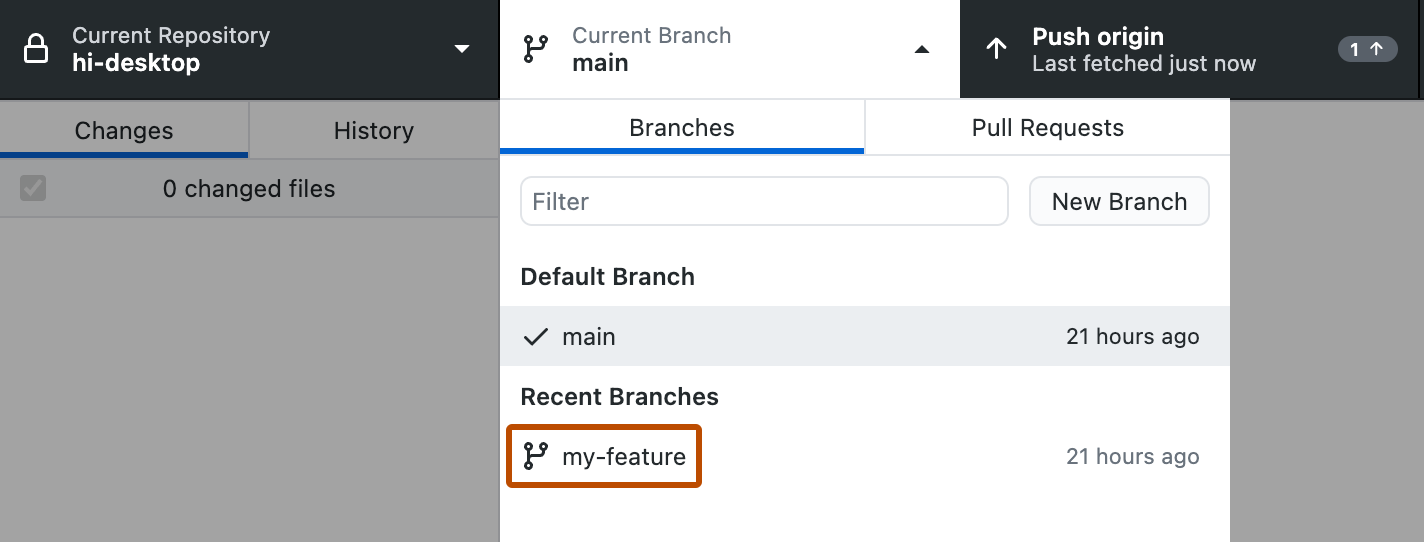
Erstelle einen neuen Branch, oder wähle einen vorhandenen Branch aus, indem du auf der Symbolleiste auf Aktueller Branch klickst und den Branch aus der Liste auswählst.
-
Verwende deinen bevorzugten Text-Editor – z. B. Visual Studio Code –, um die erforderlichen Änderungen an Dateien in deinem Projekt vorzunehmen.

Auswählen der Anzeige von Unterschieden
Du kannst die Art der Anzeige von Unterschieden GitHub Desktop an deine Anforderungen bei der Überprüfung anpassen.
Um die Anzeige der Unterschiede zu ändern, klicke in der rechten oberen Ecke der Diff-Ansicht auf .
- Um die gesamte Darstellung der Unterschiede zu ändern, wähle unter „Diff-Anzeige“ die Optionen Einheitlich oder Geteilt aus. Die einheitliche Ansicht zeigt Änderungen linear an, während die geteilte Ansicht alte Inhalte auf der linken Seite und neue Inhalte auf der rechten Seite anzeigt.
- Um Leerraumänderungen auszublenden, damit du dich auf wichtigere Änderungen konzentrieren kannst, wähle Leerraumänderungen ausblenden aus.

Tip
Die Standardregisterkartengröße, die zum Anzeigen von Diffs verwendet wird, ist 8. Du kannst dies im Bereich Darstellung des Dialogfelds Optionen anpassen.
Wenn du mehr von der Datei sehen möchtest, als GitHub Desktop standardmäßig anzeigt, kannst du die Diff-Ansicht erweitern.
- Um die nächsten Zeilen über oder unter den hervorgehobenen Änderungen zu sehen, klicke auf den Pfeil über oder unter den Zeilennummern.
- Um die gesamte Datei zu sehen, klicke mit der rechten Maustaste in die Diff-Ansicht, und klicke auf Gesamte Datei erweitern.

Die in einen Commit einzubeziehenden Änderungen auswählen
Wenn du in deinem Texteditor Änderungen an Dateien vornimmst und diese lokal speicherst, werden die Änderungen auch in GitHub Desktop angezeigt.
Auf der Registerkarte „Änderungen“ in der linken Randleiste:
-
Das rote -Symbol weist auf entfernte Dateien hin.
-
Das gelbe -Symbol verweist auf geänderte Dateien.
-
Das grüne -Symbol weist auf hinzugefügte Dateien hin.
-
Wenn du auf gestashte Änderungen zugreifen möchtest, klicke auf Gestashte Änderungen.
-
Lass das Kontrollkästchen im oberen Bereich der Liste aktiviert, um einem einzigen Commit alle Änderungen in allen Dateien hinzuzufügen.

-
Um alle Änderungen an einer oder mehreren Dateien einem einzigen Commit hinzuzufügen, deaktiviere die Kontrollkästchen neben den auszuschließenden Dateien, sodass nur die Dateien übrig bleiben, die im Commit enthalten sein sollen. Nach dem Auswählen einer Datei kannst du das Kontrollkästchen mit den Tasten
SpacebaroderEnterumschalten.

Partiellen Commit erstellen
Wenn eine Datei mehrere Änderungen enthält, du aber nur einen Teil dieser Änderungen in einen Commit einbeziehen möchtest, kannst du einen partiellen Commit erstellen. Der Rest deiner Änderungen bleibt erhalten, sodass du zusätzliche Änderungen und Commits vornehmen kannst. Dadurch kannst du separate, aussagekräftige Commits erstellen, beispielsweise kannst du Änderungen der Zeilenumbrüche in einem Commit vom Code oder von Fließtextänderungen getrennt halten.
Um geänderte Zeilen aus deinem Commit auszuschließen, klicke auf eine oder mehrere geänderte Zeilen, um sie nicht länger blau zu markieren. Die Zeilen, die weiterhin blau markiert sind, werden in den Commit aufgenommen.

Änderungen verwerfen
Wenn ausgecheckte Änderungen vorhanden sind, die du nicht beibehalten möchtest, kannst du die Änderungen verwerfen. Dadurch werden die Änderungen aus den Dateien auf deinem Computer entfernt. Du kannst alle ausgecheckten Änderungen in einer oder mehreren Dateien verwerfen, oder du kannst bestimmte Zeilen verwerfen, die du hinzugefügt hast.
Verworfene Änderungen werden in einer datierten Datei im Papierkorb gespeichert. Du kannst verworfene Änderungen wiederherstellen, bis der Papierkorb geleert wird.
Verwerfen von Änderungen in einer oder mehreren Dateien
-
Wähle in der Liste der geänderten Dateien die Dateien aus, in denen du die Änderungen seit dem letzten Commit verwerfen möchtest. Um mehrere Dateien auszuwählen, drücke die
shift-Taste, und klicke auf den Bereich der Dateien, deren Änderungen du verwerfen möchtest. -
Klicke auf Änderungen verwerfen oder Ausgewählte Änderungen verwerfen, um Änderungen in einer oder mehreren Dateien zu verwerfen, oder klicke auf Alle Änderungen verwerfen, um die seit dem letzten Commit an allen Dateien vorgenommenen Änderungen zu verwerfen.

-
Um die Änderungen zu bestätigen, überprüfe im Fenster „Verwerfen von Änderungen bestätigen“ die betroffenen Dateien, und klicke auf Änderungen verwerfen.

Verwerfen von Änderungen in einer oder mehreren Zeilen
Du kannst eine oder mehrere geänderte Zeilen verwerfen, für die noch kein Commit durchgeführt wurde.
Note
Das Verwerfen einzelner Zeilen ist bei mehreren Änderungen, die Zeilen hinzufügen und entfernen, deaktiviert.
Um eine hinzugefügte Zeile zu verwerfen, klickst du in der Liste der geänderten Zeilen mit der rechten Maustaste auf die Zeilennummer der Zeile, die du verwerfen möchtest, und wählst Hinzugefügte Zeile verwerfen aus.

Um eine Gruppe geänderter Zeilen zu verwerfen, klickst du mit der rechten Maustaste auf den vertikalen Balken rechts neben den Zeilennummern der Zeilen, die du verwerfen möchtest, und wählst dann Hinzufügte Zeilen verwerfen aus.

Eine Commit-Mitteilung schreiben und deine Änderungen per Push übertragen
Sobald du mit den Änderungen zufrieden bist, die du in deinen Commit aufnehmen möchtest, schreibest du deine Commit-Mitteilung, und überträgst deine Änderungen per Push. Wenn du an einem Commit mitgewirkt hast, kannst du einen Commit auch mehr als einem Autor zuweisen.
Note
Standardmäßig überträgt GitHub Desktop den von Dir erstellten Tag in Dein Repository mit dem zugehörigen Commit. Weitere Informationen findest du unter Verwalten von Tags in GitHub Desktop.
-
Gib im unteren Bereich der Liste der Änderungen im Feld „Summary“ (Übersicht) eine kurze, aussagekräftige Commit-Mitteilung ein. Optional kannst Du im Feld „Description“ (Beschreibung) weitere Informationen zur Änderung hinzufügen.

-
Um einen Commit einem anderen Autor zuzuweisen, kannst du optional auf das Symbol zum Hinzufügen von Co-Autoren klicken und den bzw. die Benutzername(n) eingeben, den bzw. die du hinzufügen möchtest.

-
Klicke unter dem Feld „Beschreibung“ auf An BRANCH committen.
-
Wenn der Branch, zu dem du per Commit übertragen möchtest, geschützt ist, wirst du von Desktop benachrichtigt.
- Wenn du deine Änderungen verschieben möchtest, klicke auf Branches wechseln.
- Um deine Änderungen an den geschützten Branch zu committen, klicke auf Commit an BRANCH.
Weitere Informationen zu geschützten Branches findest du unter Informationen zu geschützten Branches.
-
Um deine lokalen Änderungen per Push in das Remoterepository zu übertragen, klicke auf der Repositoryleiste auf Ursprung pushen.

-
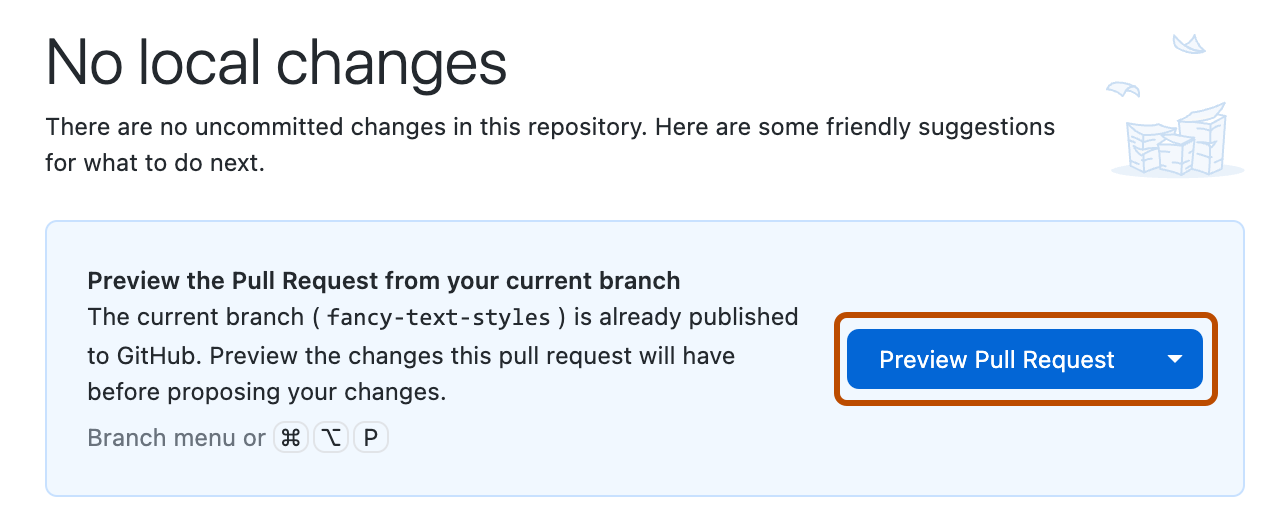
Wenn du über einen Pull Request verfügst, der auf dem Branch basiert, an dem du gerade arbeitest, zeigt GitHub Desktop neben dem Abschnitt „Aktueller Branch“ der Repositoryleiste den Status der Überprüfungen an, die für den Pull Request durchgeführt wurden. Weitere Informationen zu Überprüfungen findest du unter Anzeigen und erneutes Ausführen von Überprüfungen in GitHub Desktop.
Wenn für den aktuellen Branch noch kein Pull Request erstellt wurde, kannst du in GitHub Desktop eine Vorschau anzeigen und einen Pull Request erstellen. Weitere Informationen finden Sie unter Erstellen eines Problems oder Pull Requests von GitHub Desktop aus.


Verwalten des Commitverlaufs
Wenn Sie einen Commit rückgängig machen oder den Commitverlauf überarbeiten müssen (damit ein Prüfer ihre Änderungen leichter verfolgen kann), bietet GitHub Desktop eine Reihe von Optionen für die Verwaltung des Commitverlaufs. Weitere Informationen finden Sie unter Optionen zum Verwalten von Commits in GitHub Desktop.