JetBrains IDE の GitHub Copilot について
JetBrains IDE を使う場合、GitHub Copilot は、入力時にコードをオートコンプリートできます。 インストール後、GitHub Copilot を有効または無効にしたり、IDE または GitHub.com で詳細設定を構成したりできます。 この記事では、IntelliJ IDE で GitHub Copilot を構成する方法について説明しますが、他の JetBrains IDE のユーザー インターフェイスは異なる場合があります。
前提条件
JetBrains IDE で GitHub Copilot を構成するには、GitHub Copilot プラグインをインストールする必要があります。 詳しくは、「GitHub Copilot の概要」を参照してください。
GitHub Copilot のキーボード ショートカットの使用または再バインド
GitHub Copilot を使う場合、JetBrains IDE のインライン候補には既定のキーボード ショートカットを使用できます。 また、特定のコマンドごとに、ショートカットを任意のキーボード ショートカットに再バインドすることもできます。 JetBrains IDE でキーボード ショートカットを再バインドする方法の詳細については、JetBrains のドキュメントを参照してください。 たとえば、IntelliJ IDEA のドキュメントなどがあります。
macOS のキーボード ショートカット
| アクション | ショートカット |
|---|---|
| インライン候補を受け入れる | タブ |
| インライン候補を無視する | Esc |
| 次のインライン候補を表示する | Option (⌥) または Alt+] |
| 前のインライン候補を表示する | Option (⌥) または Alt+[ |
| インライン候補をトリガーする | Option (⌥)+\ |
| GitHub Copilot を開く (別のペインに追加の候補) | Option (⌥) または Alt+Return |
Windows のキーボード ショートカット
| アクション | ショートカット |
|---|---|
| インライン候補を受け入れる | タブ |
| インライン候補を無視する | Esc |
| 次のインライン候補を表示する | Alt+] |
| 前のインライン候補を表示する | Alt+[ |
| インライン候補をトリガーする | Alt+\ |
| GitHub Copilot を開く (別のペインに追加の候補) | Alt+Enter |
Linux のキーボード ショートカット
| アクション | ショートカット |
|---|---|
| インライン候補を受け入れる | タブ |
| インライン候補を無視する | Esc |
| 次のインライン候補を表示する | Alt+] |
| 前のインライン候補を表示する | Alt+[ |
| インライン候補をトリガーする | Alt+\ |
| GitHub Copilot を開く (別のペインに追加の候補) | Alt+Enter |
GitHub Copilot の有効化または無効化
JetBrains IDE 内でGitHub Copilot を有効または無効にすることができます。 JetBrains ウィンドウの下部パネルにある GitHub Copilot 状態アイコンは、GitHub Copilot が有効であるか、または無効であるかを示します。 有効の場合、アイコンが強調表示されます。 無効の場合、アイコンは淡色表示されます。
-
GitHub Copilot を有効または無効にするには、JetBrains ウィンドウの右にある下部パネルの状態アイコンをクリックします。

-
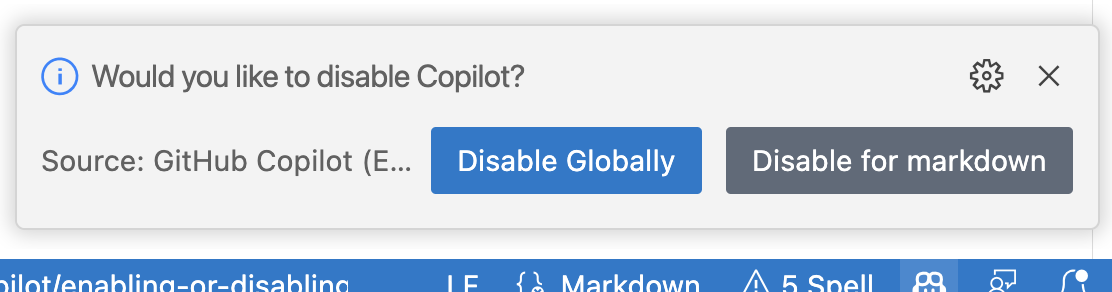
GitHub Copilot を無効にする場合、グローバルに無効にするか、または現在編集しているファイルの言語に対して無効にするかを確認されます。 グローバルに無効にするには、 Disable Completions をクリックします。 または、言語固有のボタンをクリックして、指定された言語の GitHub Copilot を無効にします。


GitHub Copilot の高度な構成を設定する
JetBrains IDE では、コードの入力候補の表示方法や、GitHub Copilotで有効にする言語、無効にする言語など、GitHub Copilot の詳細設定を管理できます。
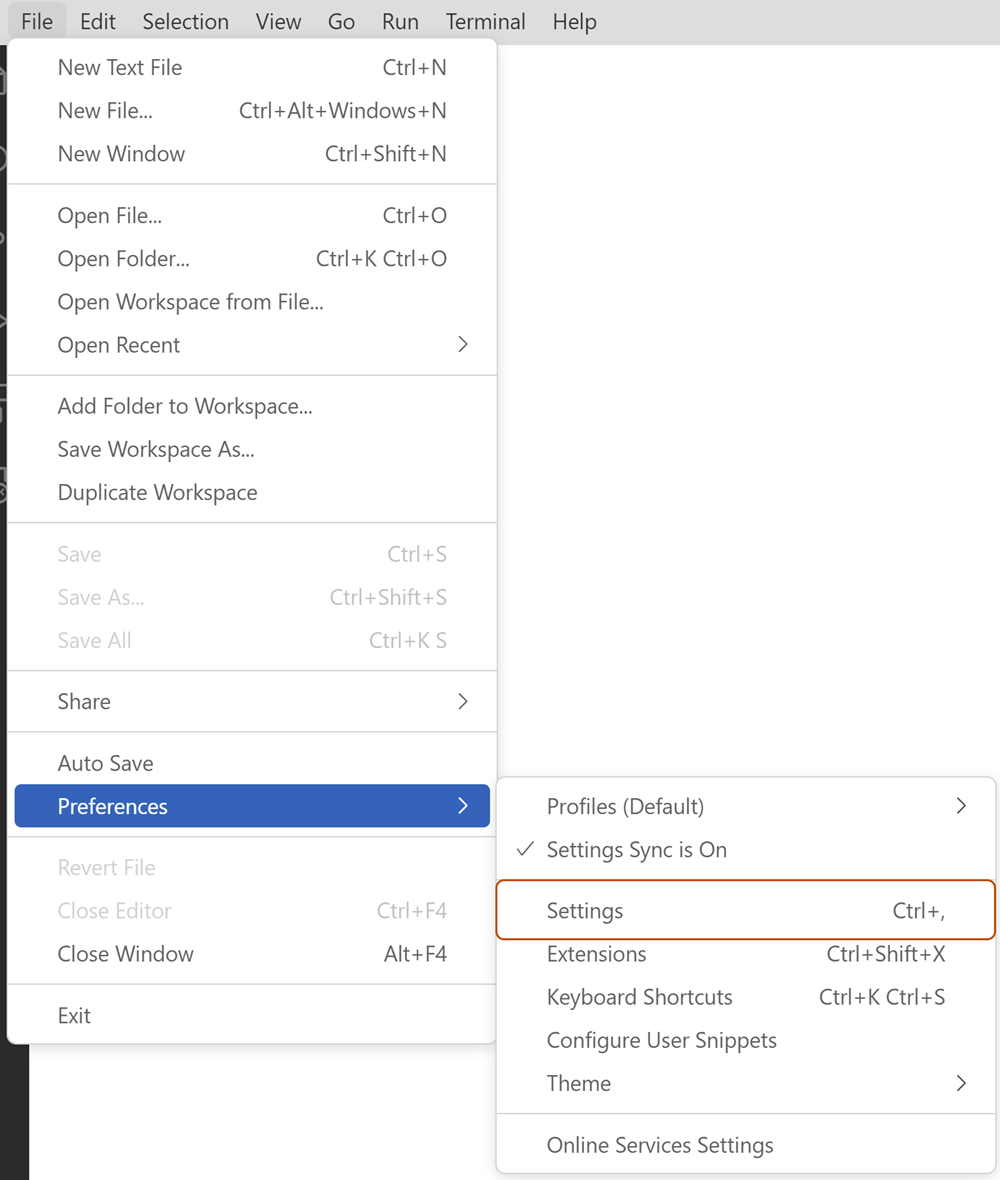
- JetBrains IDE で、ファイル メニュー (Windows) またはメニュー バー (macOS) のアプリケーションの名前をクリックし、設定 をクリックします。
- Languages & Frameworks で、 [GitHub Copilot] をクリックします。
- 自分の好みに合わせて設定を編集します。
GitHub Copilot の言語構成を設定する
IDE またはファイルを編集して、GitHub Copilot をアクティブ化または非アクティブ化する言語を github-copilot.xml 指定できます。 IDE で言語設定を変更する場合は、アクティブ化または非アクティブ化する言語を個別に選択および選択解除できます。
ファイル内のgithub-copilot.xml言語設定を変更する場合は、個々の言語を指定するか、ワイルドカードを使用して、すべての言語の GitHub Copilot をアクティブ化または非アクティブ化できます。 また、例外を指定することもできます。これは、指定した言語の野生のカード設定をオーバーライドします。 たとえば、Python と YAML を除くすべての言語で GitHub Copilot を非アクティブ化できます。 既定では、GitHub Copilot 拡張機能をインストールすると、すべての言語で GitHub Copilot がアクティブになります。
IDE での言語設定の構成
- JetBrains IDE で、ファイル メニュー (Windows) またはメニュー バー (macOS) のアプリケーションの名前をクリックし、設定 をクリックします。
- Languages & Frameworks で、 [GitHub Copilot] をクリックします。
- [言語]で、GitHub Copilotをアクティブまたは非アクティブにしたい言語のチェックボックスを選択または選択解除します。
- 適用をクリックし、OK をクリックします。
- 変更を有効にするには、JetBrains IDEを再起動します。
github-copilot.xml ファイルの編集
github-copilot.xmlファイル内の言語設定を構成するには、languageAllowListを編集する必要があります。 languageAllowListに追加するすべての行には、エントリ キーと値が含まれている必要があります。 エントリ キーは言語の名前、または ワイルドカード (*) です。 値は true または false です。 値がtrueの場合、指定した言語に対してGitHub Copilotがアクティブ化されます。 値がfalseの場合、指定した言語に対してGitHub Copilotが非アクティブ化されます。
このファイルは、次のディレクトリに格納されます。
- macOS:
~/Library/Application Support/JetBrains/<product><version>/options/github-copilot.xml - Windows:
%APPDATA%\JetBrains\<product><version>\options\github-copilot.xml - Linux:
~/.config/JetBrains/<product><version>/options/github-copilot.xml
たとえば、macOS で IntelliJ IDEA 2021.1 を使用している場合、ファイルは~/Library/Application Support/JetBrains/IdeaIC2021.1/options/github-copilot.xmlにあります。
IDE の設定で既定の言語構成を変更するまで、github-copilot.xmlファイルは生成されない場合があります。 ファイルが見つからない場合は、IDE で既定の言語設定を変更してみてください。 詳細については、「IDE での言語設定の構成」を参照してください。
または、ファイルを手動で作成し、上記のオペレーティング システムの場所に保存することもできます。 詳細については、「言語設定の例」を参照してください。
-
テキスト エディターで
github-copilot.xmlファイルを開きます。 -
<map>タグの間に、GitHub Copilot をアクティブ化または非アクティブ化する言語の行または行を追加します。 たとえば、すべての言語で GitHub Copilot を非アクティブ化するには、次のようにします。XML <entry key="*" value="false" />
<entry key="*" value="false" /> -
github-copilot.xmlファイルに加えた変更を保存します。 -
変更を有効にするには、JetBrains IDEを再起動します。
言語構成の例
すべての言語でGitHub Copilot を有効にする github-copilot.xml ファイルの既定の構成は次のとおりです。
<application>
  <component name="github-copilot">
    <languageAllowList>
      <map>
        <entry key="*" value="true" />
      </map>
    </languageAllowList>
  </component>
</application>
<application>
  <component name="github-copilot">
    <languageAllowList>
      <map>
        <entry key="*" value="true" />
      </map>
    </languageAllowList>
  </component>
</application>
すべての言語で GitHub Copilot を非アクティブ化するには、ワイルドカード (*)の値がfalseに変更されます。
<application>
  <component name="github-copilot">
    <languageAllowList>
      <map>
        <entry key="*" value="false" />
      </map>
    </languageAllowList>
  </component>
</application>
<application>
  <component name="github-copilot">
    <languageAllowList>
      <map>
        <entry key="*" value="false" />
      </map>
    </languageAllowList>
  </component>
</application>
言語を個別に指定するには、GitHub Copilot をアクティブ化または非アクティブ化する言語ごとにエントリを追加します。 特定の言語設定は、ワイルドカードをオーバーライドします。 たとえば、Python と YAML に対して GitHub Copilot をアクティブ化し、他のすべての言語で GitHub Copilot を非アクティブ化するには、次のエントリを追加します。
<application>
  <component name="github-copilot">
    <languageAllowList>
      <map>
        <entry key="*" value="false" />
        <entry key="Python" value="true" />
        <entry key="YAML" value="true" />
      </map>
    </languageAllowList>
  </component>
</application>
<application>
  <component name="github-copilot">
    <languageAllowList>
      <map>
        <entry key="*" value="false" />
        <entry key="Python" value="true" />
        <entry key="YAML" value="true" />
      </map>
    </languageAllowList>
  </component>
</application>
IDE の設定で読み取り languageAllowList 専用にする構成を追加することもできます。 これにより、IDE の言語設定は変更できなくなります。 次に例を示します。
<application>
  <component name="github-copilot">
    <option name="languageAllowListReadOnly" value="true" />
    <languageAllowList>
      <map>
        <entry key="*" value="true" />
      </map>
    </languageAllowList>
  </component>
</application>
<application>
  <component name="github-copilot">
    <option name="languageAllowListReadOnly" value="true" />
    <languageAllowList>
      <map>
        <entry key="*" value="true" />
      </map>
    </languageAllowList>
  </component>
</application>
GitHub Copilot の設定を GitHub.com
で構成する
GitHub Copilot の使用を開始する前に、無料試用版またはサブスクリプションを設定する必要があります。 個人用アカウントの試用版またはサブスクリプションの設定の詳細については、「個々の GitHub Copilot サブスクリプションの管理」を参照してください。 組織または企業のサブスクリプションの設定の詳細については、GitHub Enterprise Cloud ドキュメントの「GitHub Copilot Business サブスクリプションの管理」または「GitHub Copilot Enterprise サブスクリプションの管理」を参照してください。
アクティブな GitHub Copilot Individual 試用版またはサブスクリプションがある場合、GitHub Copilot 設定で GitHub 上の個人用アカウントの GitHub Copilot 設定を調整できます。 この設定は、GitHub Copilot を使うすべての場所に適用されます。 GitHub Copilot が提示する候補と、GitHub がテレメトリ データを使う方法を構成できます。
重複検出の有効化または無効化
注: あなたが GitHub Enterprise Cloud 上の Organization のメンバーで、Organization を通じて GitHub Copilot シートが割り当てられている場合、個人アカウント設定で重複検出を構成することはできません。 重複検出設定は、Organization または Enterprise から継承されます。
GitHub Copilot の個人用設定には、一般公開されているコードに一致するコード補完候補を許可またはブロックするオプションが含まれています。 パブリック コードに一致する候補をブロックすることを選ぶと、 によって、周囲の約 150 文字のコードに関するコード補完候補が、GitHub でのパブリック コードに対してチェックされます。 一致または近い一致がある場合、候補は表示されません。
パブリック コードに一致する候補を許可し、1 つ以上の一致が見つかった候補を受け入れる場合は、GitHub Copilot ログのエントリからクリックして、GitHub の参照の一覧を表示できます。 詳しくは、「GitHub Copilot の候補に一致するパブリック コードの検索」を参照してください。
-
任意のページで、右上隅にあるプロファイルの画像をクリックし、次に[設定]をクリックします。
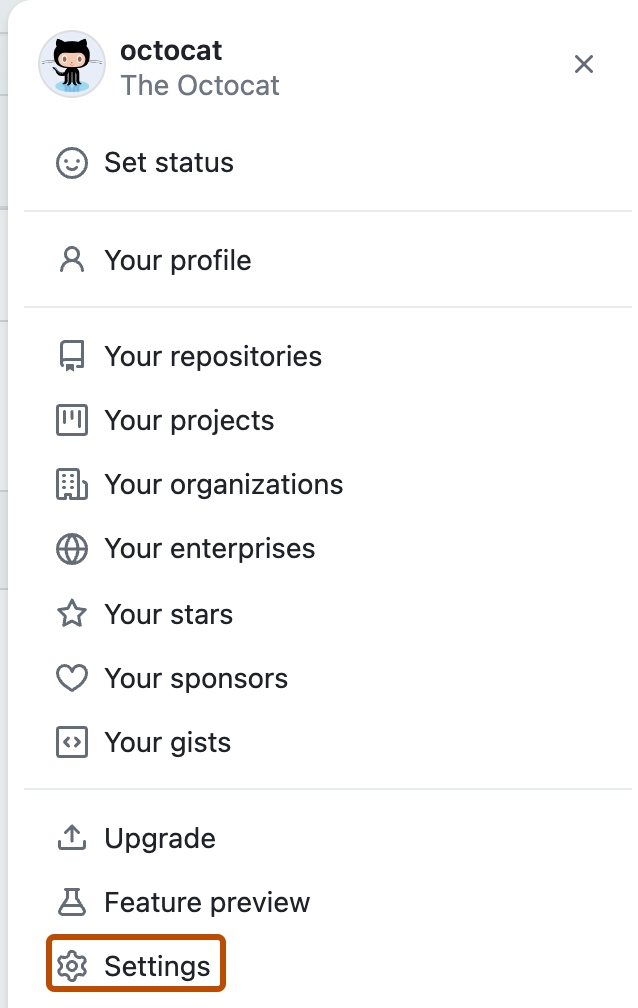
-
左側のサイドバーで、[GitHub Copilot] をクリックします。
-
Suggestions matching public code でドロップダウン メニューを選択し、 Allow をクリックして公開コードに一致する候補を許可するか、 Block をクリックして公開コードに一致する候補をブロックします。
-
新しい設定を確認するには、 [保存] をクリックします。
Prompt コレクションと Suggestion コレクションの有効化または無効化
ユーザー設定を調整することで、GitHub によってコード エディターからのプロンプトや候補を収集して保持し、さらに処理して Microsoft と共有するかどうかを選択できます。 設定によって GitHub Copilot が収集するデータの詳細については、「追加の製品および機能に適用される GitHub 条件」と GitHub Copilot のプライバシーに関する FAQ を参照してください。
-
任意のページで、右上隅にあるプロファイルの画像をクリックし、次に[設定]をクリックします。
-
左側のサイドバーで、[GitHub Copilot] をクリックします。
-
GitHub でデータの使用を許可または禁止するには、[GitHub で製品向上のためにコード エディターからコード スニペットを使用することを許可する] を選択または選択解除します。
-
新しい設定を確認するには、 [保存] をクリックします。
参考資料
Visual Studio の GitHub Copilot について
Visual Studio を使用する場合、GitHub Copilot では、入力時にコードをオートコンプリートできます。 インストール後、GitHub Copilot を有効または無効にしたり、Visual Studio または GitHub.com で詳細設定を構成したりできます。
前提条件
Visual Studio で GitHub Copilot を構成するには、GitHub Copilot プラグインをインストールする必要があります。 詳しくは、「GitHub Copilot の概要」を参照してください。
GitHub Copilot のキーボード ショートカットの使用または再バインド
GitHub Copilot を使用する場合は、Visual Studio の既定のキーボード ショートカットを使用できます。 または、特定のコマンドごとに任意のキーボード ショートカットを使用して、Visual Studio の [ツール] 設定でショートカットを再バインドすることもできます。 各キーボード ショートカットは、キーボード ショートカット エディターのコマンド名で検索できます。
既定のキーボード ショートカットの使用
| アクション | ショートカット | [コマンド名] |
|---|---|---|
| 次のインライン候補を表示する | Alt+. | Edit.NextSuggestion |
| 前のインライン候補を表示する | Alt+, | Edit.PreviousSuggestion |
| インライン候補をトリガーする | Ctrl+Alt+\ | Edit.Copilot.TriggerInlineSuggestion |
キーボード ショートカットの再バインド
GitHub Copilot を使用するときに Visual Studio の既定のキーボード ショートカットを使用しない場合は、特定のコマンドごとに任意のキーボード ショートカットを使用してキーボード エディターでショートカットを再バインドできます。
-
Visual Studio メニュー バーの [ツール] で、 [オプション] をクリックします。
![Visual Studio メニュー バーのスクリーンショット。 [ツール] メニューが展開され、[オプション] 項目がオレンジ色の枠線で強調表示されています。](/assets/cb-37180/images/help/copilot/vs-toolbar-options.png)
-
[オプション] ダイアログの [環境] で、 [キーボード] をクリックします。
-
[以下の文字列を含むコマンドを表示] で、再バインドするコマンドを検索します。
![[以下の文字列を含むコマンドを表示] 検索バーのスクリーンショット。 検索フィールドに文字列 "tools.next" が入力されています。](/assets/cb-3955/images/help/copilot/vs-show-commands-containing.png)
-
[ショートカット キー] で、コマンドに割り当てるショートカットを入力し、 [割り当て] をクリックします。

![Visual Studio メニュー バーのスクリーンショット。 [ツール] メニューが展開され、[オプション] 項目がオレンジ色の枠線で強調表示されています。](/assets/cb-37180/mw-1440/images/help/copilot/vs-toolbar-options.webp)
![[以下の文字列を含むコマンドを表示] 検索バーのスクリーンショット。 検索フィールドに文字列 "tools.next" が入力されています。](/assets/cb-3955/mw-1440/images/help/copilot/vs-show-commands-containing.webp)

GitHub Copilot の有効化または無効化
Visual Studio ウィンドウの下部パネルにある GitHub Copilot 状態アイコンは、GitHub Copilot が有効であるか無効であるかを示します。 有効にすると、アイコンの背景色はステータス バーの色と一致します。 無効にすると、異なるものになります。
-
GitHub Copilot を有効または無効にするには、Visual Studio ウィンドウの下部パネルにある GitHub Copilot アイコンをクリックします。

-
GitHub Copilot を無効にする場合は、候補をグローバルに無効にするか、現在編集中のファイルの言語に対して無効にするかを確認するメッセージが表示されます。
- GitHub Copilot からの候補をグローバルに無効にするには、 [グローバルに有効にする] をクリックします。
- 指定された言語に対して GitHub Copilot からの候補を無効にするには、 [言語に対して有効にする] をクリックします。

GitHub Copilot の ReSharper の構成
ReSharper を使用する場合、GitHub Copilot は、GitHub Copilot のネイティブ IntelliSense を使用するように ReSharper を構成すると最適に動作できます。 ReSharper について詳しくは、ReSharper のドキュメントを参照してください。
- Visual Studio のメニュー バーの [拡張機能] 内で、[ReSharper] をクリックして、続いて、[オプション] をクリックします。
- [オプション] ダイアログの [環境] で、 [IntelliSense] をクリックし、 [全般] をクリックします。
- [全般] で [Visual Studio] を選択してから、 [保存] をクリックします。
GitHub Copilot の設定を GitHub.com
で構成する
GitHub Copilot の使用を開始する前に、無料試用版またはサブスクリプションを設定する必要があります。 個人用アカウントの試用版またはサブスクリプションの設定の詳細については、「個々の GitHub Copilot サブスクリプションの管理」を参照してください。 組織または企業のサブスクリプションの設定の詳細については、GitHub Enterprise Cloud ドキュメントの「GitHub Copilot Business サブスクリプションの管理」または「GitHub Copilot Enterprise サブスクリプションの管理」を参照してください。
アクティブな GitHub Copilot Individual 試用版またはサブスクリプションがある場合、GitHub Copilot 設定で GitHub 上の個人用アカウントの GitHub Copilot 設定を調整できます。 この設定は、GitHub Copilot を使うすべての場所に適用されます。 GitHub Copilot が提示する候補と、GitHub がテレメトリ データを使う方法を構成できます。
重複検出の有効化または無効化
注: あなたが GitHub Enterprise Cloud 上の Organization のメンバーで、Organization を通じて GitHub Copilot シートが割り当てられている場合、個人アカウント設定で重複検出を構成することはできません。 重複検出設定は、Organization または Enterprise から継承されます。
GitHub Copilot の個人用設定には、一般公開されているコードに一致するコード補完候補を許可またはブロックするオプションが含まれています。 パブリック コードに一致する候補をブロックすることを選ぶと、 によって、周囲の約 150 文字のコードに関するコード補完候補が、GitHub でのパブリック コードに対してチェックされます。 一致または近い一致がある場合、候補は表示されません。
パブリック コードに一致する候補を許可し、1 つ以上の一致が見つかった候補を受け入れる場合は、GitHub Copilot ログのエントリからクリックして、GitHub の参照の一覧を表示できます。 詳しくは、「GitHub Copilot の候補に一致するパブリック コードの検索」を参照してください。
-
任意のページで、右上隅にあるプロファイルの画像をクリックし、次に[設定]をクリックします。
-
左側のサイドバーで、[GitHub Copilot] をクリックします。
-
Suggestions matching public code でドロップダウン メニューを選択し、 Allow をクリックして公開コードに一致する候補を許可するか、 Block をクリックして公開コードに一致する候補をブロックします。
-
新しい設定を確認するには、 [保存] をクリックします。
Prompt コレクションと Suggestion コレクションの有効化または無効化
ユーザー設定を調整することで、GitHub によってコード エディターからのプロンプトや候補を収集して保持し、さらに処理して Microsoft と共有するかどうかを選択できます。 設定によって GitHub Copilot が収集するデータの詳細については、「追加の製品および機能に適用される GitHub 条件」と GitHub Copilot のプライバシーに関する FAQ を参照してください。
-
任意のページで、右上隅にあるプロファイルの画像をクリックし、次に[設定]をクリックします。
-
左側のサイドバーで、[GitHub Copilot] をクリックします。
-
GitHub でデータの使用を許可または禁止するには、[GitHub で製品向上のためにコード エディターからコード スニペットを使用することを許可する] を選択または選択解除します。
-
新しい設定を確認するには、 [保存] をクリックします。
参考資料
Visual Studio Code のGitHub Copilot について
Visual Studio Code を使うと、GitHub Copilot で入力時にコードをオートコンプリートできます。 インストール後、GitHub Copilot を有効または無効にしたり、Visual Studio Code または GitHub.com で詳細設定を構成したりできます。
前提条件
Visual Studio Code で GitHub Copilot を構成するには、GitHub Copilot プラグインをインストールする必要があります。 詳しくは、「GitHub Copilot の概要」を参照してください。
GitHub Copilot のキーボード ショートカット
GitHub Copilot を使用する場合は、Visual Studio Code の既定のキーボード ショートカットを使用できます。 または、キーボード ショートカット エディターで、特定のコマンドごとに好みのキーボード ショートカットを使い、ショートカットを再バインドすることもできます。 詳しくは、「キーボード ショートカットの再バインド」をご覧ください。
キーボード ショートカット エディターでは、コマンド名から各キーボード ショートカットを検索できます。
macOS のキーボード ショートカット
| アクション | ショートカット | [コマンド名] |
|---|---|---|
| インライン候補を受け入れる | タブ | editor.action.inlineSuggest.commit |
| インライン候補を無視する | Esc | editor.action.inlineSuggest.hide |
| 次のインライン候補を表示する | Option (⌥)+] | editor.action.inlineSuggest.showNext |
| 前のインライン候補を表示する | Option (⌥)+[ | editor.action.inlineSuggest.showPrevious |
| インライン候補をトリガーする | Option (⌥)+\ | editor.action.inlineSuggest.trigger |
| GitHub Copilot を開く (別のペインに追加の候補) | Ctrl+Return | github.copilot.generate |
| GitHub Copilot のオン/オフを切り替える | "既定のショートカットなし" | github.copilot.toggleCopilot |
Windows のキーボード ショートカット
| アクション | ショートカット | [コマンド名] |
|---|---|---|
| インライン候補を受け入れる | タブ | editor.action.inlineSuggest.commit |
| インライン候補を無視する | Esc | editor.action.inlineSuggest.hide |
| 次のインライン候補を表示する | Alt+] | editor.action.inlineSuggest.showNext |
| 前のインライン候補を表示する | Alt+[ | editor.action.inlineSuggest.showPrevious |
| インライン候補をトリガーする | Alt+\ | editor.action.inlineSuggest.trigger |
| GitHub Copilot を開く (別のペインに追加の候補) | Ctrl+Enter | github.copilot.generate |
| GitHub Copilot のオン/オフを切り替える | "既定のショートカットなし" | github.copilot.toggleCopilot |
Linux のキーボード ショートカット
| アクション | ショートカット | [コマンド名] |
|---|---|---|
| インライン候補を受け入れる | タブ | editor.action.inlineSuggest.commit |
| インライン候補を無視する | Esc | editor.action.inlineSuggest.hide |
| 次のインライン候補を表示する | Alt+] | editor.action.inlineSuggest.showNext |
| 前のインライン候補を表示する | Alt+[ | editor.action.inlineSuggest.showPrevious |
| インライン候補をトリガーする | Alt+\ | editor.action.inlineSuggest.trigger |
| GitHub Copilot を開く (別のペインに追加の候補) | Ctrl+Enter | github.copilot.generate |
| GitHub Copilot のオン/オフを切り替える | "既定のショートカットなし" | github.copilot.toggleCopilot |
キーボード ショートカットの再バインド
GitHub Copilot を使用するときに Visual Studio Code の既定のキーボード ショートカットを使わない場合は、キーボード ショートカット エディターで特定のコマンドごとに任意のキーボード ショートカットを使い、ショートカットを再バインドできます。
macOS のキーボード ショートカットの再バインド
-
メニュー バーで、 [コード] をクリックし、 [基本設定] をクリックしてから、 [キーボード ショートカット] をクリックします。
![Visual Studio Code のメニュー バーのスクリーンショット。[コード] メニューが展開されています。 [環境設定] サブメニューの [キーボード ショートカット] オプションが青色で強調表示されています。](/assets/cb-205494/images/help/copilot/vsc-keyboard-shortcuts-mac.png)
-
"キーボード ショートカット" エディターで、変更するキーボード ショートカットのコマンド名を検索します。
-
変更するコマンドの横にある鉛筆アイコンをクリックします。
![[キーボード ショートカット] エディターのスクリーンショット。 [インライン候補を受け入れる] というラベルの付いたコマンドの横に、鉛筆アイコンがオレンジ色の枠線で強調表示されています。](/assets/cb-13167/images/help/copilot/vsc-edit-shortcuts-mac.png)
-
コマンドに使うキーストロークを入力し、Enter/Return キーを押します。
![Visual Studio Code のメニュー バーのスクリーンショット。[コード] メニューが展開されています。 [環境設定] サブメニューの [キーボード ショートカット] オプションが青色で強調表示されています。](/assets/cb-205494/mw-1440/images/help/copilot/vsc-keyboard-shortcuts-mac.webp)
![[キーボード ショートカット] エディターのスクリーンショット。 [インライン候補を受け入れる] というラベルの付いたコマンドの横に、鉛筆アイコンがオレンジ色の枠線で強調表示されています。](/assets/cb-13167/mw-1440/images/help/copilot/vsc-edit-shortcuts-mac.webp)
Windows のキーボード ショートカットの再バインド
-
File メニューをクリックし、 Preferences をクリックし、 [Keyboard Shortcuts](キーボード ショートカット) をクリックします。
![Visual Studio Code のメニュー バーのスクリーンショット。[ファイル] メニューが展開されています。 [環境設定] サブメニューで、[キーボード ショートカット] オプションがオレンジ色の枠線で強調表示されています。](/assets/cb-60711/images/help/copilot/vsc-keyboard-shortcuts.png)
-
"キーボード ショートカット" エディターで、変更するキーボード ショートカットのコマンド名を検索します。
-
変更するコマンドの横にある鉛筆アイコンをクリックします。
![[キーボード ショートカット] エディターのスクリーンショット。 [インライン候補を受け入れる] というラベルの付いたコマンドの横に、鉛筆アイコンがオレンジ色の枠線で強調表示されています。](/assets/cb-19348/images/help/copilot/vsc-edit-shortcuts.png)
-
コマンドに使うキーストロークを入力し、Enter/Return キーを押します。
![Visual Studio Code のメニュー バーのスクリーンショット。[ファイル] メニューが展開されています。 [環境設定] サブメニューで、[キーボード ショートカット] オプションがオレンジ色の枠線で強調表示されています。](/assets/cb-60711/mw-1440/images/help/copilot/vsc-keyboard-shortcuts.webp)
![[キーボード ショートカット] エディターのスクリーンショット。 [インライン候補を受け入れる] というラベルの付いたコマンドの横に、鉛筆アイコンがオレンジ色の枠線で強調表示されています。](/assets/cb-19348/mw-1440/images/help/copilot/vsc-edit-shortcuts.webp)
Linux のキーボード ショートカットの再バインド
-
File メニューをクリックし、 Preferences をクリックし、 [Keyboard Shortcuts](キーボード ショートカット) をクリックします。
-
"キーボード ショートカット" エディターで、変更するキーボード ショートカットのコマンド名を検索します。
-
変更するコマンドの横にある鉛筆アイコンをクリックします。
-
コマンドに使うキーストロークを入力し、Enter/Return キーを押します。
GitHub Copilot の有効化または無効化
Visual Studio Code 内から GitHub Copilot を有効または無効にすることができます。 Visual Studio Code ウィンドウの下部パネルにある GitHub Copilot 状態アイコンは、GitHub Copilot が有効であるか無効であるかを示します。 有効にすると、アイコンの背景色はステータス バーの色と一致します。 無効にすると、アイコンの背景色はステータス バーの色と異なります。
-
GitHub Copilot を有効または無効にするには、Visual Studio Code ウィンドウの下部パネルにある状態アイコンをクリックします。

-
GitHub Copilot を無効にする場合は、候補をグローバルに無効にするか、現在編集中のファイルの言語に対して無効にするかを確認するメッセージが表示されます。
- GitHub Copilot からの候補をグローバルに無効にするには、 [グローバルに無効にする] をクリックします。
- 指定された言語に対して GitHub Copilot からの候補を無効にするには、 [言語に対して無効にする] をクリックします。

インライン候補の有効化または無効化
Visual Studio Code で GitHub Copilot のインライン候補を有効にするか無効にするかを選択できます。
-
File メニューで Preferences に移動し、 Settings をクリックします。
-
[設定] タブの左側のパネルで、 [拡張機能] をクリックし [Copilot] を選びます。
-
[インライン候補:有効] の下にあるチェックボックスをオンまたはオフにして、インライン候補の有効または無効を設定します。

特定の言語に対する GitHub Copilot の有効化または無効化
どの言語に対して GitHub Copilot を有効にするか無効にするかを指定できます。
-
Visual Studio Code から Extensions タブをクリックし、 [Copilot] セクションに移動します。 詳細については、「インライン候補の有効化または無効化」をご覧ください。
-
[指定した言語に対して Copilot を有効または無効にする] で、 [settings.json で編集] をクリックします。
-
settings.json ファイルで、GitHub Copilot を有効または無効にする言語を、追加または削除します。 たとえば、GitHub Copilotで Python を有効にするには、リストに
"python": trueを追加し、最後以外のすべてのリスト項目の末尾にコンマがあることを確認します。{ "editor.inlineSuggest.enabled": true, "github.copilot.enable": { "*": true, "yaml": false, "plaintext": false, "markdown": true, "javascript": true, "python": true } }
GitHub Copilot 承認の取り消し
Visual Studio Code は、特定の GitHub アカウントを介して GitHub Copilot を使用するための承認を保持します。 アクセスできなくなったデバイスで GitHub アカウントが GitHub Copilot に使用されないようにするには、承認を取り消してから、もう一度承認プロセスを実行します。 以前に使用したデバイスには、新しい承認がありません。
-
任意のページで、右上隅にあるプロファイルの画像をクリックし、次に[設定]をクリックします。
-
サイドバーの [統合] セクションで、[ アプリケーション] を選択します。
-
[認可された OAuth アプリ] タブをクリックします。
![[アプリケーション] ページのスクリーンショット。 "認可された OAuth アプリ" というラベルの付いたタブが、オレンジ色の枠線で強調表示されています。](/assets/cb-25474/images/help/settings/settings-authorized-oauth-apps-tab.png)
-
[GitHub for VS Code] の横の [...] をクリックし、 [取り消し] をクリックします。
-
[承認されている GitHub Apps] タブをクリックします。
-
[GitHub Copilot] プラグインが一覧表示されている場合は、 [取り消し] をクリックします。
![[アプリケーション] ページのスクリーンショット。 "認可された OAuth アプリ" というラベルの付いたタブが、オレンジ色の枠線で強調表示されています。](/assets/cb-25474/mw-1440/images/help/settings/settings-authorized-oauth-apps-tab.webp)
承認を取り消すと、Visual Studio Code は現在のセッションで最大 30 分間、GitHub Copilot を引き続き使用できるようになります。 その後、Visual Studio Code で使用するために GitHub Copilot をもう一度承認する必要があります。
GitHub Copilot の再承認
承認を取り消した後、GitHub Copilot を引き続き使用する場合は、再承認プロセスを完了する必要があります。
-
Visual Studio Code の左下隅にある [アカウント] アイコンをクリックし、ユーザー名をポイントして、 [サインアウト] をクリックします。
![Visual Studio Code のメニューのスクリーンショット。 [サインアウト] オプションが濃いオレンジ色の枠線で囲まれています。](/assets/cb-35192/images/help/copilot/vsc-sign-out.png)
-
[Visual Studio Code] ポップアップで、 [サインアウト] をクリックします。
-
Visual Studio Code の左下隅にある [アカウント] アイコンをクリックし、ユーザー名をポイントし、 [GitHub でサインインして GitHub Copilot を使用] をクリックします。
![Visual Studio Code のアカウント メニューのスクリーンショット。 [GitHub でサインインして GitHub Copilot を使用 (1)] オプションが濃いオレンジ色の外枠で囲まれています。](/assets/cb-25983/images/help/copilot/vsc-sign-in.png)
-
ブラウザーで、GitHub から、GitHub Copilot に必要なアクセス許可が要求されます。 これらのアクセス許可を承認するには、 [続行] をクリックします。
-
[Visual Studio Code を開きますか?] ポップアップで、 [Visual Studio Code を開く] をクリックします。
![Visual Studio Code のメニューのスクリーンショット。 [サインアウト] オプションが濃いオレンジ色の枠線で囲まれています。](/assets/cb-35192/mw-1440/images/help/copilot/vsc-sign-out.webp)
![Visual Studio Code のアカウント メニューのスクリーンショット。 [GitHub でサインインして GitHub Copilot を使用 (1)] オプションが濃いオレンジ色の外枠で囲まれています。](/assets/cb-25983/mw-1440/images/help/copilot/vsc-sign-in.webp)
GitHub Copilot の設定を GitHub.com
で構成する
GitHub Copilot の使用を開始する前に、無料試用版またはサブスクリプションを設定する必要があります。 個人用アカウントの試用版またはサブスクリプションの設定の詳細については、「個々の GitHub Copilot サブスクリプションの管理」を参照してください。 組織または企業のサブスクリプションの設定の詳細については、GitHub Enterprise Cloud ドキュメントの「GitHub Copilot Business サブスクリプションの管理」または「GitHub Copilot Enterprise サブスクリプションの管理」を参照してください。
アクティブな GitHub Copilot Individual 試用版またはサブスクリプションがある場合、GitHub Copilot 設定で GitHub 上の個人用アカウントの GitHub Copilot 設定を調整できます。 この設定は、GitHub Copilot を使うすべての場所に適用されます。 GitHub Copilot が提示する候補と、GitHub がテレメトリ データを使う方法を構成できます。
重複検出の有効化または無効化
注: あなたが GitHub Enterprise Cloud 上の Organization のメンバーで、Organization を通じて GitHub Copilot シートが割り当てられている場合、個人アカウント設定で重複検出を構成することはできません。 重複検出設定は、Organization または Enterprise から継承されます。
GitHub Copilot の個人用設定には、一般公開されているコードに一致するコード補完候補を許可またはブロックするオプションが含まれています。 パブリック コードに一致する候補をブロックすることを選ぶと、 によって、周囲の約 150 文字のコードに関するコード補完候補が、GitHub でのパブリック コードに対してチェックされます。 一致または近い一致がある場合、候補は表示されません。
パブリック コードに一致する候補を許可し、1 つ以上の一致が見つかった候補を受け入れる場合は、GitHub Copilot ログのエントリからクリックして、GitHub の参照の一覧を表示できます。 詳しくは、「GitHub Copilot の候補に一致するパブリック コードの検索」を参照してください。
-
任意のページで、右上隅にあるプロファイルの画像をクリックし、次に[設定]をクリックします。
-
左側のサイドバーで、[GitHub Copilot] をクリックします。
-
Suggestions matching public code でドロップダウン メニューを選択し、 Allow をクリックして公開コードに一致する候補を許可するか、 Block をクリックして公開コードに一致する候補をブロックします。
-
新しい設定を確認するには、 [保存] をクリックします。
Prompt コレクションと Suggestion コレクションの有効化または無効化
ユーザー設定を調整することで、GitHub によってコード エディターからのプロンプトや候補を収集して保持し、さらに処理して Microsoft と共有するかどうかを選択できます。 設定によって GitHub Copilot が収集するデータの詳細については、「追加の製品および機能に適用される GitHub 条件」と GitHub Copilot のプライバシーに関する FAQ を参照してください。
-
任意のページで、右上隅にあるプロファイルの画像をクリックし、次に[設定]をクリックします。
-
左側のサイドバーで、[GitHub Copilot] をクリックします。
-
GitHub でデータの使用を許可または禁止するには、[GitHub で製品向上のためにコード エディターからコード スニペットを使用することを許可する] を選択または選択解除します。
-
新しい設定を確認するには、 [保存] をクリックします。
参考資料
Vim/Neovim での GitHub Copilot の構成
Vim/Neovim での GitHub Copilot の構成に関するガイダンスについては、次のコマンドを実行し、Vim/Neovim で GitHub Copilot ドキュメントを呼び出します。
:help copilot
キーボード ショートカットの再バインド
GitHub Copilot を使って、特定のコマンドごとに好みのキーボード ショートカットを使っているときは、Vim/Neovim でキーボード ショートカットを再バインドできます。 詳しくは、Neovim のドキュメントの記事「マップ」をご覧ください。
GitHub Copilot の設定を GitHub.com
で構成する
GitHub Copilot の使用を開始する前に、無料試用版またはサブスクリプションを設定する必要があります。 個人用アカウントの試用版またはサブスクリプションの設定の詳細については、「個々の GitHub Copilot サブスクリプションの管理」を参照してください。 組織または企業のサブスクリプションの設定の詳細については、GitHub Enterprise Cloud ドキュメントの「GitHub Copilot Business サブスクリプションの管理」または「GitHub Copilot Enterprise サブスクリプションの管理」を参照してください。
アクティブな GitHub Copilot Individual 試用版またはサブスクリプションがある場合、GitHub Copilot 設定で GitHub 上の個人用アカウントの GitHub Copilot 設定を調整できます。 この設定は、GitHub Copilot を使うすべての場所に適用されます。 GitHub Copilot が提示する候補と、GitHub がテレメトリ データを使う方法を構成できます。
重複検出の有効化または無効化
注: あなたが GitHub Enterprise Cloud 上の Organization のメンバーで、Organization を通じて GitHub Copilot シートが割り当てられている場合、個人アカウント設定で重複検出を構成することはできません。 重複検出設定は、Organization または Enterprise から継承されます。
GitHub Copilot の個人用設定には、一般公開されているコードに一致するコード補完候補を許可またはブロックするオプションが含まれています。 パブリック コードに一致する候補をブロックすることを選ぶと、 によって、周囲の約 150 文字のコードに関するコード補完候補が、GitHub でのパブリック コードに対してチェックされます。 一致または近い一致がある場合、候補は表示されません。
パブリック コードに一致する候補を許可し、1 つ以上の一致が見つかった候補を受け入れる場合は、GitHub Copilot ログのエントリからクリックして、GitHub の参照の一覧を表示できます。 詳しくは、「GitHub Copilot の候補に一致するパブリック コードの検索」を参照してください。
-
任意のページで、右上隅にあるプロファイルの画像をクリックし、次に[設定]をクリックします。
-
左側のサイドバーで、[GitHub Copilot] をクリックします。
-
Suggestions matching public code でドロップダウン メニューを選択し、 Allow をクリックして公開コードに一致する候補を許可するか、 Block をクリックして公開コードに一致する候補をブロックします。
-
新しい設定を確認するには、 [保存] をクリックします。
Prompt コレクションと Suggestion コレクションの有効化または無効化
ユーザー設定を調整することで、GitHub によってコード エディターからのプロンプトや候補を収集して保持し、さらに処理して Microsoft と共有するかどうかを選択できます。 設定によって GitHub Copilot が収集するデータの詳細については、「追加の製品および機能に適用される GitHub 条件」と GitHub Copilot のプライバシーに関する FAQ を参照してください。
-
任意のページで、右上隅にあるプロファイルの画像をクリックし、次に[設定]をクリックします。
-
左側のサイドバーで、[GitHub Copilot] をクリックします。
-
GitHub でデータの使用を許可または禁止するには、[GitHub で製品向上のためにコード エディターからコード スニペットを使用することを許可する] を選択または選択解除します。
-
新しい設定を確認するには、 [保存] をクリックします。