Notes:
- Projects (beta), the all-new projects experience, is now available. For more information about Projects (beta), see "About Projects (beta)."
- You can only create a new project (classic) for an organization, repository, or user that already has at least one project (classic). If you're unable to create a project (classic), create a project instead.
You can use a project (classic) template to create a project (classic) with automation already configured. For more information, see "About projects (classic)."
You can link up to twenty-five repositories to your organization or user-owned project (classic). Linking repositories makes it easier to add issues and pull requests from those repositories to your project (classic) using Add cards or from the issue or pull requests sidebar. For more information, see "Linking a repository to a project (classic)."
Once you've created your project (classic), you can add issues, pull requests, and notes to it. For more information, see "Adding issues and pull requests to a project (classic)" and "Adding notes to a project (classic)."
You can also configure workflow automations to keep your project (classic) in sync with the status of issues and pull requests. For more information, see "About automation for projects (classic)."
You can use GitHub's API to import a project (classic). For more information, see "Mutations."
Creating a user-owned project (classic)
-
In the top right corner of GitHub Enterprise Server, click your profile photo, then click Your profile.

-
On the top of your profile page, in the main navigation, click Projects.

-
Click Projects (classic)
-
Click New Project.
-
Type a name and description for your project (classic).
-
Optionally, to add a template to your project (classic), use the Template: drop-down menu and click a template.
-
Under "Visibility", choose to make your project (classic) public or private. For more information, see "Changing project (classic) visibility."
-
Optionally, under Linked repositories, search for a repository you'd like to link to your project (classic).
-
Click Create project.
-
On your new project (classic), to add your first column, Add a column.
-
Under "Column name", type the name of the column you want to create.
-
Optionally, under "Automation", select an automation preset using the drop-down menu.
-
Select the workflow automations you want to configure for the column.
-
Click Create column.
-
Add columns to best suit your workflow.

Tip: To edit or remove a column from your project (classic), in the upper-right corner of the column, click .
Creating an organization-wide project (classic)
Note: Organization owners can control the ability of organization members to create public projects and projects (classic), or change the visibility of existing projects and projects (classic) to public. For more information, see "Allowing project visibility changes in your organization."
-
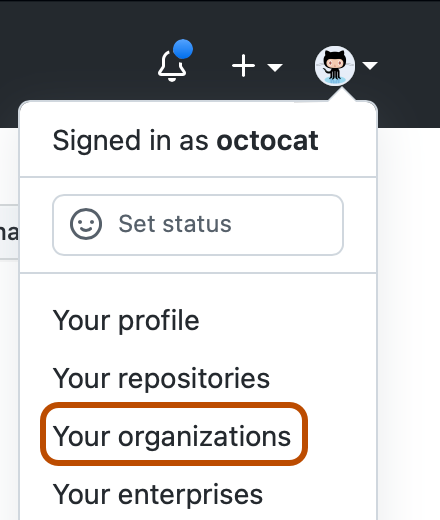
In the upper-right corner of GitHub Enterprise Server, select your profile photo, then click Your organizations.
-
Click the name of your organization.
-
Under your organization name, click Projects.

-
Click Projects (classic)
-
Click New Project.
-
Type a name and description for your project (classic).
-
Optionally, to add a template to your project (classic), use the Template: drop-down menu and click a template.
-
Under "Visibility", choose to make your project (classic) public or private. For more information, see "Changing project (classic) visibility."
-
Optionally, under Linked repositories, search for a repository you'd like to link to your project (classic).
-
Click Create project.
-
On your new project (classic), to add your first column, Add a column.
-
Under "Column name", type the name of the column you want to create.
-
Optionally, under "Automation", select an automation preset using the drop-down menu.
-
Select the workflow automations you want to configure for the column.
-
Click Create column.
-
Add columns to best suit your workflow.


Tip: To edit or remove a column from your project (classic), in the upper-right corner of the column, click .
Creating a repository project (classic)
- On your GitHub Enterprise Server instance, navigate to the main page of the repository.
- Under your repository name, click Projects.
- Click Projects (classic)
- Click New Project.
- Type a name and description for your project (classic).
- Optionally, to add a template to your project (classic), use the Template: drop-down menu and click a template.
- Click Create project.
- On your new project (classic), to add your first column, Add a column.
- Under "Column name", type the name of the column you want to create.
- Optionally, under "Automation", select an automation preset using the drop-down menu.
- Select the workflow automations you want to configure for the column.
- Click Create column.
- Add columns to best suit your workflow.
Tip: To edit or remove a column from your project (classic), in the upper-right corner of the column, click .