In addition to changing the file location, you can also update the contents of your file, or give it a new name in the same commit.
Moving a file to a new location on GitHub
Tip
- If you try to move a file in a repository that you don’t have access to, we'll fork the project to your personal account and help you send a pull request to the original repository after you commit your change.
- Some files, such as images, require that you move them from the command line. For more information, see Moving a file to a new location.
- If a repository has any protected branches, you can't edit or upload files in the protected branch using GitHub. You can use GitHub Desktop to move your changes to a new branch and commit them. For more information, see About protected branches and Committing and reviewing changes to your project in GitHub Desktop.
-
In your repository, browse to the file you want to move.
-
In the upper right corner of the file view, click to open the file editor.

Note
Instead of editing and committing the file using the default file editor, you can optionally choose to use the github.dev code editor by selecting the dropdown menu and clicking github.dev. You can also clone the repository and edit the file locally via GitHub Desktop by clicking GitHub Desktop.

-
In the filename field, change the name of the file using these guidelines:
- To move the file into a subfolder, type the name of the folder you want, followed by
/. Your new folder name becomes a new item in the navigation breadcrumbs. - To move the file into a directory above the file's current location, place your cursor at the beginning of the filename field, then either type
../to jump up one full directory level, or type thebackspacekey to edit the parent folder's name.
- To move the file into a subfolder, type the name of the folder you want, followed by
-
Click Commit changes...
-
In the "Commit message" field, type a short, meaningful commit message that describes the change you made to the file. You can attribute the commit to more than one author in the commit message. For more information, see Creating a commit with multiple authors.
-
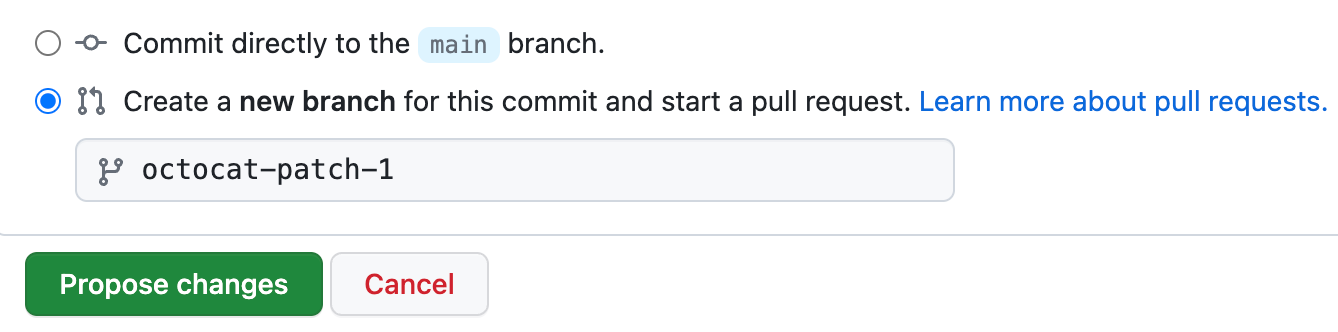
Below the commit message fields, decide whether to add your commit to the current branch or to a new branch. If your current branch is the default branch, you should choose to create a new branch for your commit and then create a pull request. For more information, see Creating a pull request.
-
Click Commit changes or Propose changes.


Moving a file to a new location using the command line
You can use the command line to move files within a repository by removing the file from the old location and then adding it in the new location.
Many files can be moved directly on GitHub, but some files, such as images, require that you move them from the command line.
This procedure assumes you've already:
- Created a repository on GitHub, or have an existing repository owned by someone else you'd like to contribute to
- Cloned the repository locally on your computer
-
On your computer, move the file to a new location within the directory that was created locally on your computer when you cloned the repository.
-
Open TerminalTerminalGit Bash.
-
Use
git statusto check the old and new file locations.$ git status > # On branch YOUR-BRANCH > # Changes not staged for commit: > # (use "git add/rm <file>..." to update what will be committed) > # (use "git checkout -- <file>..." to discard changes in working directory) > # > # deleted: /OLD-FOLDER/IMAGE.PNG > # > # Untracked files: > # (use "git add <file>..." to include in what will be committed) > # > # /NEW-FOLDER/IMAGE.PNG > # > # no changes added to commit (use "git add" and/or "git commit -a") -
Stage the file for commit to your local repository. This will delete, or
git rm, the file from the old location and add, orgit add, the file to the new location.$ git add . # Adds the file to your local repository and stages it for commit. # To unstage a file, use 'git reset HEAD YOUR-FILE'. -
Use
git statusto check the changes staged for commit.$ git status > # On branch YOUR-BRANCH > # Changes to be committed: > # (use "git reset HEAD <file>..." to unstage) > # > # renamed: /old-folder/image.png -> /new-folder/image.png # Displays the changes staged for commit -
Commit the file that you've staged in your local repository.
$ git commit -m "Move file to new directory" # Commits the tracked changes and prepares them to be pushed to a remote repository. # To remove this commit and modify the file, use 'git reset --soft HEAD~1' and commit and add the file again. -
Push the changes in your local repository to GitHub.com.
$ git push origin YOUR_BRANCH
# Pushes the changes in your local repository up to the remote repository you specified as the origin