
워크플로 정보

트리거, 구문, 고급 기능을 포함하여 GitHub Actions 워크플로의 개략적인 개요를 가져옵니다.

워크플로 정보

워크플로는 하나 이상의 작업을 실행하는 구성 가능한 자동화된 프로세스입니다. 워크플로는 리포지토리에 체크 인된 YAML 파일에서 정의되며, 리포지토리의 이벤트로 트리거될 때 실행되거나 수동으로 또는 정의된 일정에 따라 트리거될 수 있습니다.

워크플로는 리포지토리의 .github/workflows 디렉터리에 정의되며 리포지토리에는 여러 워크플로가 있을 수 있으며, 각 워크플로는 다른 작업 세트를 수행할 수 있습니다. 예를 들어 끌어오기 요청을 빌드 및 테스트하는 워크플로, 릴리스가 생성될 때마다 애플리케이션을 배포하는 워크플로, 누군가가 새 이슈를 열 때마다 레이블을 추가하는 워크플로가 있을 수 있습니다.

워크플로 기본 사항

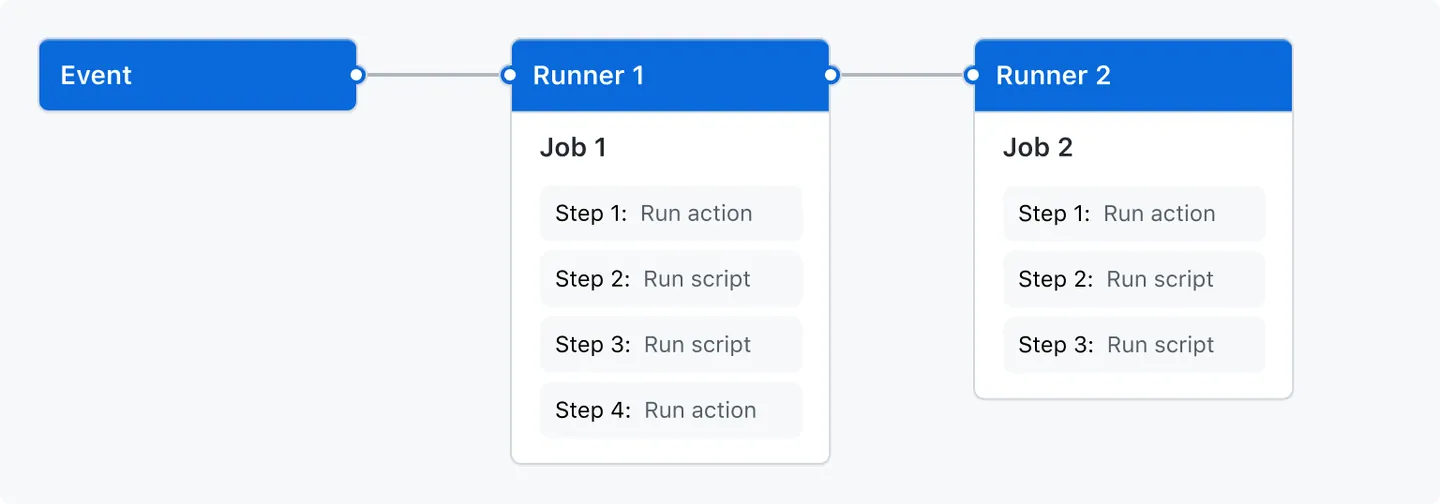
워크플로에는 다음과 같은 기본 구성 요소가 포함되어야 합니다.

  1. 워크플로를 트리거하는 하나 이상의 이벤트.
  2. 하나 이상의 _작업_이며, 각 작업은 실행기 머신에서 실행되고 일련의 하나 이상의 _단계_를 실행합니다.
  3. 각 단계에서는 워크플로를 간소화할 수 있는 재사용 가능한 확장인 작업을 정의하거나 실행하는 스크립트를 실행할 수 있습니다.

이러한 기본 구성 요소를 사용하는 방법에 관한 자세한 내용은 "GitHub Actions 이해"을 참조하세요.

Runner 1이 작업 1을 실행하도록 트리거하는 이벤트 다이어그램으로, Runner 2를 트리거하여 작업 2를 실행합니다. 각 작업은 여러 단계로 구분됩니다.

워크플로 트리거

워크플로 트리거는 워크플로를 실행하게 하는 이벤트입니다. 해당 이벤트는 다음과 같습니다.

  • 워크플로의 리포지토리에서 발생하는 이벤트
  • GitHub Enterprise Cloud 외부에서 발생하고 GitHub Enterprise Cloud에서 repository_dispatch 이벤트를 트리거하는 이벤트
  • 예약된 시간
  • 수동

예를 들어 리포지토리의 기본 분기로 푸시되거나, 릴리스가 생성되거나, 이슈가 열리면 실행되도록 워크플로를 구성할 수 있습니다.

자세한 내용은 "워크플로 트리거"을 참조하고 이벤트의 전체 목록은 "워크플로를 트리거하는 이벤트"을 참조하세요.

워크플로 구문

워크플로는 YAML을 사용하여 정의됩니다. 워크플로 작성에 대한 YAML 구문의 전체 참조는 "GitHub Actions에 대한 워크플로 구문"을 참조하세요.

예제 워크로드 만들기

GitHub Actions는 YAML 구문을 사용하여 워크플로를 정의합니다. 각 워크플로는 코드 리포지토리의 .github/workflows 디렉터리에 별도의 YAML 파일로 저장됩니다.

리포지토리에서 코드가 푸시될 때마다 일련의 명령을 자동으로 트리거하는 예제 워크플로를 만들 수 있습니다. 이 워크플로에서 GitHub Actions는 푸시된 코드를 체크 아웃하고 bats 테스트 프레임워크를 설치하고, 기본 명령 bats -v를 실행하여 bats 버전을 출력합니다.

  1. 리포지토리에서 워크플로 파일을 저장할 .github/workflows/ 디렉터리를 만듭니다.

  2. .github/workflows/ 디렉터리에서 learn-github-actions.yml이라는 새 파일을 만들고 다음 코드를 추가합니다.

    YAML
    name: learn-github-actions
    run-name: ${{ github.actor }} is learning GitHub Actions
    on: [push]
    jobs:
      check-bats-version:
        runs-on: ubuntu-latest
        steps:
          - uses: actions/checkout@v4
          - uses: actions/setup-node@v4
            with:
              node-version: '14'
          - run: npm install -g bats
          - run: bats -v
    
  3. 변경 내용을 커밋하고 GitHub 리포지토리에 푸시합니다.

이제 새 GitHub Actions 워크플로 파일이 리포지토리에 설치되고, 누군가가 리포지토리에 변경 내용을 푸시할 때마다 자동으로 실행됩니다. 워크플로의 실행 기록에 관한 세부 정보를 보려면 “워크플로 실행에 대한 작업 보기”를 참조하세요.

워크플로 파일 이해

YAML 구문을 사용하여 워크플로 파일을 만드는 방법의 이해를 돕기 위해 이 섹션에서는 소개 예제의 각 줄에 대해 설명합니다.

YAML
name: learn-github-actions

Optional - The name of the workflow as it will appear in the "Actions" tab of the GitHub repository. If this field is omitted, the name of the workflow file will be used instead.

run-name: ${{ github.actor }} is learning GitHub Actions

Optional - The name for workflow runs generated from the workflow, which will appear in the list of workflow runs on your repository's "Actions" tab. This example uses an expression with the github context to display the username of the actor that triggered the workflow run. For more information, see "GitHub Actions에 대한 워크플로 구문."

on: [push]

Specifies the trigger for this workflow. This example uses the push event, so a workflow run is triggered every time someone pushes a change to the repository or merges a pull request. This is triggered by a push to every branch; for examples of syntax that runs only on pushes to specific branches, paths, or tags, see "GitHub Actions에 대한 워크플로 구문."

jobs:

Groups together all the jobs that run in the learn-github-actions workflow.

  check-bats-version:

Defines a job named check-bats-version. The child keys will define properties of the job.

    runs-on: ubuntu-latest

Configures the job to run on the latest version of an Ubuntu Linux runner. This means that the job will execute on a fresh virtual machine hosted by GitHub. For syntax examples using other runners, see "GitHub Actions에 대한 워크플로 구문"

    steps:

Groups together all the steps that run in the check-bats-version job. Each item nested under this section is a separate action or shell script.

      - uses: actions/checkout@v4

The uses keyword specifies that this step will run v4 of the actions/checkout action. This is an action that checks out your repository onto the runner, allowing you to run scripts or other actions against your code (such as build and test tools). You should use the checkout action any time your workflow will use the repository's code.

      - uses: actions/setup-node@v4
        with:
          node-version: '14'

This step uses the actions/setup-node@v4 action to install the specified version of the Node.js. (This example uses version 14.) This puts both the node and npm commands in your PATH.

      - run: npm install -g bats

The run keyword tells the job to execute a command on the runner. In this case, you are using npm to install the bats software testing package.

      - run: bats -v

Finally, you'll run the bats command with a parameter that outputs the software version.

# Optional - The name of the workflow as it will appear in the "Actions" tab of the GitHub repository. If this field is omitted, the name of the workflow file will be used instead.
name: learn-github-actions
# Optional - The name for workflow runs generated from the workflow, which will appear in the list of workflow runs on your repository's "Actions" tab. This example uses an expression with the `github` context to display the username of the actor that triggered the workflow run. For more information, see "[AUTOTITLE](/actions/using-workflows/workflow-syntax-for-github-actions#run-name)."
run-name: ${{ github.actor }} is learning GitHub Actions

# Specifies the trigger for this workflow. This example uses the `push` event, so a workflow run is triggered every time someone pushes a change to the repository or merges a pull request.  This is triggered by a push to every branch; for examples of syntax that runs only on pushes to specific branches, paths, or tags, see "[AUTOTITLE](/actions/reference/workflow-syntax-for-github-actions#onpushpull_requestpull_request_targetpathspaths-ignore)."
on: [push]

# Groups together all the jobs that run in the `learn-github-actions` workflow.
jobs:

# Defines a job named `check-bats-version`. The child keys will define properties of the job.
  check-bats-version:

# Configures the job to run on the latest version of an Ubuntu Linux runner. This means that the job will execute on a fresh virtual machine hosted by GitHub. For syntax examples using other runners, see "[AUTOTITLE](/actions/reference/workflow-syntax-for-github-actions#jobsjob_idruns-on)"
    runs-on: ubuntu-latest

# Groups together all the steps that run in the `check-bats-version` job. Each item nested under this section is a separate action or shell script.
    steps:

# The `uses` keyword specifies that this step will run `v4` of the `actions/checkout` action. This is an action that checks out your repository onto the runner, allowing you to run scripts or other actions against your code (such as build and test tools). You should use the checkout action any time your workflow will use the repository's code.
      - uses: actions/checkout@v4

# This step uses the `actions/setup-node@v4` action to install the specified version of the Node.js. (This example uses version 14.) This puts both the `node` and `npm` commands in your `PATH`.
      - uses: actions/setup-node@v4
        with:
          node-version: '14'

# The `run` keyword tells the job to execute a command on the runner. In this case, you are using `npm` to install the `bats` software testing package.
      - run: npm install -g bats

# Finally, you'll run the `bats` command with a parameter that outputs the software version.
      - run: bats -v

워크플로 파일 시각화

아래 다이어그램에서, 방금 만든 워크플로 파일 및 GitHub Actions 구성 요소가 계층 구조로 구성된 방식을 확인할 수 있습니다. 각 단계는 단일 작업 또는 셸 스크립트를 실행합니다. 1단계와 2단계는 작업을 실행하는 반면, 3단계와 4단계는 셸 스크립트를 실행합니다. 워크플로에 대해 미리 빌드된 작업을 더 찾으려면 "작업 찾기 및 사용자 지정"을 참조하세요.

워크플로의 트리거, 실행기 및 작업을 보여 주는 다이어그램입니다. 작업은 4단계로 구분됩니다.

워크플로 실행에 대한 작업 보기

워크플로가 트리거되면 워크플로를 실행하는 워크플로 실행이 만들어집니다.__ 워크플로 실행이 시작된 후 GitHub에서 실행 진행률 시각화 그래프를 확인하고 각 단계의 작업을 볼 수 있습니다.

  1. GitHub.com에서 리포지토리의 기본 페이지로 이동합니다.

  2. 리포지토리 이름 아래에서 작업을 클릭합니다.

    "github/docs" 리포지토리의 탭 스크린샷. "작업" 탭은 주황색 윤곽선으로 강조 표시됩니다.

  3. 왼쪽 사이드바에서 확인할 워크플로를 클릭합니다.

    "작업" 탭의 왼쪽 사이드바 스크린샷. "CodeQL"이라는 워크플로가 진한 주황색 윤곽선으로 표시되어 있습니다.

  4. 워크플로 실행 목록에서 실행 이름을 클릭하여 워크플로 실행 요약을 확인합니다.

  5. 왼쪽 사이드바 또는 시각화 그래프에서 확인할 작업을 클릭합니다.

  6. 단계의 결과를 보려면 단계를 클릭합니다.

워크플로 실행 다시 실행, 취소 또는 삭제와 같은 워크플로 실행 관리에 대한 자세한 내용은 "워크플로 실행 관리"를 참조하세요.

시작 워크플로 사용

GitHub은 사용자 지정하여 고유한 연속 통합 워크플로를 만들 수 있는 미리 구성된 시작 워크플로를 제공합니다. GitHub Enterprise Cloud은 코드를 분석하고 리포지토리에 유용할 수 있는 CI 시작 워크플로를 보여 줍니다. 예를 들어 리포지토리에 Node.js 코드가 포함된 경우 Node.js 프로젝트에 대한 제안이 표시됩니다. 시작 워크플로를 시작 위치로 사용하여 사용자 지정 워크플로를 빌드하거나 있는 그대로 사용할 수 있습니다.

GitHub.com의 작업/시작-워크플로 리포지토리

시작 워크플로 사용 및 생성에 대한 자세한 내용은 "시작 워크플로 사용" 및 "조직의 시작 워크플로 만들기"을 참조하세요.

고급 워크플로 기능

이 섹션에서는 더 복잡한 워크플로를 만드는 데 도움이 되는 GitHub Actions의 고급 기능 중 일부를 간략하게 설명합니다.

비밀 저장

워크플로에서 암호 또는 인증서와 같은 중요한 데이터를 사용하는 경우 GitHub에 비밀로 저장한 다음 워크플로에서 환경 변수로 사용할 수 있습니다.__ 즉, 워크플로의 YAML 원본에 중요한 값을 직접 포함할 필요 없이 워크플로를 만들고 공유할 수 있습니다.

이 예제 작업은 기존 비밀을 환경 변수로 참조하고 예제 명령에 매개 변수로 보내는 방법을 보여 줍니다.

jobs:
  example-job:
    runs-on: ubuntu-latest
    steps:
      - name: Retrieve secret
        env:
          super_secret: ${{ secrets.SUPERSECRET }}
        run: |
          example-command "$super_secret"

자세한 내용은 "GitHub Actions에서 비밀 사용"을(를) 참조하세요.

종속 작업 만들기

기본적으로 워크플로의 작업은 모두 동시에 병렬로 실행됩니다. 다른 작업이 완료된 후에만 실행해야 하는 작업이 있는 경우 needs 키워드를 사용하여 이 종속성을 만들 수 있습니다. 작업 중 하나가 실패하면 모든 종속 작업은 건너뜁니다. 그러나 작업을 계속해야 하는 경우 if 조건문을 사용하여 이를 정의할 수 있습니다.

이 예제에서 setup, buildtest 작업은 연달아 실행되며 buildtest는 그 앞 작업의 성공적인 완료에 따라 실행됩니다.

jobs:
  setup:
    runs-on: ubuntu-latest
    steps:
      - run: ./setup_server.sh
  build:
    needs: setup
    runs-on: ubuntu-latest
    steps:
      - run: ./build_server.sh
  test:
    needs: build
    runs-on: ubuntu-latest
    steps:
      - run: ./test_server.sh

자세한 내용은 "워크플로에서 작업 사용"을(를) 참조하세요.

매트릭스 사용

매트릭스 전략을 사용하면 단일 작업 정의에서 변수를 사용하여 변수의 조합을 기반으로 하는 여러 작업 실행을 자동으로 만들 수 있습니다. 예를 들어 매트릭스 전략을 사용하여 여러 버전의 언어 또는 여러 운영 체제에서 코드를 테스트할 수 있습니다. 매트릭스는 빌드 옵션을 배열로 수신하는 strategy 키워드를 사용하여 만들어집니다. 예를 들어 이 매트릭스는 여러 버전의 Node.js 사용하여 작업을 여러 번 실행합니다.

jobs:
  build:
    runs-on: ubuntu-latest
    strategy:
      matrix:
        node: [14, 16]
    steps:
      - uses: actions/setup-node@v4
        with:
          node-version: ${{ matrix.node }}

자세한 내용은 "작업에 행렬 사용"을(를) 참조하세요.

종속성 캐싱

작업에서 종속성을 정기적으로 다시 사용하는 경우 이러한 파일을 캐싱하여 성능을 개선하는 것이 좋습니다. 캐시가 만들어지면 동일한 리포지토리의 모든 워크플로에서 사용할 수 있습니다.

이 예제에서는 ~/.npm 디렉터리를 캐싱하는 방법을 보여 줍니다.

jobs:
  example-job:
    steps:
      - name: Cache node modules
        uses: actions/cache@v3
        env:
          cache-name: cache-node-modules
        with:
          path: ~/.npm
          key: ${{ runner.os }}-build-${{ env.cache-name }}-${{ hashFiles('**/package-lock.json') }}
          restore-keys: |
            ${{ runner.os }}-build-${{ env.cache-name }}-

자세한 정보는 "워크플로 속도를 높이기 위한 종속성 캐싱"을(를) 참조하세요.

데이터베이스 및 서비스 컨테이너 사용

작업에 데이터베이스 또는 캐시 서비스가 필요한 경우 services 키워드를 사용하여 서비스를 호스팅하는 임시 컨테이너를 만들 수 있습니다. 그러면 해당 작업의 모든 단계에서 결과 컨테이너를 사용할 수 있으며 작업이 완료되면 제거됩니다. 이 예제에서는 작업이 services을 사용하여 postgres 컨테이너를 만든 다음 서비스에 연결하는 데 node을 사용할 수 있는 방법을 보여 줍니다.

jobs:
  container-job:
    runs-on: ubuntu-latest
    container: node:10.18-jessie
    services:
      postgres:
        image: postgres
    steps:
      - name: Check out repository code
        uses: actions/checkout@v4
      - name: Install dependencies
        run: npm ci
      - name: Connect to PostgreSQL
        run: node client.js
        env:
          POSTGRES_HOST: postgres
          POSTGRES_PORT: 5432

자세한 내용은 "컨테이너화된 서비스 사용"을(를) 참조하세요.

레이블을 사용하여 워크플로 라우팅

특정 유형의 실행기에서 작업을 처리하도록 하려면 레이블을 사용하여 작업이 실행되는 위치를 제어할 수 있습니다. 자체 호스팅 실행기에서 self-hosted의 기본 레이블 외에도 레이블을 할당할 수 있습니다. 그런 다음, YAML 워크플로에서 이러한 레이블을 참조하여 작업이 예측 가능한 방식으로 라우팅되도록 할 수 있습니다. GitHub 호스트형 실행기에는 미리 정의된 레이블이 할당됩니다.

이 예제에서는 다음과 같이 워크플로에서 레이블을 사용하여 필요한 실행기를 지정하는 방법을 보여 줍니다.

jobs:
  example-job:
    runs-on: [self-hosted, linux, x64, gpu]

워크플로는 runs-on 배열에 모든 레이블이 있는 실행기에서만 실행됩니다. 작업은 우선 지정된 레이블이 있는 유휴 자체 호스팅 실행기로 이동합니다. 사용할 수 없는 경우 지정된 레이블이 있는 GitHub 호스팅 실행기가 있으면 작업이 GitHub 호스팅 실행기로 이동합니다.

자체 호스팅 실행기 레이블에 대한 자세한 내용은 "자체 호스트형 실행기로 레이블 사용"을 참조하세요.

GitHub 호스팅 실행기 레이블에 대한 자세한 내용은 “GitHub 호스팅 실행기 사용”를 참조하세요.

워크플로 다시 사용

한 워크플로를 호출하여 조직과 워크플로를 공개 또는 비공개적으로 공유할 수 있습니다. 이렇게 하면 워크플로를 다시 사용할 수 있으므로 중복을 방지하고 워크플로를 더 쉽게 유지 관리할 수 있습니다. 자세한 내용은 "워크플로 다시 사용"을(를) 참조하세요.

워크플로에 대한 보안 강화

GitHub는 워크플로의 보안을 강화하는 데 사용할 수 있는 보안 기능을 제공합니다. GitHub의 기본 제공 기능으로 이용하는 작업의 약점에 대한 알림을 받거나 워크플로의 작업을 최신 상태로 유지하는 프로세스를 자동화할 수 있습니다. 자세한 내용은 "GitHub의 보안 기능을 사용하여 안전하게 GitHub Actions 사용"을(를) 참조하세요.

환경 사용

워크플로에서 작업 실행을 제어하도록 보호 규칙 및 비밀을 사용하여 환경을 구성할 수 있습니다. 워크플로의 각 작업은 단일 환경을 참조할 수 있습니다. 환경을 참조하는 작업이 실행기에 전송되기 전에 환경에 대해 구성된 모든 보호 규칙이 전달되어야 합니다. 자세한 내용은 "배포에 환경 사용"을(를) 참조하세요.