リポジトリ、Organization、Enterpriseに自己ホストランナーを追加できます。
Organization または Enterprise 管理者の場合は、Organization または Enterprise レベルで自己ホストランナーを追加することをお勧めします。 このアプローチにより、Organization または Enterprise 内の複数のリポジトリでランナーを使用できるようになり、ランナーを1か所で管理することもできます。
自己ホスト ランナーでサポートされているオペレーティング システム、またはプロキシ サーバーで自己ホスト ランナーを使う方法については、「自己ホスト ランナーの概要」をご覧ください。
Warning
自己ホストランナーは、プライベートリポジトリでのみ利用することをおすすめします。 これは、ワークフロー内でコードを実行する pull request を作成することで、パブリック リポジトリのフォークによって、自己ホスト ランナー マシン上で危険なコードが実行される可能性があるからです。
詳しくは、「自己ホスト ランナーの概要」を参照してください。
自己ホスト ランナーの数をスケーリングするように自動化を設定できます。 詳しくは、「セルフホステッド ランナーによる自動スケーリング」を参照してください。
Just-In-Time ランナーの登録を使って、登録がクリーンアップされる前に 1 つのジョブを実行するエフェメラル ランナーを登録できます。 詳しくは、「GitHub Actions のセキュリティ強化」を参照してください。
前提条件
- 環境内でセルフホステッド ランナーとして使用するマシンにアクセスできる必要があります。
リポジトリへの自己ホストランナーの追加
単一のリポジトリに自己ホストランナーを追加できます。 自己ホストランナーをユーザのリポジトリに追加するには、リポジトリのオーナーでなければなりません。 組織リポジトリの場合、組織の所有者であるか、リポジトリへの管理者アクセス権を持っている必要があります。
REST API を使って自己ホスト ランナーを追加する方法については、「セルフホステッド ランナーの REST API エンドポイント」をご覧ください。
Note
Organization の所有者は、リポジトリ レベルのセルフホステッド ランナーの作成を許可するリポジトリを選択できます。 。
詳細については、「Organization について GitHub Actions を無効化または制限する」を参照してください。
-
GitHub で、リポジトリのメイン ページに移動します。
-
リポジトリ名の下にある [設定] をクリックします。 [設定] タブが表示されない場合は、 [] ドロップダウン メニューを選び、 [設定] をクリックします。
![タブを示すリポジトリ ヘッダーのスクリーンショット。 [設定] タブが濃いオレンジ色の枠線で強調表示されています。](/assets/cb-28260/images/help/repository/repo-actions-settings.png)
-
左のサイドバーで [アクション] をクリックしてから、 [ランナー] をクリックします。
-
[新規フホスト ランナー] をクリックします。
-
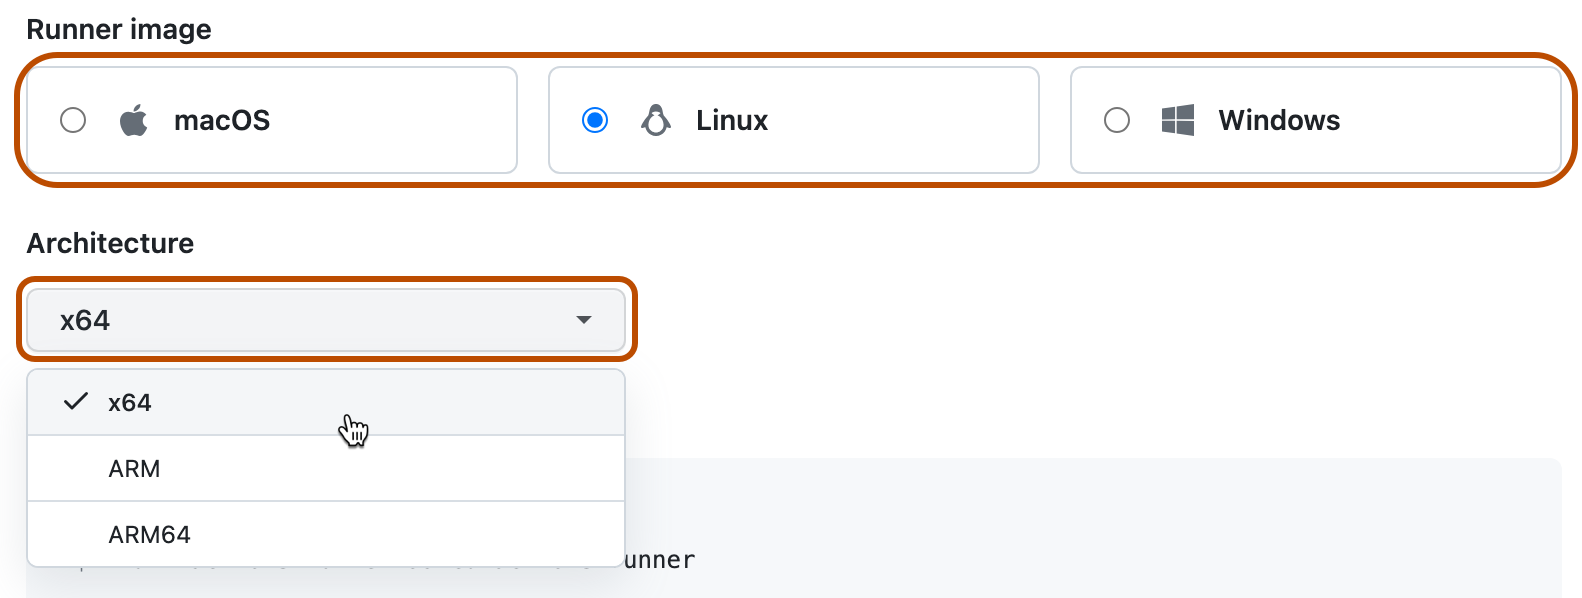
使用する自己ホスト ランナー マシンのオペレーティング システム イメージとアーキテクチャを選択します。
-
ランナーアプリケーションをダウンロードして、使用する自己ホストランナーのマシンにインストールする方法が表示されます。
自己ホストランナーのマシンでシェルを開き、表示順に従ってシェルコマンドを実行してください。
注: Windows で、自己ホスト ランナー アプリケーションをサービスとしてインストールする場合は、シェルを管理者権限でオープンしなければなりません。 また、
C:\actions-runnerを自己ホスト ランナー アプリケーション用のディレクトリとして使用し、Windows のシステム アカウントでランナー ディレクトリにアクセスできるようにすることをお勧めします。この指示に従えば、以下のタスクが完了します。
- 自己ホストランナーアプリケーションのダウンロードと展開。
configスクリプトを実行して自己ホスト ランナー アプリケーションを設定し、GitHub Actions に登録します。configスクリプトには、登録先の URL と、リクエストを認証してもらうための自動的に生成された時間制限付きのトークンが必要です。- Windows では、
configスクリプトから自己ホスト ランナーをサービスとしてインストールするかどうかも尋ねられます。 LinuxとmacOSでは、ランナーの追加を終えた後にサービスをインストールできます。 詳しくは、「自己ホストランナーアプリケーションをサービスとして設定する」を参照してください。
- Windows では、
- 自己ホストランナーアプリケーションを実行して、マシンをGitHub Actionsに接続します。
![タブを示すリポジトリ ヘッダーのスクリーンショット。 [設定] タブが濃いオレンジ色の枠線で強調表示されています。](/assets/cb-28260/mw-1440/images/help/repository/repo-actions-settings.webp)

自己ホストランナーの追加に成功したことの確認
自己ホスト ランナーを追加する手順を完了すると、ランナーとその状態が "ランナー" の下に表示されます。
ジョブをランナーが受け付けるためには、自己ホストランナーアプリケーションが動作していなければなりません。 ランナー アプリケーションが GitHub に接続されており、ジョブの受信準備ができたら、以下のメッセージがコンピューターのターミナルに表示されます。
√ Connected to GitHub

2019-10-24 05:45:56Z: Listening for Jobs
詳しくは、「自己ホストランナーのモニタリングとトラブルシューティング」を参照してください。
Organizationへの自己ホストランナーの追加
自己ホストランナーをOrganizationのレベルで追加し、Organization内の複数のリポジトリのジョブを処理するために使うことができます。 セルフ ホスト ランナーを組織に追加するには、組織の所有者。 REST API を使って自己ホスト ランナーを追加する方法については、「セルフホステッド ランナーの REST API エンドポイント」をご覧ください。
-
GitHub で、organization のメイン ページに移動します。
-
組織名の下で、 [設定] をクリックします。 [設定] タブが表示されない場合は、 [] ドロップダウン メニューを選び、 [設定] をクリックします。
![組織のプロファイルのタブのスクリーンショット。 [設定] タブが濃いオレンジ色の枠線で囲まれています。](/assets/cb-49309/images/help/discussions/org-settings-global-nav-update.png)
-
左のサイドバーで [アクション] をクリックしてから、 [ランナー] をクリックします。
-
[新しいランナー] をクリックし、 [新しい自己ホスト ランナー] をクリックします。 1. 使用する自己ホスト ランナー マシンのオペレーティング システム イメージとアーキテクチャを選択します。
-
ランナーアプリケーションをダウンロードして、使用する自己ホストランナーのマシンにインストールする方法が表示されます。
自己ホストランナーのマシンでシェルを開き、表示順に従ってシェルコマンドを実行してください。
注: Windows で、自己ホスト ランナー アプリケーションをサービスとしてインストールする場合は、シェルを管理者権限でオープンしなければなりません。 また、
C:\actions-runnerを自己ホスト ランナー アプリケーション用のディレクトリとして使用し、Windows のシステム アカウントでランナー ディレクトリにアクセスできるようにすることをお勧めします。この指示に従えば、以下のタスクが完了します。
- 自己ホストランナーアプリケーションのダウンロードと展開。
configスクリプトを実行して自己ホスト ランナー アプリケーションを設定し、GitHub Actions に登録します。configスクリプトには、登録先の URL と、リクエストを認証してもらうための自動的に生成された時間制限付きのトークンが必要です。- Windows では、
configスクリプトから自己ホスト ランナーをサービスとしてインストールするかどうかも尋ねられます。 LinuxとmacOSでは、ランナーの追加を終えた後にサービスをインストールできます。 詳しくは、「自己ホストランナーアプリケーションをサービスとして設定する」を参照してください。
- Windows では、
- 自己ホストランナーアプリケーションを実行して、マシンをGitHub Actionsに接続します。
![組織のプロファイルのタブのスクリーンショット。 [設定] タブが濃いオレンジ色の枠線で囲まれています。](/assets/cb-49309/mw-1440/images/help/discussions/org-settings-global-nav-update.webp)
自己ホストランナーの追加に成功したことの確認
自己ホスト ランナーを追加する手順を完了すると、ランナーとその状態が "ランナー" の下に表示されます。
ジョブをランナーが受け付けるためには、自己ホストランナーアプリケーションが動作していなければなりません。 ランナー アプリケーションが GitHub に接続されており、ジョブの受信準備ができたら、以下のメッセージがコンピューターのターミナルに表示されます。
√ Connected to GitHub

2019-10-24 05:45:56Z: Listening for Jobs
詳しくは、「自己ホストランナーのモニタリングとトラブルシューティング」を参照してください。
注: セキュリティ上の理由により、既定で、パブリック リポジトリでは、ランナー グループ内でランナーを使用することができませんが、ランナー グループの設定でこれをオーバーライドすることができます。 詳しくは、「グループを使用してセルフホストランナーへのアクセスを管理する」を参照してください。
自己ホストランナーを Enterprise に追加する
GitHub Enterprise Cloud を使用する場合、自己ホスト ランナーを Enterprise に追加できます。この場合、複数の組織に割り当てることができます。 組織のオーナーは、どのリポジトリがそれを使用できるかをコントロールできます。 詳しくは、GitHub Enterprise Cloud のドキュメントをご覧ください。