Introduction
This guide demonstrates how to use GitHub Issues to plan and track a piece of work. In this guide, you will create a new issue and add a task list to track sub-tasks. You'll also learn how to add labels, milestones, assignees, and projects to communicate metadata about your issue.
Prerequisites
To create an issue, you need a repository. You can use an existing repository that you have write access to, or you can create a new repository. The repository must have issues enabled. For more information about creating a repository, see "Creating a new repository." For more information about enabling issues if they are disabled in your repository, see "Disabling issues."
Opening a blank issue
First, create an issue. There are multiple ways to create an issue; you can choose the most convenient method for your workflow. This example will use the GitHub UI. For more information about other ways to create an issue, see "Creating an issue."
-
On your GitHub Enterprise Server instance, navigate to the main page of the repository.
-
Under your repository name, click Issues.

-
Click New issue.
-
In this example, we will start with a blank issue. Your repository may use issue templates to encourage contributors to provide specific information. If your repository uses issue templates, click Open a blank issue.

Filling in information
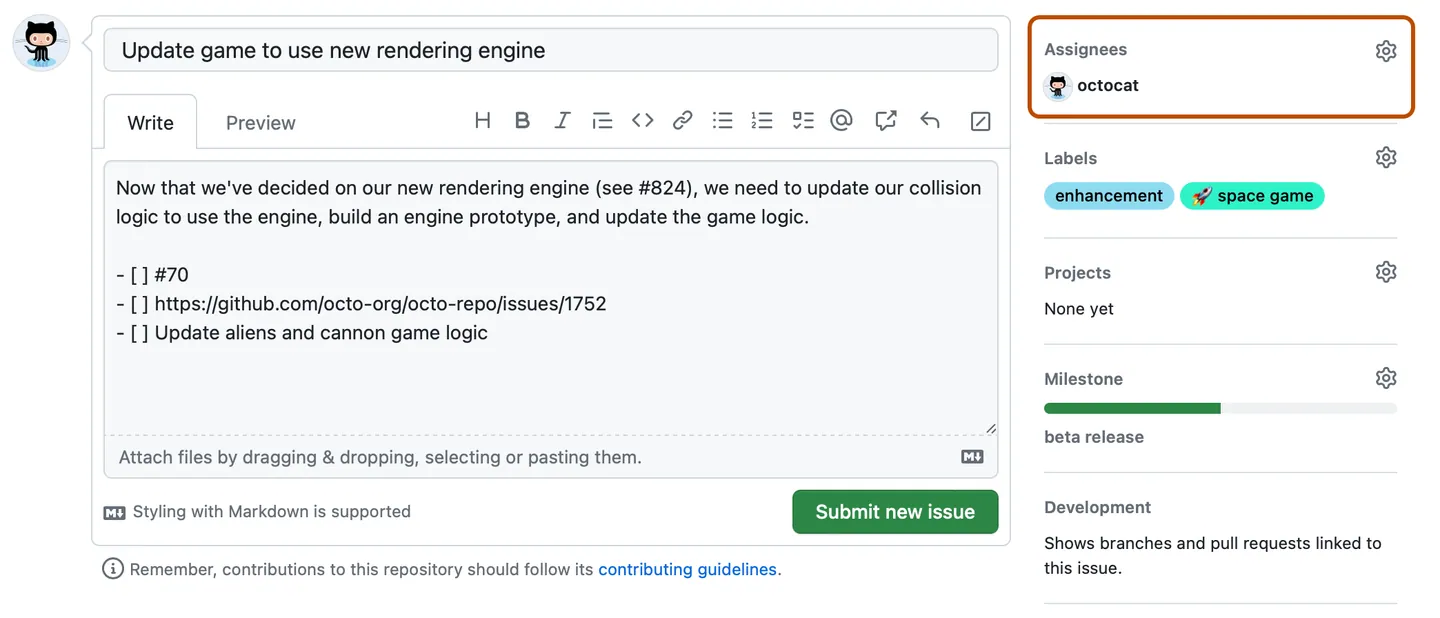
Give your issue a descriptive title. The title should convey at a glance what the issue is about.
Add a description that explains the purpose of the issue, including any details that might help resolve the issue. For example, if this is a bug report, describe the steps to reproduce the bug, the expected result, and the actual result.
You can use markdown to add formatting, links, emojis, and more. For more information, see "Writing on GitHub."

Adding labels
Add a label to categorize your issue. For example, you might use a bug label and a good first issue label to indicate that an issue is a bug that a first-time contributor could pick up. Users can filter issues by label to find all issues that have a specific label.
You can use the default labels, or you can create a new label. For more information, see "Managing labels."

Adding milestones
You can add a milestone to track the issue as part of a date based target. A milestone will show the progress of the issues as the target date approaches. For more information, see "About milestones."

Assigning the issue
To communicate responsibility, you can assign the issue to a member of your organization. For more information, see "Assigning issues and pull requests to other GitHub users."
Adding the issue to a project
You can add the issue to an existing project For more information about projects, see "Organizing your work with project boards."

Submitting your issue
Click Submit new issue to create your issue. You can edit any of the above fields after creating the issue. Your issue has a unique URL that you can share with team members, or reference in other issues or pull requests.
Communicating
After your issue is created, continue the conversation by adding comments to the issue. You can @mention collaborators or teams to draw their attention to a comment. To link related issues in the same repository, you can type # followed by part of the issue title and then clicking the issue that you want to link. For more information, see "Writing on GitHub."

Next steps
You can use issues for a wide range of purposes. For example:
- Tracking ideas
- Collecting feedback
- Planning tasks
- Reporting bugs
Here are some helpful resources for taking your next steps with GitHub Issues:
- To learn more about issues, see "About issues."
- To learn more about how projects can help you with planning and tracking, see "Organizing your work with project boards."
- To learn more about using issue templates to encourage contributors to provide specific information, see "Using templates to encourage useful issues and pull requests."