Overview
Typically, when you create a codespace you are offered a choice of specifications for the machine that will run your codespace. You can choose the machine type that best suits your needs. For more information, see Creating a codespace for a repository.
If you pay for using GitHub Codespaces then your choice of machine type will affect how much you are billed. The compute cost for a codespace is proportional to the number of processor cores in the machine type you choose. For example, the compute cost of using a codespace for an hour on a 16-core machine is eight times greater than a 2-core machine. For more information about pricing, see GitHub Codespaces billing.
As an organization owner, you may want to configure constraints on the types of machine that are available. For example, if the work in your organization doesn't require significant compute power or storage space, you can remove the highly resourced machines from the list of options that people can choose from. You do this by defining one or more policies in the GitHub Codespaces settings for your organization.
Behavior when you set a machine type constraint
If there are existing codespaces that no longer conform to a policy you have defined, these codespaces will continue to operate until they are stopped or time out. When the user attempts to resume the codespace they are shown a message telling them that the currently selected machine type is no longer allowed for this organization and prompting them to choose an alternative machine type.
If you remove higher specification machine types that are required by the GitHub Codespaces configuration for an individual repository in your organization, then it won't be possible to create a codespace for that repository. When someone attempts to create a codespace they will see a message telling them that there are no valid machine types available that meet the requirements of the repository's GitHub Codespaces configuration.
Примечание.
Anyone who can edit the devcontainer.json configuration file in a repository can set a minimum specification for machines that can be used for codespaces for that repository. For more information, see Setting a minimum specification for codespace machines.
If setting a policy for machine types prevents people from using GitHub Codespaces for a particular repository there are two options:
- You can adjust your policies to specifically remove the restrictions from the affected repository.
- Anyone who has a codespace that they can no longer access, because of the new policy, can export their codespace to a branch. This branch will contain all of their changes from the codespace. They can then open a new codespace on this branch with a compliant machine type or work on this branch locally. For more information, see Exporting changes to a branch.
Setting organization-wide and repository-specific policies
When you create a policy you choose whether it applies to all repositories in your organization, or only to specified repositories. If you set an organization-wide policy then any policies you set for individual repositories must fall within the restriction set at the organization level. Adding policies makes the choice of machine more, not less, restrictive.
For example, you could create an organization-wide policy that restricts the machine types to either 2 or 4 cores. You can then set a policy for Repository A that restricts it to just 2-core machines. Setting a policy for Repository A that restricted it to machines with 2, 4, or 8 cores would result in a choice of 2-core and 4-core machines only, because the organization-wide policy prevents access to 8-core machines.
If you add an organization-wide policy, you should set it to the largest choice of machine types that will be available for any repository in your organization. You can then add repository-specific policies to further restrict the choice.
Примечание.
Codespaces policies only apply to codespaces that your organizations pays for. If someone creates a codespace for a repository in your organization at their own expense, then the codespace will not be bound by these policies. For more information, see Choosing who owns and pays for codespaces in your organization.
Adding a policy to limit the available machine types
-
In the upper-right corner of GitHub, click your profile picture, then click Your organizations.
-
Next to the organization, click Settings.
-
In the "Code, planning, and automation" section of the sidebar, select Codespaces then click Policies.
-
On the "Codespaces policies" page, click Create Policy.
-
Enter a name for your new policy.
-
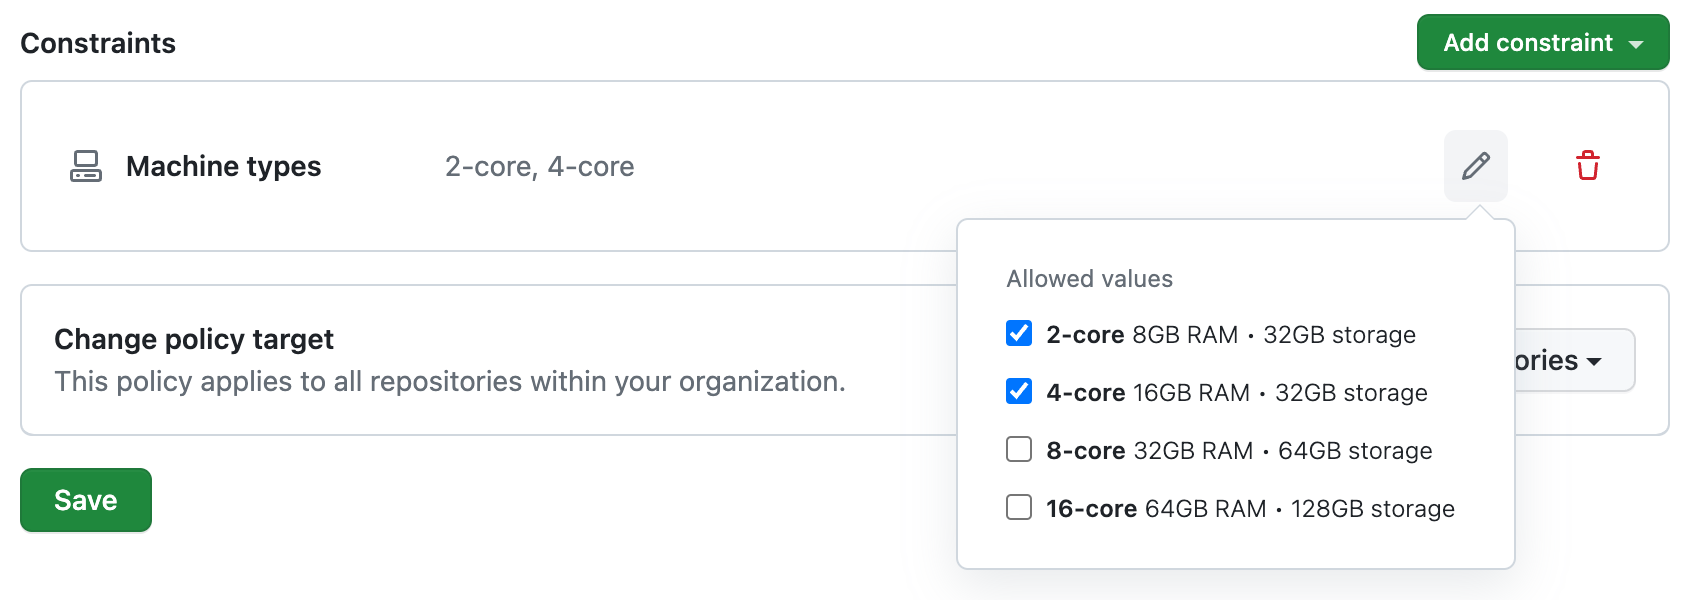
Click Add constraint and choose Machine types.
-
Click to edit the constraint, then clear the selection of any machine types that you don't want to be available.
-
Click outside of the dialog box to close it.
-
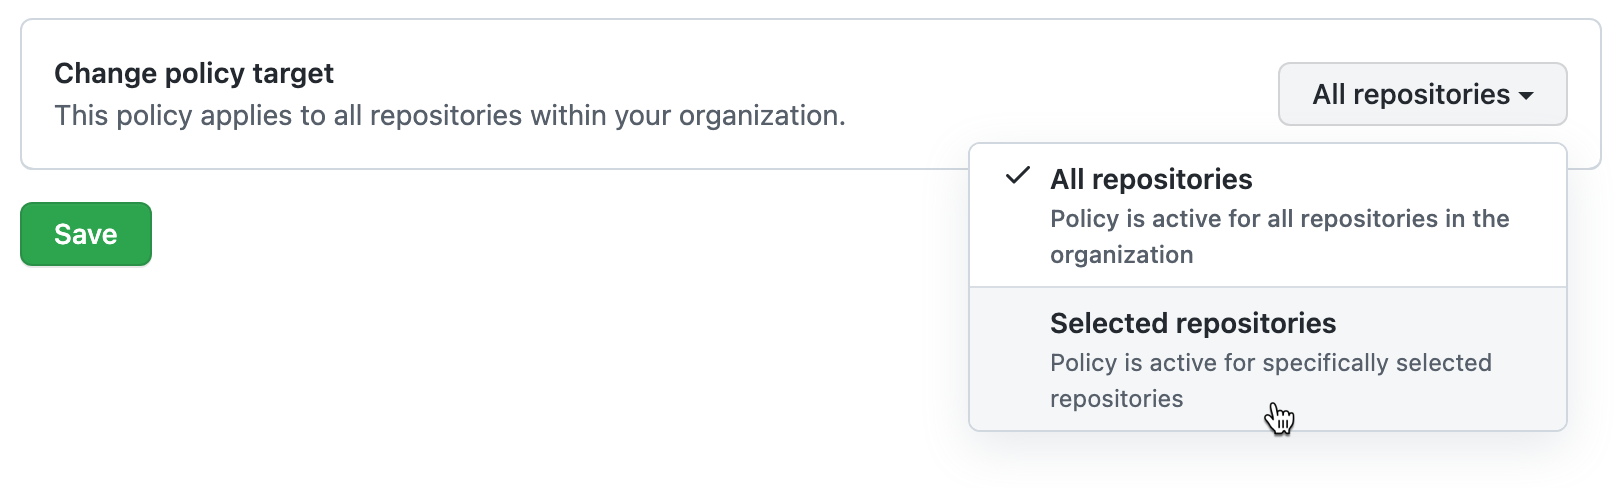
By default the policy is set to apply to all repositories, if you want it to apply only to some of the repositories in your organization, click All repositories and then click Selected repositories in the dropdown menu.
Примечание.
If you're adding a constraint to an existing policy that already contains the "Maximum codespaces per user" constraint, you won't be able to apply the policy to selected repositories. This is because the "Maximum codespaces per user" constraint always applies to all repositories in the organization.
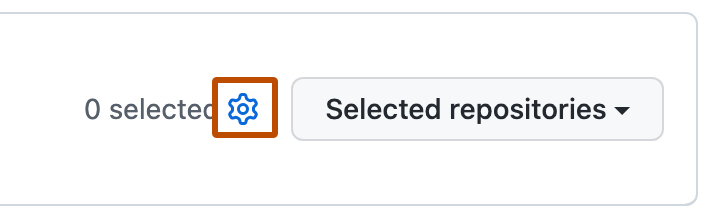
With Selected repositories selected:
-
Click .
-
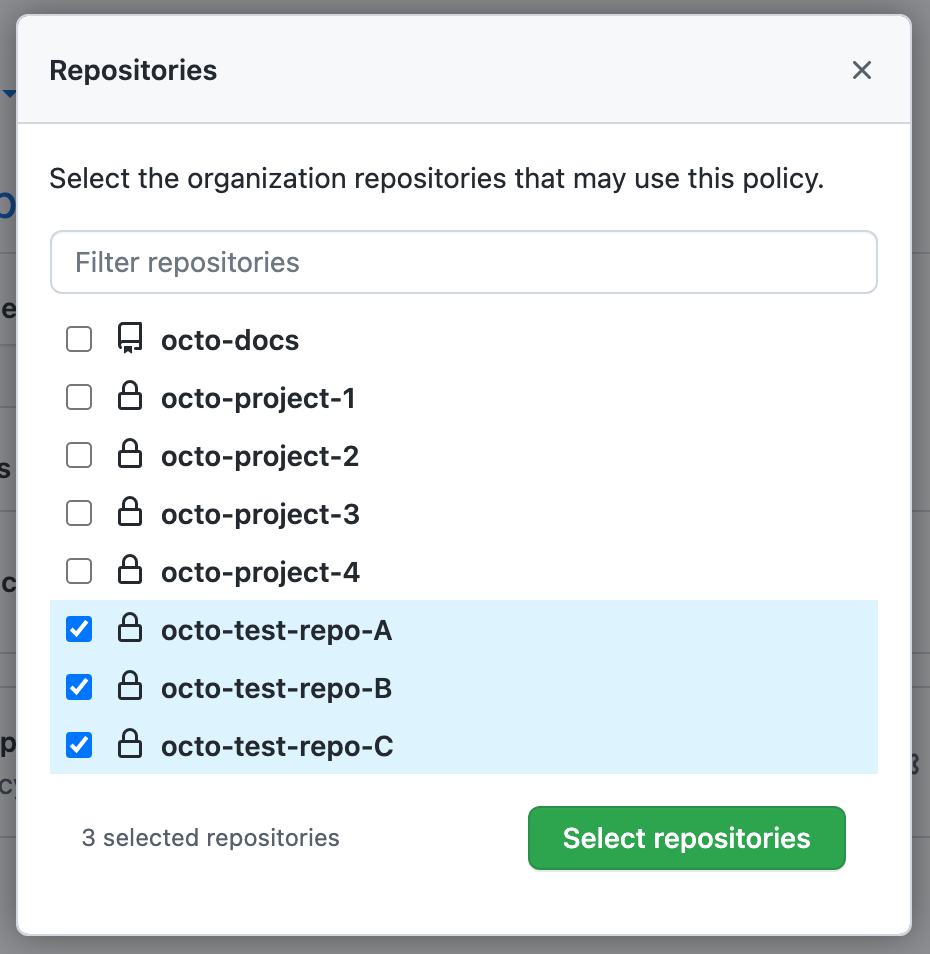
Select the repositories you want this policy to apply to.
-
At the bottom of the repository list, click Select repositories.
-
-
If you want to add another constraint to the policy, click Add constraint and choose another constraint. For information about other constraints, see:
-
After you've finished adding constraints to your policy, click Save.


The policy will be applied to all new codespaces that are billable to your organization. The machine type constraint is also applied to existing codespaces when someone attempts to restart a stopped codespace or reconnect to an active codespace.
Editing a policy
You can edit an existing policy. For example, you may want to add or remove constraints to or from a policy.
- Display the "Codespaces policies" page. For more information, see Adding a policy to limit the available machine types.
- Click the name of the policy you want to edit.
- Beside the "Machine types" constraint, click .
- Make the required changes then click Save.
Deleting a policy
-
Display the "Codespaces policies" page. For more information, see Adding a policy to limit the available machine types.
-
Click to the right of the policy you want to delete.

