참고 항목
The information and instructions in this article only apply to larger runners with Linux and Windows operating systems.
Managing access to larger runners
참고 항목
Before your workflows can send jobs to larger runners, you must first configure permissions for the runner group. See the following sections for more information.
Runner groups are used to control which repositories can run jobs on your larger runners. You must manage access to the group from each level of the management hierarchy, depending on where you've defined the larger runner:
- Runners at the enterprise level: By default, repositories in an organization do not have access to enterprise-level runner groups. To give repositories access to enterprise runner groups, organization owners must configure each enterprise runner group and choose which repositories have access.
- Runners at the organization level: By default, all repositories in an organization are granted access to organization-level runner groups. To restrict which repositories have access, organization owners and users with the "Manage organization runners and runner groups" permission must configure organization runner groups and choose which repositories have access.
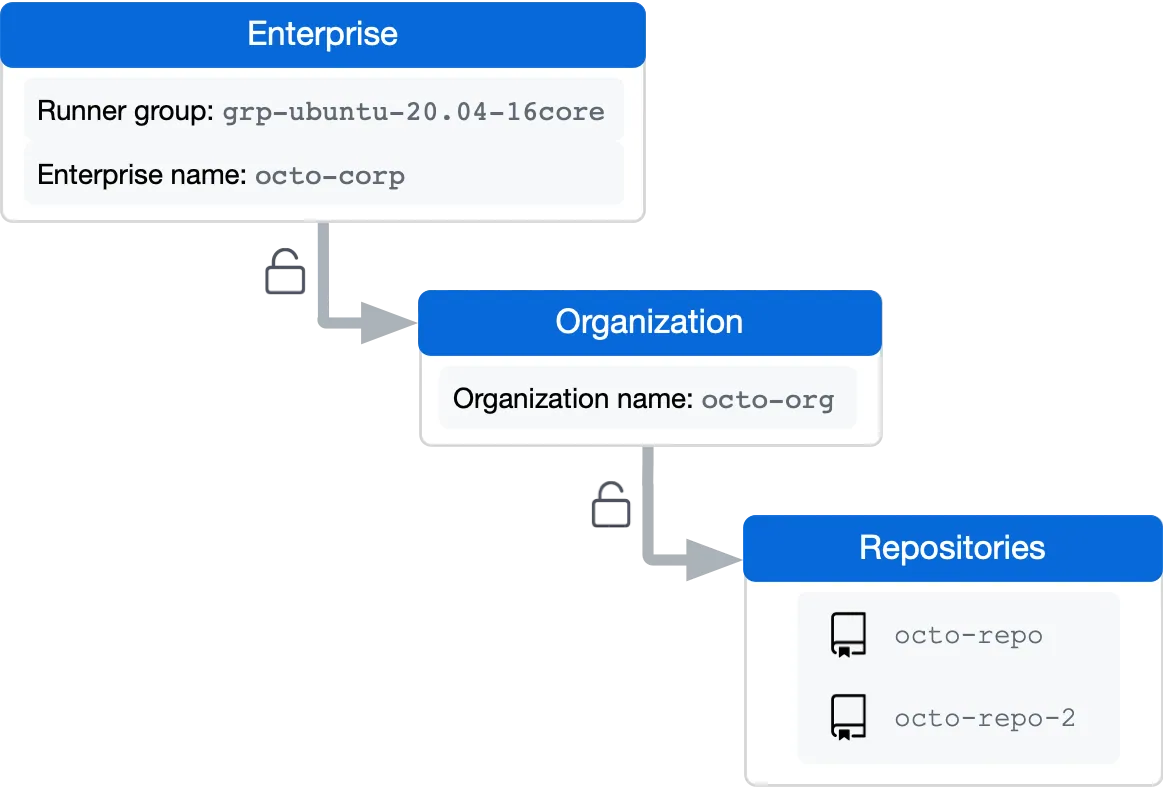
For example, the following diagram has a runner group named grp-ubuntu-20.04-16core at the enterprise level. Before the repository named octo-repo can use the runners in the group, you must first configure the group at the enterprise level to allow access to the octo-org organization. You must then configure the group at the organization level to allow access to octo-repo.
Creating a runner group for an organization
경고
If you are using a Fixed IP range, we recommend that you only use larger runners with private repositories. Forks of your repository can potentially run dangerous code on your larger runner by creating a pull request that executes the code in a workflow.
참고 항목
When creating a runner group, you must choose a policy that defines which repositories and workflows have access to the runner group. To change which repositories and workflows can access the runner group, organization owners and users with the “Manage organization runners and runner groups” permission can set a policy for the organization. For more information, see Enforcing policies for GitHub Actions in your enterprise.
All organizations have a single default runner group. Organization owners and users with the "Manage organization runners and runner groups" permission can create additional organization-level runner groups. For more information about custom organization roles, see About custom organization roles.
If no group is specified during the registration process, runners are automatically added to the default group. You can later move the runner from the default group to a custom group.
For information about how to create a runner group with the REST API, see REST API endpoints for GitHub Actions.
-
On GitHub, navigate to the main page of the organization.
-
Under your organization name, click Settings. If you cannot see the "Settings" tab, select the dropdown menu, then click Settings.

-
In the left sidebar, click Actions, then click Runner groups.
-
In the "Runner groups" section, click New runner group.
-
Enter a name for your runner group.
-
Assign a policy for repository access.
You can configure a runner group to be accessible to a specific list of repositories, or to all repositories in the organization. By default, only private repositories can access runners in a runner group, but you can override this. This setting can't be overridden if configuring an organization's runner group that was shared by an enterprise.
-
Assign a policy for workflow access.
You can configure a runner group to be accessible to a specific list of workflows, or to all workflows. This setting can't be overridden if you are configuring an organization's runner group that was shared by an enterprise. If you specify what workflow can access the runner group, you must use the full path to the workflow, including the repository name and owner, and you must pin the workflow to a branch, tag, or full SHA. For example:
octo-org/octo-repo/.github/workflows/build.yml@refs/tags/v2, octo-org/octo-repo/.github/workflows/deploy.yml@d6dc6c96df4f32fa27b039f2084f576ed2c5c2a5, monalisa/octo-test/.github/workflows/test.yml@refs/heads/main.It is best practice to fully qualify ambiguous refs. For example, instead of providing
mainas a ref, providerefs/heads/main.Only jobs directly defined within the selected workflows will have access to the runner group. Organization-owned runner groups cannot access workflows from a different organization in the enterprise; instead, you must create an enterprise-owned runner group.
-
Click Create group to create the group and apply the policy.

Creating a runner group for an enterprise
경고
If you are using a Fixed IP range, we recommend that you only use larger runners with private repositories. Forks of your repository can potentially run dangerous code on your larger runner by creating a pull request that executes the code in a workflow.
Enterprises can add their runners to groups for access management. Enterprises can create groups of runners that are accessible to specific organizations in the enterprise account or to specific workflows. Organization owners can then assign additional granular repository or workflow access policies to the enterprise runner groups. For information about how to create a runner group with the REST API, see the enterprise endpoints in the GitHub Actions REST API.
If no group is specified during the registration process, runners are automatically added to a default group. You can later move the runner from the default group to a custom group.
When creating a group, you must choose a policy that defines which organizations have access to the runner group.
-
In the top-right corner of GitHub, click your profile picture.
-
Depending on your environment, click Your enterprise, or click Your enterprises then click the enterprise you want to view.
-
At the top of the page, click Policies.
-
Under " Policies", click Actions.
-
Click the Runner groups tab.
-
Click New runner group.
-
Under "Group name", type a name for your runner group.
-
To choose a policy for organization access, select the Organization access dropdown menu and click a policy. You can configure a runner group to be accessible to a specific list of organizations, or all organizations in the enterprise.
-
Assign a policy for workflow access.
You can configure a runner group to be accessible to a specific list of workflows, or to all workflows. This setting can't be overridden if you are configuring an organization's runner group that was shared by an enterprise. If you specify what workflow can access the runner group, you must use the full path to the workflow, including the repository name and owner, and you must pin the workflow to a branch, tag, or full SHA. For example:
octo-org/octo-repo/.github/workflows/build.yml@refs/tags/v2, octo-org/octo-repo/.github/workflows/deploy.yml@d6dc6c96df4f32fa27b039f2084f576ed2c5c2a5, monalisa/octo-test/.github/workflows/test.yml@refs/heads/main.It is best practice to fully qualify ambiguous refs. For example, instead of providing
mainas a ref, providerefs/heads/main.Only jobs directly defined within the selected workflows will have access to the runner group.
-
Click Save group to create the group and apply the policy.
Using unique names for runner groups
GitHub Actions requires that runner group names must be unique at the organization level. This means that an organization will no longer be able to create a runner group with the same name as one in the enterprise. In addition, users will see a warning banner on any runner groups that share the same name as a group in the enterprise, suggesting that the organization group should be renamed.
To avoid ambiguity, a workflow will fail if there are duplicate runner groups in the organization and enterprise. To address this, you can either rename one of your runner groups in the organization or enterprise, or you can update your workflow file to add a prefix to the runner group name:
org/ororganization/ent/orenterprise/
Example: Using prefixes to differentiate runner groups
For example, if you have a runner group named my-group in the organization and another named my-group in the enterprise, you can update your workflow file to use org/my-group or ent/my-group to differentiate between the two.
Using org/:
runs-on:
  group: org/my-group
  labels: [ self-hosted, label-1 ]
Using ent/:
runs-on:
  group: ent/my-group
  labels: [ self-hosted, label-1 ]
Changing which organizations can access a runner group
경고
If you are using a Fixed IP range, we recommend that you only use larger runners with private repositories. Forks of your repository can potentially run dangerous code on your larger runner by creating a pull request that executes the code in a workflow.
For runner groups in an enterprise, you can change what organizations in the enterprise can access a runner group.
-
In the top-right corner of GitHub, click your profile picture.
-
Depending on your environment, click Your enterprise, or click Your enterprises then click the enterprise you want to view.
-
At the top of the page, click Policies.
-
Under " Policies", click Actions.
-
Click the Runner groups tab.
-
Under "Organization access," use the dropdown menu to click Selected organizations.
- To the right of the dropdown menu, click .
- In the popup, use the checkboxes to select organizations that can use this runner group.
-
Click Save group.
Changing which repositories can access a runner group
경고
If you are using a Fixed IP range, we recommend that you only use larger runners with private repositories. Forks of your repository can potentially run dangerous code on your larger runner by creating a pull request that executes the code in a workflow.
For runner groups in an organization, you can change what repositories in the organization can access a runner group.
-
Navigate to the main page of the organization where your runner groups are located.
-
Click Settings.
-
In the left sidebar, click Actions, then click Runner groups.
-
In the list of groups, click the runner group you'd like to configure.
-
Under "Repository access," use the dropdown menu to click Selected repositories.
- To the right of the dropdown menu, click .
- In the popup, use the checkboxes to select repositories that can access this runner group.
-
Click Save group.
Changing which workflows can access a runner group
경고
If you are using a Fixed IP range, we recommend that you only use larger runners with private repositories. Forks of your repository can potentially run dangerous code on your larger runner by creating a pull request that executes the code in a workflow.
You can configure a runner group to run either selected workflows or all workflows. For example, you might use this setting to protect secrets that are stored on runners or to standardize deployment workflows by restricting a runner group to run only a specific reusable workflow. This setting cannot be overridden if you are configuring an organization's runner group that was shared by an enterprise.
- Changing which workflows can access an organization runner group
- Changing which workflows can access an enterprise runner group
Changing which workflows can access an organization runner group
-
Navigate to the main page of the organization where your runner groups are located.
-
Click Settings.
-
In the left sidebar, click Actions, then click Runner groups.
-
In the list of groups, click the runner group you'd like to configure.
-
Under Workflow access, select the dropdown menu and click Selected workflows.
-
Click .
-
Enter a comma separated list of the workflows that can access the runner group. Use the full path, including the repository name and owner. Pin the workflow to a branch, tag, or full SHA. For example:
octo-org/octo-repo/.github/workflows/build.yml@v2, octo-org/octo-repo/.github/workflows/deploy.yml@d6dc6c96df4f32fa27b039f2084f576ed2c5c2a5, monalisa/octo-test/.github/workflows/test.yml@main.Only jobs directly defined within the selected workflows will have access to the runner group.
Organization-owned runner groups cannot access workflows from a different organization in the enterprise; instead, you must create an enterprise-owned runner group.
-
Click Save.
Changing which workflows can access an enterprise runner group
-
In the top-right corner of GitHub, click your profile picture.
-
Depending on your environment, click Your enterprise, or click Your enterprises then click the enterprise you want to view.
-
At the top of the page, click Policies.
-
Under " Policies", click Actions.
-
Click the Runner groups tab.
-
In the list of groups, click the runner group you'd like to configure.
-
Under Workflow access, select the dropdown menu and click Selected workflows.
-
Click .
-
Enter a comma separated list of the workflows that can access the runner group. Use the full path, including the repository name and owner. Pin the workflow to a branch, tag, or full SHA. For example:
octo-org/octo-repo/.github/workflows/build.yml@v2, octo-org/octo-repo/.github/workflows/deploy.yml@d6dc6c96df4f32fa27b039f2084f576ed2c5c2a5, monalisa/octo-test/.github/workflows/test.yml@main.Only jobs directly defined within the selected workflows will have access to the runner group.
Organization-owned runner groups cannot access workflows from a different organization in the enterprise; instead, you must create an enterprise-owned runner group.
-
Click Save.
Configuring private network access for larger runners
You can use GitHub-hosted runners in an Azure VNET. This enables you to use GitHub-managed infrastructure for CI/CD while providing you with full control over the networking policies of your runners. For more information about Azure VNET, see What is Azure Virtual Network? in the Azure documentation.
If you have configured your enterprise or organization to connect to an Azure VNET, you can give runner groups access to the virtual network. For more information, see Private networking with GitHub-hosted runners.
Changing the name of a runner group
You can rename runner groups at the enterprise and organization levels.
Changing the name of an organization runner group
- Navigate to the main page of the organization where your runner groups are located.
- Click Settings.
- In the left sidebar, click Actions, then click Runner groups.
- In the list of groups, click the runner group you'd like to configure.
- Enter the new runner group name in the text field under "Group name."
- Click Save.
Changing the name of an enterprise runner group
- In the top-right corner of GitHub, click your profile picture.
- Depending on your environment, click Your enterprise, or click Your enterprises then click the enterprise you want to view.
- At the top of the page, click Policies.
- Under " Policies", click Actions.
- Click the Runner groups tab.
- In the list of groups, click the runner group you'd like to configure.
- Enter the new runner group name in the text field under "Group name."
- Click Save.
Moving a runner to a group
If you don't specify a runner group during the registration process, your new runners are automatically assigned to the default group, and can then be moved to another group.
Moving an organization runner to a group
-
On GitHub, navigate to the main page of the organization.
-
Under your organization name, click Settings. If you cannot see the "Settings" tab, select the dropdown menu, then click Settings.
-
In the left sidebar, click Actions, then click Runners.
-
In the "Runners" list, click the runner that you want to configure.
-
Select the Runner group drop-down.
-
In "Move runner to group", choose a destination group for the runner.
Moving an enterprise runner to a group
- In the top-right corner of GitHub, click your profile picture.
- Depending on your environment, click Your enterprise, or click Your enterprises then click the enterprise you want to view.
- At the top of the page, click Policies.
- Under " Policies", click Actions.
- Click the Runners tab.
- In the "Runners" list, click the runner that you want to configure.
- Select the Runner group drop-down.
- In "Move runner to group", choose a destination group for the runner.
Removing a runner group
In order to remove a runner group, you must first move or remove all of the runners from the group.
Removing a runner group from an organization
- Navigate to the main page of the organization where your runner groups are located.
- Click Settings.
- In the left sidebar, click Actions, then click Runner groups.
- In the list of groups, to the right of the group you want to delete, click .
- To remove the group, click Remove group.
- Review the confirmation prompts, and click Remove this runner group.
Removing a runner group from an enterprise
- In the top-right corner of GitHub, click your profile picture.
- Depending on your environment, click Your enterprise, or click Your enterprises then click the enterprise you want to view.
- At the top of the page, click Policies.
- Under " Policies", click Actions.
- Click the Runner groups tab.
- In the list of groups, to the right of the group you want to delete, click .
- To remove the group, click Remove group.
- Review the confirmation prompts, and click Remove this runner group.