日常的なユースケースに取り組みながら、APIの中心的な概念を見ていきましょう。
概要
ほとんどのアプリケーションは、任意の言語において既存のラッパーライブラリを使用しています。ただ、まずは基底となっているAPI HTTPメソッドについて知ることが大切です。
ちょっと試しにやってみるだけなら、cURLを使うのが一番簡単です。
Hello World
まずはセットアップをテストすることから始めましょう。 コマンドプロンプトを開き、次のコマンドを入力します。
$ curl http(s)://[hostname]/api/v3/zen

> Keep it logically awesome.
レスポンスは、私たちの設計思想からランダムに選択されます。
次に、Chris WanstrathのGitHubプロフィールをGETします。
# GET /users/defunkt
$ curl http(s)://[hostname]/api/v3/users/defunkt

> {
>   "login": "defunkt",
>   "id": 2,
>   "url": "http(s)://[hostname]/api/v3/users/defunkt",
>   "html_url": "https://github.com/defunkt",
>   ...
> }うーん、なんだかJSONみたいですね。 -iフラグを追加して、ヘッダを入れてみましょう。
$ curl -i http(s)://[hostname]/api/v3/users/defunkt

> HTTP/1.1 200 OK
> Server: GitHub.com
> Date: Sun, 11 Nov 2012 18:43:28 GMT
> Content-Type: application/json; charset=utf-8
> Connection: keep-alive
> Status: 200 OK
> ETag: "bfd85cbf23ac0b0c8a29bee02e7117c6"
> X-RateLimit-Limit: 60
> X-RateLimit-Remaining: 57
> X-RateLimit-Reset: 1352660008
> X-GitHub-Media-Type: github.v3
> Vary: Accept
> Cache-Control: public, max-age=60, s-maxage=60
> X-Content-Type-Options: nosniff
> Content-Length: 692
> Last-Modified: Tue, 30 Oct 2012 18:58:42 GMT

> {
>   "login": "defunkt",
>   "id": 2,
>   "url": "http(s)://[hostname]/api/v3/users/defunkt",
>   "html_url": "https://github.com/defunkt",
>   ...
> }
レスポンスヘッダの中に、ちょっと面白いものがありますね。 思っていたとおり、Content-Typeはapplication/jsonです。
X-で始まるヘッダはすべてカスタムヘッダで、HTTPの仕様にはありません。 例:
X-GitHub-Media-Typeの値はgithub.v3です。 これは、レスポンスのメディアタイプを伝えています。 メディアタイプは、出力をAPI v3にするために役立ちました。 これについては、後ほど詳しく説明します。X-RateLimit-LimitとX-RateLimit-Remainingのヘッダに注目してください。 この2つのヘッダは、1つのローリング期間 (通常は1時間) に1つのクライアントが行えるリクエストの数と、クライアントが既に消費したリクエストの数を示しています。
認証
認証されていないクライアントは、1時間に60件のリクエストを行うことができます。 1時間あたりのリクエストを増やすには、認証が必要です。 実のところ、GitHub Enterprise APIを使って何か面白いことがしたければ、認証は欠かせません。
個人アクセストークンの使用
GitHub Enterprise APIで認証を行う最も簡単かつ最善の方法は、OAuthトークン経由でBasic認証を使用することです。 OAuthトークンには個人アクセストークンが含まれています。
-uフラグを使って、ユーザ名を設定します。
$ curl -i -u your_username http(s)://[hostname]/api/v3/users/octocat
プロンプトが表示されたらOAuthトークンを入力できますが、そのための変数を設定することをお勧めします。
トークンをシェル履歴に残すことは避けるべきです。-u "username:$token"を使用して、tokenの変数を設定すると、トークンはシェル履歴に残りません。
$ curl -i -u username:$token http(s)://[hostname]/api/v3/users/octocat
認証の際、X-RateLimit-Limitヘッダが示す通り、レート制限が1時間に5,000リクエストに上がったことがわかるはずです。 1時間あたりの呼び出し数が増えるだけでなく、認証するとAPIを使用してプライベート情報を読み書きできます。
個人アクセストークンの設定ページから、簡単に個人アクセストークンを作成できます。

ユーザプロフィールの取得
認証が正しく行われると、GitHub Enterpriseアカウントに関連づけられている権限を利用できます。 For example, try getting
$ curl -i -u your_username:your_token http(s)://[hostname]/api/v3/user

> {
>   ...
>   "plan": {
>     "space": 2516582,
>    "collaborators": 10,
>    "private_repos": 20,
>    "name": "medium"
>  }
>   ...
> }先に@defunktについて取得したパブリックな情報に加えて、今回はユーザプロフィールのパブリックでない情報も表示されているはずです。 たとえば、レスポンスにはplanオブジェクトが表示されますが、これはアカウントのGitHub Enterpriseプランについての詳細です。
Using OAuth tokens for apps
Apps that need to read or write private information using the API on behalf of another user should use OAuth.
OAuth uses tokens. Tokens provide two big features:
- Revokable access: users can revoke authorization to third party apps at any time
- Limited access: users can review the specific access that a token will provide before authorizing a third party app
Tokens should be created via a web flow. An application sends users to GitHub Enterprise to log in. GitHub Enterprise then presents a dialog indicating the name of the app, as well as the level of access the app has once it's authorized by the user. After a user authorizes access, GitHub Enterprise redirects the user back to the application:
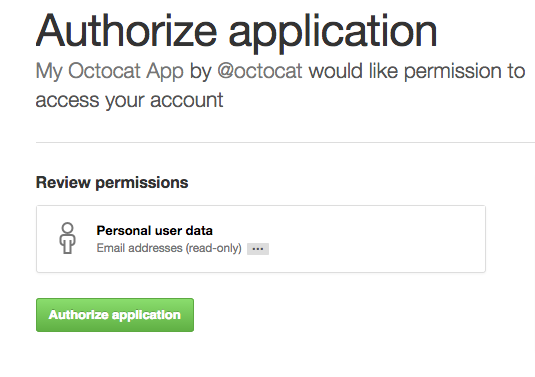
Treat OAuth tokens like passwords! Don't share them with other users or store them in insecure places. The tokens in these examples are fake and the names have been changed to protect the innocent.
Now that we've got the hang of making authenticated calls, let's move along to the Repositories API.
リポジトリ
Almost any meaningful use of the GitHub Enterprise API will involve some level of Repository information. We can GET repository details in the same way we fetched user details earlier:
$ curl -i http(s)://[hostname]/api/v3/repos/twbs/bootstrapIn the same way, we can view repositories for the authenticated user:
$ curl -i -H "Authorization: token 5199831f4dd3b79e7c5b7e0ebe75d67aa66e79d4" \
    http(s)://[hostname]/api/v3/user/repos
Or, we can list repositories for another user:
$ curl -i http(s)://[hostname]/api/v3/users/octocat/reposOr, we can list repositories for an organization:
$ curl -i http(s)://[hostname]/api/v3/orgs/octo-org/reposThe information returned from these calls will depend on which scopes our token has when we authenticate:
- A token with
public_reposcope returns a response that includes all public repositories we have access to see on github.com. - A token with
reposcope returns a response that includes all public and private repositories we have access to see on github.com.
As the docs indicate, these methods take a type parameter that can filter the repositories returned based on what type of access the user has for the repository. In this way, we can fetch only directly-owned repositories, organization repositories, or repositories the user collaborates on via a team.
$ curl -i "http(s)://[hostname]/api/v3/users/octocat/repos?type=owner"In this example, we grab only those repositories that octocat owns, not the ones on which she collaborates. Note the quoted URL above. Depending on your shell setup, cURL sometimes requires a quoted URL or else it ignores the query string.
リポジトリの作成
Fetching information for existing repositories is a common use case, but the
GitHub Enterprise API supports creating new repositories as well. To create a repository, we need to POST some JSON containing the details and configuration options.
$ curl -i -H "Authorization: token 5199831f4dd3b79e7c5b7e0ebe75d67aa66e79d4" \
    -d '{ \
        "name": "blog", \
        "auto_init": true, \
        "private": true, \
        "gitignore_template": "nanoc" \
      }' \
    http(s)://[hostname]/api/v3/user/repos
In this minimal example, we create a new repository for our blog (to be served on GitHub Pages, perhaps). Though the blog will be public, we've made the repository private. In this single step, we'll also initialize it with a README and a nanoc-flavored .gitignore template.
The resulting repository will be found at https://github.com/<your_username>/blog. To create a repository under an organization for which you're an owner, just change the API method from /user/repos to /orgs/<org_name>/repos.
Next, let's fetch our newly created repository:
$ curl -i http(s)://[hostname]/api/v3/repos/pengwynn/blog

> HTTP/1.1 404 Not Found

> {
>    "message": "Not Found"
> }
Oh noes! Where did it go? Since we created the repository as private, we need to authenticate in order to see it. If you're a grizzled HTTP user, you might expect a 403 instead. Since we don't want to leak information about private repositories, the GitHub Enterprise API returns a 404 in this case, as if to say "we can neither confirm nor deny the existence of this repository."
問題
The UI for Issues on GitHub Enterprise aims to provide 'just enough' workflow while staying out of your way. With the GitHub Enterprise Issues API, you can pull data out or create issues from other tools to create a workflow that works for your team.
Just like github.com, the API provides a few methods to view issues for the authenticated user. To see all your issues, call GET /issues:
$ curl -i -H "Authorization: token 5199831f4dd3b79e7c5b7e0ebe75d67aa66e79d4" \
    http(s)://[hostname]/api/v3/issues
To get only the issues under one of your GitHub Enterprise organizations, call GET /orgs/<org>/issues:
$ curl -i -H "Authorization: token 5199831f4dd3b79e7c5b7e0ebe75d67aa66e79d4" \
    http(s)://[hostname]/api/v3/orgs/rails/issues
We can also get all the issues under a single repository:
$ curl -i http(s)://[hostname]/api/v3/repos/rails/rails/issuesページネーション
A project the size of Rails has thousands of issues. We'll need to paginate, making multiple API calls to get the data. Let's repeat that last call, this time taking note of the response headers:
$ curl -i http(s)://[hostname]/api/v3/repos/rails/rails/issues

> HTTP/1.1 200 OK

> ...
> Link: <http(s)://[hostname]/api/v3/repositories/8514/issues?page=2>; rel="next", <http(s)://[hostname]/api/v3/repositories/8514/issues?page=30>; rel="last"
> ...
The Link header provides a way for a response to link to external resources, in this case additional pages of data. Since our call found more than thirty issues (the default page size), the API tells us where we can find the next page and the last page of results.
Issue の作成
Now that we've seen how to paginate lists of issues, let's create an issue from the API.
To create an issue, we need to be authenticated, so we'll pass an OAuth token in the header. Also, we'll pass the title, body, and labels in the JSON body to the /issues path underneath the repository in which we want to create the issue:
$ curl -i -H 'Authorization: token 5199831f4dd3b79e7c5b7e0ebe75d67aa66e79d4' \
$    -d '{ \
$         "title": "New logo", \
$         "body": "We should have one", \
$         "labels": ["design"] \
$       }' \
$    http(s)://[hostname]/api/v3/repos/pengwynn/api-sandbox/issues

> HTTP/1.1 201 Created
> Location: http(s)://[hostname]/api/v3/repos/pengwynn/api-sandbox/issues/17
> X-RateLimit-Limit: 5000

> {
>   "pull_request": {
>     "patch_url": null,
>     "html_url": null,
>     "diff_url": null
>   },
>   "created_at": "2012-11-14T15:25:33Z",
>   "comments": 0,
>   "milestone": null,
>   "title": "New logo",
>   "body": "We should have one",
>   "user": {
>     "login": "pengwynn",
>     "gravatar_id": "7e19cd5486b5d6dc1ef90e671ba52ae0",
>     "avatar_url": "https://secure.gravatar.com/avatar/7e19cd5486b5d6dc1ef90e671ba52ae0?d=https://a248.e.akamai.net/assets.github.com%2Fimages%2Fgravatars%2Fgravatar-user-420.png",
>     "id": 865,
>     "url": "http(s)://[hostname]/api/v3/users/pengwynn"
>   },
>   "closed_at": null,
>   "updated_at": "2012-11-14T15:25:33Z",
>   "number": 17,
>   "closed_by": null,
>   "html_url": "https://github.com/pengwynn/api-sandbox/issues/17",
>   "labels": [
>     {
>       "color": "ededed",
>       "name": "design",
>       "url": "http(s)://[hostname]/api/v3/repos/pengwynn/api-sandbox/labels/design"
>     }
>   ],
>   "id": 8356941,
>   "assignee": null,
>   "state": "open",
>   "url": "http(s)://[hostname]/api/v3/repos/pengwynn/api-sandbox/issues/17"
> }
The response gives us a couple of pointers to the newly created issue, both in the Location response header and the url field of the JSON response.
条件付きリクエスト
A big part of being a good API citizen is respecting rate limits by caching information that hasn't changed. The API supports conditional requests and helps you do the right thing. Consider the first call we made to get defunkt's profile:
$ curl -i http(s)://[hostname]/api/v3/users/defunkt

> HTTP/1.1 200 OK
> ETag: "bfd85cbf23ac0b0c8a29bee02e7117c6"
In addition to the JSON body, take note of the HTTP status code of 200 and the ETag header. The ETag is a fingerprint of the response. If we pass that on subsequent calls, we can tell the API to give us the resource again, only if it has changed:
$ curl -i -H 'If-None-Match: "bfd85cbf23ac0b0c8a29bee02e7117c6"' \
$    http(s)://[hostname]/api/v3/users/defunkt

> HTTP/1.1 304 Not Modified
The 304 status indicates that the resource hasn't changed since the last time we asked for it and the response will contain no body. As a bonus, 304 responses don't count against your rate limit.
Woot! Now you know the basics of the GitHub Enterprise API!
- Basic & OAuth authentication
- Fetching and creating repositories and issues
- Conditional requests
Keep learning with the next API guide Basics of Authentication!