
Configuring code scanning for a repository

You can configure code scanning for a repository to find security vulnerabilities in your code.

Who can use this feature

People with admin permissions to a repository, or the security manager role for the repository, can configure code scanning for that repository. People with write permissions to a repository can also configure code scanning, but only by creating a workflow file or manually uploading a SARIF file.

Code scanning is available for all public repositories on GitHub.com. Code scanning is also available for private repositories owned by organizations that use GitHub Enterprise Cloud and have a license for GitHub Advanced Security. For more information, see "About GitHub Advanced Security."

Options for configuring code scanning

You decide how to generate code scanning alerts, and which tools to use, at a repository level. GitHub provides fully integrated support for CodeQL analysis, and also supports analysis using third-party tools. For more information, see the following bullets and "About code scanning."

If you run code scanning using multiple configurations, the same alert will sometimes be generated by more than one configuration. If an alert comes from multiple configurations, you can view the status of the alert for each configuration on the alert page. For more information, see "About code scanning alerts."

The tool status page shows useful information about all of your code scanning tools. If code scanning is not working as you'd expect, the tool status page is a good starting point for debugging problems. For more information, see "About the tool status page for code scanning."

Configuring code scanning automatically

The default setup for code scanning will automatically configure code scanning with the best settings for your repository. Default setup uses GitHub Actions to run CodeQL analysis without requiring you to commit a workflow file to your repository.

Your repository is eligible for default setup if it uses GitHub Actions and contains only the following CodeQL-supported languages: Go, JavaScript/TypeScript, Python, or Ruby. While you can use default setup if your repository includes languages that aren't supported by CodeQL, such as R, you must use the advanced setup if you include CodeQL-supported languages other than those previously listed. For more information on CodeQL-supported languages, see "About code scanning with CodeQL." For information on bulk enablement, see "Configuring code scanning at scale using CodeQL."

Enabling default setup is the quickest way to configure code scanning for your repository. Additionally, default setup requires none of the maintenance necessary with a CodeQL workflow file. Before you enable default setup, you'll see the languages it will analyze, the query suites it will run, and the events that will trigger a new scan.

Try default setup if you don't need to run extra queries, change the scan schedule, or scan a language that is currently unsupported by default setup.

  1. On GitHub.com, navigate to the main page of the repository.

  2. Under your repository name, click Settings. If you cannot see the "Settings" tab, select the dropdown menu, then click Settings.

    Screenshot of a repository header showing the tabs. The "Settings" tab is highlighted by a dark orange outline.

  3. In the "Security" section of the sidebar, click Code security and analysis.

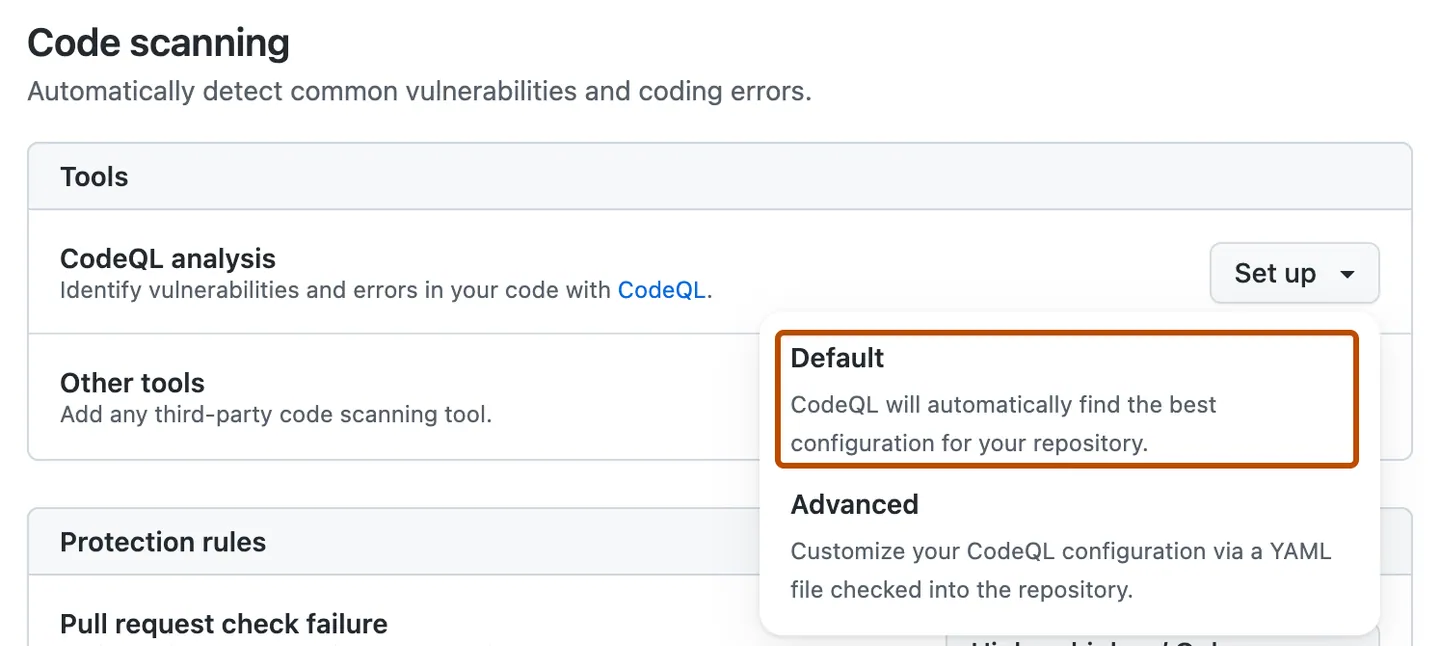
  4. In the "Code scanning" section, select Set up , then click Default.
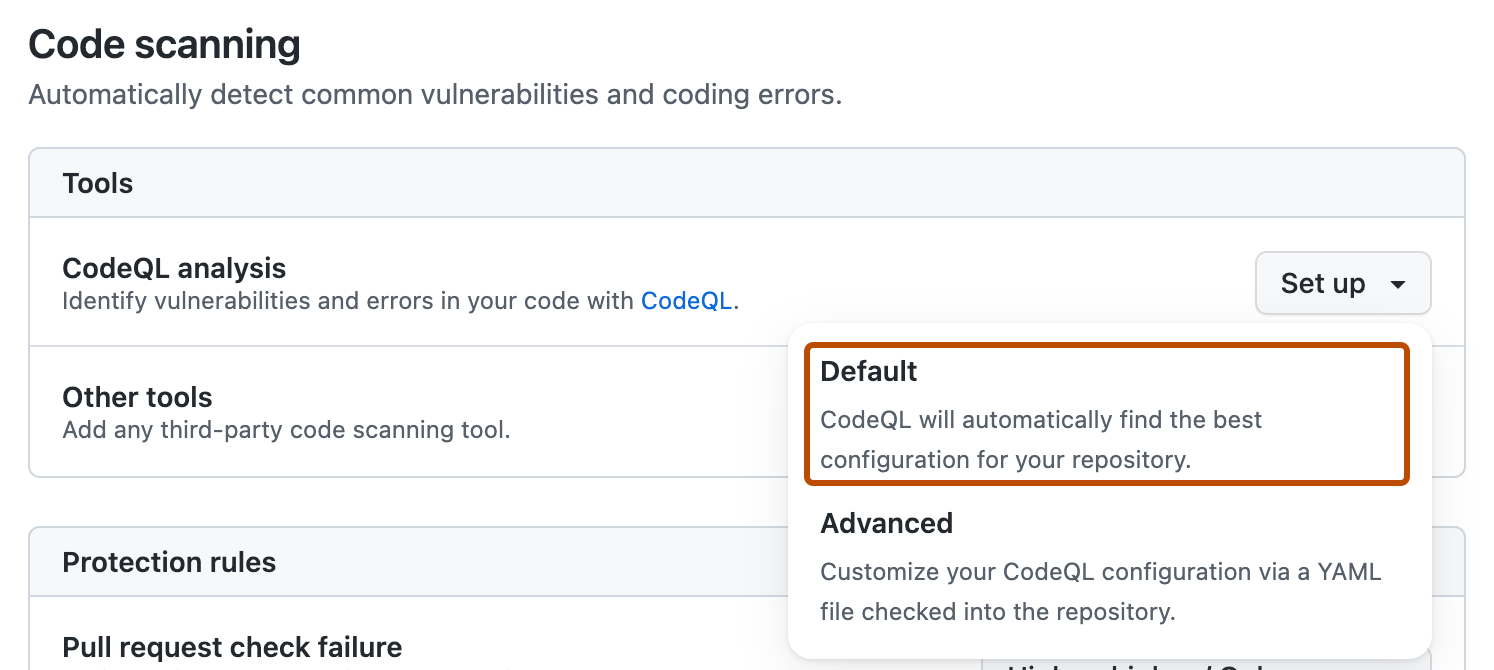
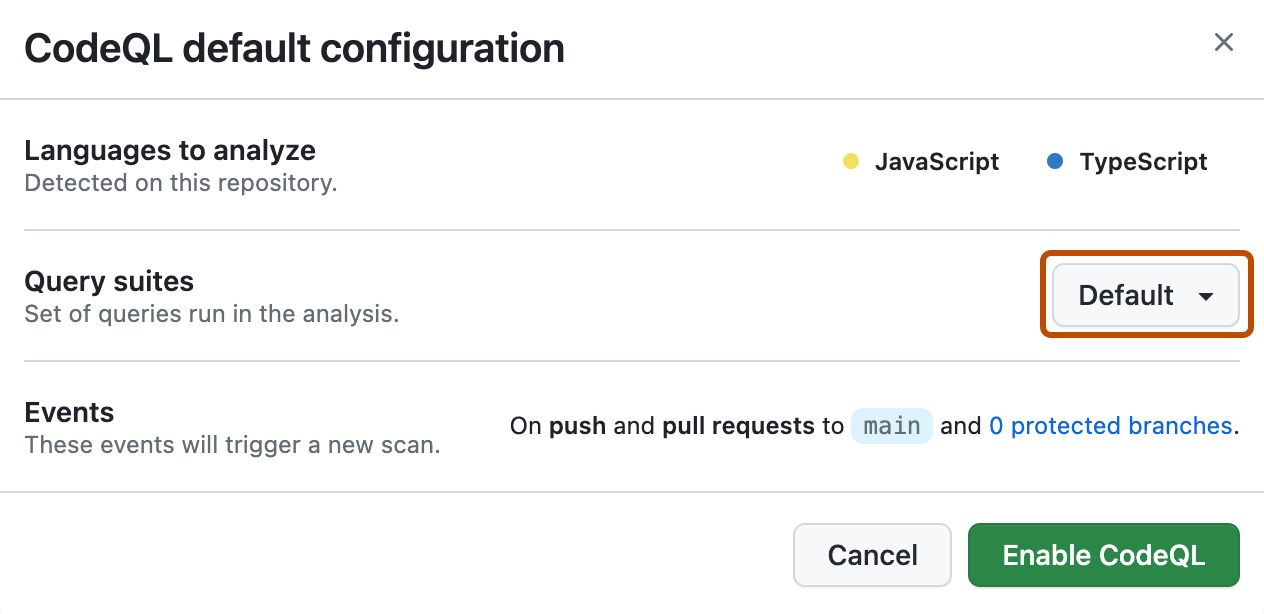
    Screenshot of the "Code scanning" section of "Code security and analysis" settings. The "Default setup" button is highlighted with an orange outline.

  5. Optionally, in the "Query suites" section of the "CodeQL default configuration" modal dialog, select the Default dropdown menu, then click the CodeQL query suite you would like to use.

    Screenshot of the default setup modal for code scanning. A button labeled "Default", with an arrow indicating a dropdown menu, is outlined in dark orange.

    If you choose the Extended query suite, your code scanning configuration will run lower severity and precision queries in addition to the queries included in the Default query suite.

    Note: If you configure code scanning to use the Extended query suite, you may experience a higher rate of false positive alerts.

  6. Review the settings for the default setup on your repository, then click Enable CodeQL.

    Notes:

    • The CodeQL default configuration window displays the details of the default setup, including the languages to analyze, the query suites to run, and the events that trigger a new scan. If you would like to change which events will trigger a new scan or customize other code scanning features, you need to use the advanced setup. For more information, see "Configuring code scanning for a repository."
    • If you are switching to the default setup from the advanced setup, you will see a warning informing you that the default setup will override existing configurations. CodeQL default setup will disable the existing workflow file, and block any CodeQL analysis API uploads.
    • If you would like to see your default CodeQL setup after configuration, select , then click View CodeQL configuration.

Creating an advanced setup

The advanced setup for code scanning is helpful when you need to customize your code scanning. By creating and editing a workflow file, you can choose which queries to run, change the scan schedule, scan any CodeQL-supported language, use a matrix build, and more.

Configuring code scanning using starter workflows

Note: Starter workflows for Advanced Security have been consolidated in a "Security" category in the Actions tab of a repository. This new configuration is currently in beta and subject to change.

GitHub provides starter workflows for security features such as code scanning. You can use these suggested workflows to construct your code scanning workflows, instead of starting from scratch. Code scanning starter workflows are only available for your repository if code scanning is enabled.

Using actions to run code scanning will use minutes. For more information, see "About billing for GitHub Actions."

  1. On GitHub.com, navigate to the main page of the repository.
  2. Under your repository name, click Actions. Actions tab in the main repository navigation
  3. If the repository has already at least one workflow configured and running, click New workflow to display starter workflows. If there are currently no workflows configured for the repository, go to the next step. Screenshot of the Actions tab for a repository. The "New workflow" button is highlighted with an orange outline
  4. In the "Choose a workflow" or "Get started with GitHub Actions" view, scroll down to the "Security" category and click Configure under the workflow you want to configure. You may need to click View all to find the security workflow you want to configure. Screenshot of the Security category of starter workflows. The Configure button and "View all" link are highlighted with an orange outline.
  5. Follow any instructions in the workflow to customize it to your needs. For more general assistance about workflows, click Documentation on the right pane of the workflow page. Screenshot showing a starter workflow file open for editing. The "Documentation" button is highlighted with an orange outline. For more information, see "Using starter workflows" and "Customizing code scanning."

Configuring code scanning manually

You can customize your code scanning by creating and editing a workflow file. The advanced setup generates a basic workflow file for you to customize.

Using actions to run code scanning will use minutes. For more information, see "About billing for GitHub Actions."

Note: You can configure code scanning for any public repository where you have write access.

  1. On GitHub.com, navigate to the main page of the repository.

  2. Under your repository name, click Settings. If you cannot see the "Settings" tab, select the dropdown menu, then click Settings.

    Screenshot of a repository header showing the tabs. The "Settings" tab is highlighted by a dark orange outline.

  3. In the "Security" section of the sidebar, click Code security and analysis.

  4. Scroll down to the "Code scanning" section, select Set up , then click Advanced.

    Note: If you are switching to the advanced code scanning setup from the default setup, in the "Code scanning" section, select , then click Switch to advanced. In the pop-up window that appears, click Disable CodeQL.

    Screenshot of the "Code scanning" section of "Code security and analysis" settings. The "Advanced setup" button is highlighted with an orange outline.

  5. To customize how code scanning scans your code, edit the workflow.

    Generally, you can commit the CodeQL analysis workflow without making any changes to it. However, many of the third-party workflows require additional configuration, so read the comments in the workflow before committing.

    For more information, see "Customizing code scanning."

  6. Click Commit changes... to display the commit changes form.

    Screenshot of the form to create a new file. To the right of the file name, a green button, labeled "Commit changes...", is outlined in dark orange.

  7. In the commit message field, type a commit message.

  8. Choose whether you'd like to commit directly to the default branch, or create a new branch and start a pull request.

  9. Click Commit new file to commit the workflow file to the default branch or click Propose new file to commit the file to a new branch.

  10. If you created a new branch, click Create pull request and open a pull request to merge your change into the default branch.

In the suggested CodeQL analysis workflow, code scanning is configured to analyze your code each time you either push a change to the default branch or any protected branches, or raise a pull request against the default branch. As a result, code scanning will now commence.

The on:pull_request and on:push triggers for code scanning are each useful for different purposes. For more information, see "Customizing code scanning."

For information on bulk enablement, see "Configuring code scanning at scale using CodeQL."

Viewing the logging output from code scanning

After configuring code scanning for your repository, you can watch the output of the actions as they run.

  1. Under your repository name, click Actions. Actions tab in the main repository navigation

    You'll see a list that includes an entry for running the code scanning workflow. The text of the entry is the title you gave your commit message.

    Actions list showing code scanning workflow

  2. Click the entry for the run of the code scanning workflow.

  3. Click the job name on the left. For example, Analyze (LANGUAGE).

    Log output from the code scanning workflow

  4. Review the logging output from the actions in this workflow as they run.

  5. Once all jobs are complete, you can view the details of any code scanning alerts that were identified. For more information, see "Managing code scanning alerts for your repository."

Understanding the pull request checks

Each code scanning workflow you set to run on pull requests always has at least two entries listed in the checks section of a pull request. There is one entry for each of the analysis jobs in the workflow, and a final one for the results of the analysis.

The names of the code scanning analysis checks take the form: "TOOL NAME / JOB NAME (TRIGGER)." For example, for CodeQL, analysis of C++ code has the entry "CodeQL / Analyze (cpp) (pull_request)." You can click Details on a code scanning analysis entry to see logging data. This allows you to debug a problem if the analysis job failed. For example, for code scanning analysis of compiled languages, this can happen if the action can't build the code.

Screenshot showing an example of code scanning pull request checks. Failure of CodeQL analysis for C++ is shown with a red cross.

When the code scanning jobs complete, GitHub works out whether any alerts were added by the pull request and adds the "Code scanning results / TOOL NAME" entry to the list of checks. After code scanning has been performed at least once, you can click Details to view the results of the analysis.

Next steps

After configuring code scanning, and allowing its actions to complete, you can: