关于工作流程
工作流是一个可配置的自动化过程,它将运行一个或多个作业。 工作流程由签入到存储库的 YAML 文件定义,并在存储库中的事件触发时运行,也可以手动触发,或按定义的时间表触发。
工作流在仓库的 .github/workflows 目录中定义。 一个仓库可以有多个工作流,每个工作流都可以执行一组不同的任务,例如:
- 构建和测试拉取请求
- 在每次创建发布时,部署应用程序
- 每当创建新提议时,添加标签
工作流基础知识
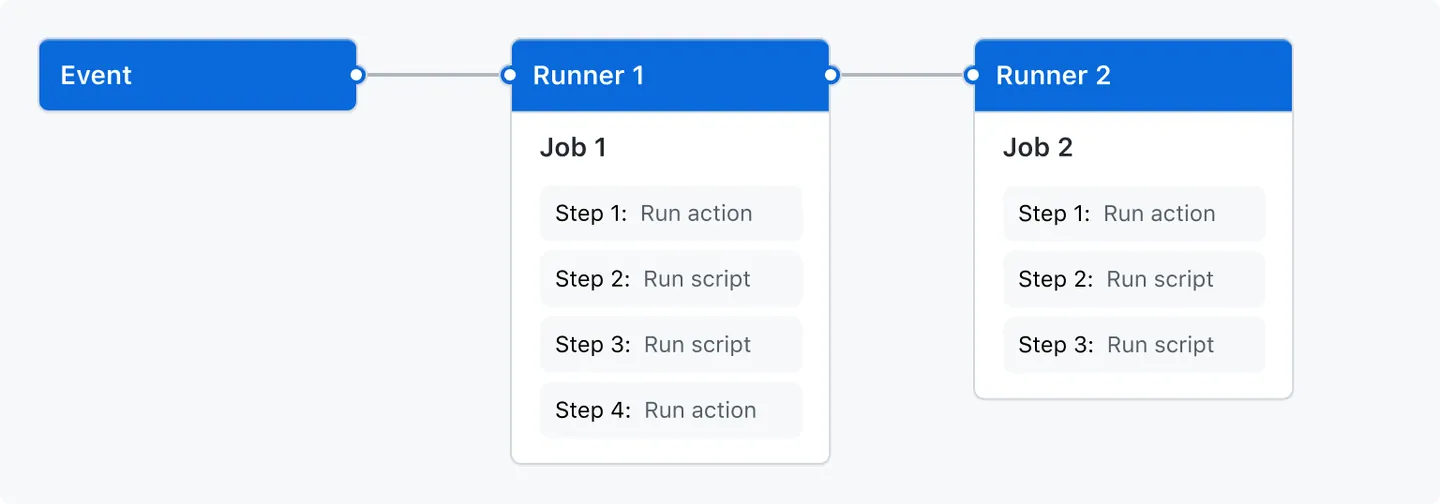
工作流必须包含以下基本组件:
- 一个或多个将触发工作流的事件。
- 一个或多个作业,每个作业都将在运行器计算机上执行,并运行一系列(一个或多个)步骤 。
- 每个步骤都可以运行你定义的脚本或运行操作,这是一个可简化工作流的可重用扩展。
有关这些基本组件的详细信息,请参阅“了解 GitHub Actions”。
触发工作流程
工作流程触发器是导致工作流程运行的事件。 这些事件可以是:
- 工作流程存储库中发生的事件
- 在 GitHub 外部发生并在 GitHub 上触发
repository_dispatch事件的事件 - 预定时间
- 手动
例如,您可以将工作流程配置为在推送到存储库的默认分支、创建发行版或打开议题时运行。
有关详细信息,请参阅“触发工作流程”;有关事件的完整列表,请参阅“触发工作流的事件”。
工作流程语法
工作流是使用 YAML 定义的。 有关用于创作工作流的 YAML 语法的完整参考,请参阅“GitHub Actions 的工作流语法”。
有关管理工作流运行(例如重新运行、取消或删除工作流运行)的详细信息,请参阅“管理工作流运行和部署”。
使用工作流模板
GitHub 提供预配置的工作流模板,可以按原样使用或自定义它来创建自己的工作流。 GitHub 分析代码并显示可能对仓库有用的工作流模板。 例如,如果仓库包含 Node.js 代码,您就会看到 Node.js 项目的建议。
这些工作流模板旨在帮助你快速启动和运行,提供了一系列配置,例如:
使用这些工作流作为构建自定义工作流的起点或按原样使用它们。 可以在 actions/starter-workflows 存储库中浏览工作流模板的完整列表。 有关详细信息,请参阅“使用工作流模板”。
高级工作流程功能
本部分简要介绍了 GitHub Actions 的一些高级功能,可帮助你创建更复杂的工作流。
存储机密
如果你的工作流使用密码或证书等敏感数据,你可以将这些数据作为机密保存在 GitHub 中,然后在工作流中将它们用作环境变量。 这意味着你将能够创建和共享工作流,而无需直接在工作流的 YAML 源中嵌入敏感值。
此示例作业演示如何将现有机密引用为环境变量,并将其作为参数发送到示例命令。
jobs:
  example-job:
    runs-on: ubuntu-latest
    steps:
      - name: Retrieve secret
        env:
          super_secret: ${{ secrets.SUPERSECRET }}
        run: |
          example-command "$super_secret"
有关详细信息,请参阅“在 GitHub Actions 中使用机密”。
创建依赖的作业
默认情况下,工作流程中的作业同时并行运行。 如果你有一个作业只能在另一个作业完成后运行,则可以使用 needs 关键字来创建此依赖项。 如果其中一个作业失败,则跳过所有从属作业;但如果需要作业继续运行,可以使用 if 条件语句来定义。
在此示例中,setup、build 和 test 作业连续运行,其中 build 和 test 取决于其前面的作业是否成功完成:
jobs:
  setup:
    runs-on: ubuntu-latest
    steps:
      - run: ./setup_server.sh
  build:
    needs: setup
    runs-on: ubuntu-latest
    steps:
      - run: ./build_server.sh
  test:
    needs: build
    runs-on: ubuntu-latest
    steps:
      - run: ./test_server.sh
有关详细信息,请参阅“在工作流程中使用作业”。
使用矩阵
使用矩阵策略,可以在单个作业定义中使用变量自动创建基于变量组合的多个作业运行。 例如,可以使用矩阵策略在某个语言的多个版本或多个操作系统上测试代码。 矩阵是使用 strategy 关键字创建的,该关键字接收生成选项作为数组。 例如,此矩阵将使用不同版本的 Node.js 多次运行作业:
jobs:
  build:
    runs-on: ubuntu-latest
    strategy:
      matrix:
        node: [14, 16]
    steps:
      - uses: actions/setup-node@v4
        with:
          node-version: ${{ matrix.node }}
有关详细信息,请参阅“在工作流中运行作业的变体”。
缓存依赖项
如果你的作业定期重用依赖项,你可以考虑缓存这些文件以帮助提高性能。 缓存一旦创建,就可用于同一仓库中的所有工作流程。
此示例演示如何缓存 ~/.npm 目录:
jobs:
  example-job:
    steps:
      - name: Cache node modules
        uses: actions/cache@v4
        env:
          cache-name: cache-node-modules
        with:
          path: ~/.npm
          key: ${{ runner.os }}-build-${{ env.cache-name }}-${{ hashFiles('**/package-lock.json') }}
          restore-keys: |
            ${{ runner.os }}-build-${{ env.cache-name }}-
有关详细信息,请参阅“缓存依赖项以加快工作流程”。
使用数据库和服务容器
如果作业需要数据库或缓存服务,可以使用 services 关键字创建临时容器来托管服务;生成的容器随后可用于该作业中的所有步骤,并在作业完成后删除。 此示例演示作业如何使用 services 创建 postgres 容器,然后使用 node 连接到服务。
jobs:
  container-job:
    runs-on: ubuntu-latest
    container: node:20-bookworm-slim
    services:
      postgres:
        image: postgres
    steps:
      - name: Check out repository code
        uses: actions/checkout@v4
      - name: Install dependencies
        run: npm ci
      - name: Connect to PostgreSQL
        run: node client.js
        env:
          POSTGRES_HOST: postgres
          POSTGRES_PORT: 5432
有关详细信息,请参阅“使用容器化服务”。
使用标签路由工作流程
如果要确保特定类型的运行器处理作业,可以使用标签来控制作业的执行位置。 除了默认标签 self-hosted 之外,还可以为自托管运行器分配其他标签。 然后,可以在 YAML 工作流中引用这些标签,确保作业以可预测的方式路由。 GitHub 托管运行器已获分配了预定义的标签。
此示例显示工作流程如何使用标签来指定所需的运行器:
jobs:
  example-job:
    runs-on: [self-hosted, linux, x64, gpu]
工作流只能在所有标签处于 runs-on 数组中的运行器上运行。 作业将优先转到具有指定标签的空闲自托管运行器。 如果没有可用且具有指定标签的 GitHub 托管的运行器,作业将转到 GitHub 托管的运行器。
若要详细了解自托管运行程序标签,请参阅“将标签与自托管运行程序结合使用”。
若要详细了解 GitHub 托管运行程序标签,请参阅“使用 GitHub 托管的运行器”。
重新使用工作流
可调用一个工作流,可以公开或私下与组织共享工作流。 这样便可重用工作流,避免重复并使工作流更易于维护。 有关详细信息,请参阅“重新使用工作流”。
工作流的安全强化
GitHub 提供了可用于提高工作流安全性的安全功能。 可以使用 GitHub 的内置功能来确保收到有关所用操作中的漏洞的通知,或自动执行使工作流中的操作保持最新状态的过程。 有关详细信息,请参阅“使用 GitHub 的安全功能来保护 GitHub Actions 的使用”。
使用环境
可以使用保护规则和机密配置环境,以控制工作流中作业的执行。 工作流程中的每个作业都可以引用单个环境。 在将引用环境的作业发送到运行器之前,必须通过为环境配置的任何保护规则。 有关详细信息,请参阅“管理部署环境”。