참고 항목
GitHub 호스트 실행기는 현재 GitHub Enterprise Server에서 지원되지 않습니다. GitHub public roadmap에 예정된 향후 지원에 대해 자세히 알아볼 수 있습니다.
Introduction
GitHub Actions는 빌드, 테스트 및 배포 파이프라인을 자동화할 수 있는 CI/CD(연속 통합 및 지속적인 업데이트) 플랫폼입니다. You can create workflows that run tests whenever you push a change to your repository, or that deploy merged pull requests to production.
This quickstart guide shows you how to use the user interface of GitHub to add a workflow that demonstrates some of the essential features of GitHub Actions.
미리 구성된 워크플로를 시작하려면 actions/starter-workflows 리포지토리의 템플릿 목록을 탐색합니다. 자세한 내용은 워크플로 템플릿 사용을(를) 참조하세요.
For an overview of GitHub Actions workflows, see 워크플로 정보. If you want to learn about the various components that make up GitHub Actions, see Understanding GitHub Actions.
Using workflow templates
GitHub는 미리 구성된 워크플로 템플릿을 제공하며, 이를 그대로 사용하거나 사용자 지정하여 자신만의 워크플로를 만들 수 있습니다. GitHub는 코드를 분석하여 리포지토리에 유용할 수 있는 워크플로 템플릿을 보여줍니다. 예를 들어 리포지토리에 Node.js 코드가 포함된 경우 Node.js 프로젝트에 대한 제안이 표시됩니다.
이러한 워크플로 템플릿은 빠르게 시작하고 실행할 수 있도록 설계되어 다음과 같은 다양한 구성을 제공합니다.
- CI: 연속 통합 워크플로
- 배포: 배포 워크플로
- 자동화: 워크플로 자동화
- 코드 검사: 코드 검사 워크플로
- 페이지: 페이지 워크플로
워크플로 템플릿을 시작 위치로 사용하여 사용자 지정 워크플로를 빌드하거나 있는 그대로 사용할 수 있습니다. actions/starter-workflows 리포지토리에서 워크플로 템플릿의 전체 목록을 찾아볼 수 있습니다.
Prerequisites
This guide assumes that:
-
You have at least a basic knowledge of how to use GitHub. If you don't, you'll find it helpful to read some of the articles in the documentation for repositories and pull requests first. For example, see 리포지토리에 대한 빠른 시작, 분기 정보, and 끌어오기 요청 정보.
-
You have a repository on GitHub where you can add files.
-
You have access to GitHub Actions.
참고 항목
If the Actions tab is not displayed under the name of your repository on GitHub, it may be because Actions is disabled for the repository. For more information, see 리포지토리에 대한 GitHub Actions 설정 관리.
Creating your first workflow
-
In your repository on GitHub, create a workflow file called
github-actions-demo.ymlin the.github/workflowsdirectory. To do this:-
If the
.github/workflowsdirectory already exists, navigate to that directory on GitHub, click Add file, then click Create new file, and name the filegithub-actions-demo.yml. -
If your repository doesn't have a
.github/workflowsdirectory, go to the main page of the repository on GitHub, click Add file, then click Create new file, and name the file.github/workflows/github-actions-demo.yml. This creates the.githubandworkflowsdirectories and thegithub-actions-demo.ymlfile in a single step.
참고 항목
For GitHub to discover any GitHub Actions workflows in your repository, you must save the workflow files in a directory called
.github/workflows.You can give the workflow file any name you like, but you must use
.ymlor.yamlas the file name extension. YAML is a markup language that's commonly used for configuration files. -
-
Copy the following YAML contents into the
github-actions-demo.ymlfile:YAML name: GitHub Actions Demo run-name: ${{ github.actor }} is testing out GitHub Actions 🚀 on: [push] jobs: Explore-GitHub-Actions: runs-on: ubuntu-latest steps: - run: echo "🎉 The job was automatically triggered by a ${{ github.event_name }} event." - run: echo "🐧 This job is now running on a ${{ runner.os }} server hosted by GitHub!" - run: echo "🔎 The name of your branch is ${{ github.ref }} and your repository is ${{ github.repository }}." - name: Check out repository code uses: actions/checkout@v4 - run: echo "💡 The ${{ github.repository }} repository has been cloned to the runner." - run: echo "🖥️ The workflow is now ready to test your code on the runner." - name: List files in the repository run: | ls ${{ github.workspace }} - run: echo "🍏 This job's status is ${{ job.status }}."name: GitHub Actions Demo run-name: ${{ github.actor }} is testing out GitHub Actions 🚀 on: [push] jobs: Explore-GitHub-Actions: runs-on: ubuntu-latest steps: - run: echo "🎉 The job was automatically triggered by a ${{ github.event_name }} event." - run: echo "🐧 This job is now running on a ${{ runner.os }} server hosted by GitHub!" - run: echo "🔎 The name of your branch is ${{ github.ref }} and your repository is ${{ github.repository }}." - name: Check out repository code uses: actions/checkout@v4 - run: echo "💡 The ${{ github.repository }} repository has been cloned to the runner." - run: echo "🖥️ The workflow is now ready to test your code on the runner." - name: List files in the repository run: | ls ${{ github.workspace }} - run: echo "🍏 This job's status is ${{ job.status }}."At this stage you don't need to understand the details of this workflow. For now, you can just copy and paste the contents into the file. After completing this quickstart guide, you can learn about the syntax of workflow files in 워크플로 정보, and for an explanation of GitHub Actions contexts, such as
${{ github.actor }}and${{ github.event_name }}, see Contexts reference. -
Click Commit changes.
-
In the "Propose changes" dialog, select either the option to commit to the default branch or the option to create a new branch and start a pull request. Then click Commit changes or Propose changes.
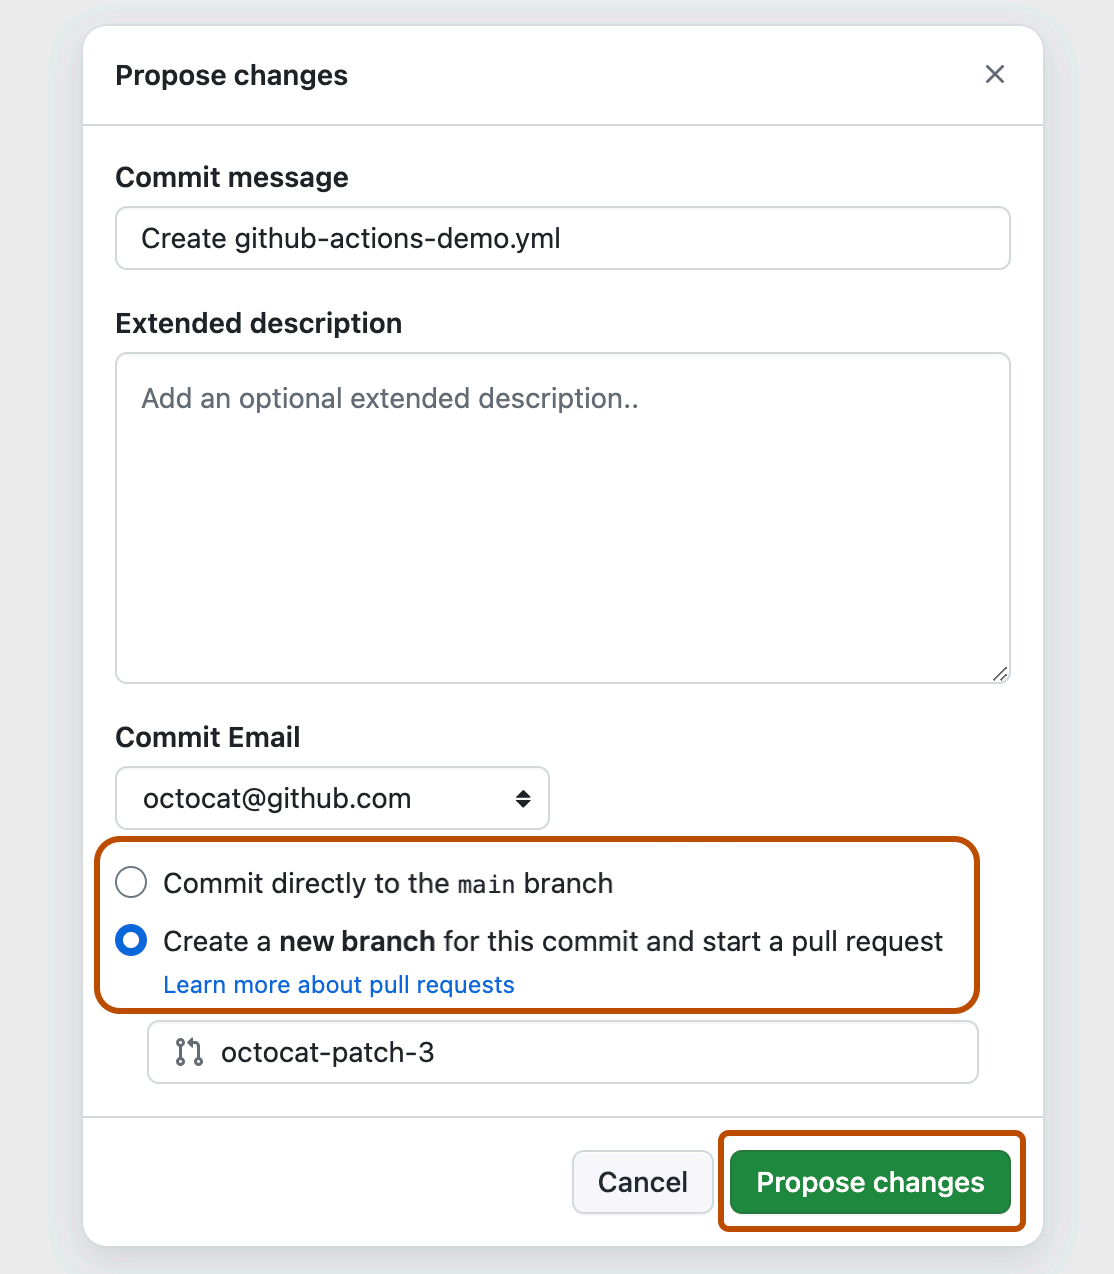

Committing the workflow file to a branch in your repository triggers the push event and runs your workflow.
If you chose to start a pull request, you can continue and create the pull request, but this is not necessary for the purposes of this quickstart because the commit has still been made to a branch and will trigger the new workflow.
Viewing your workflow results
-
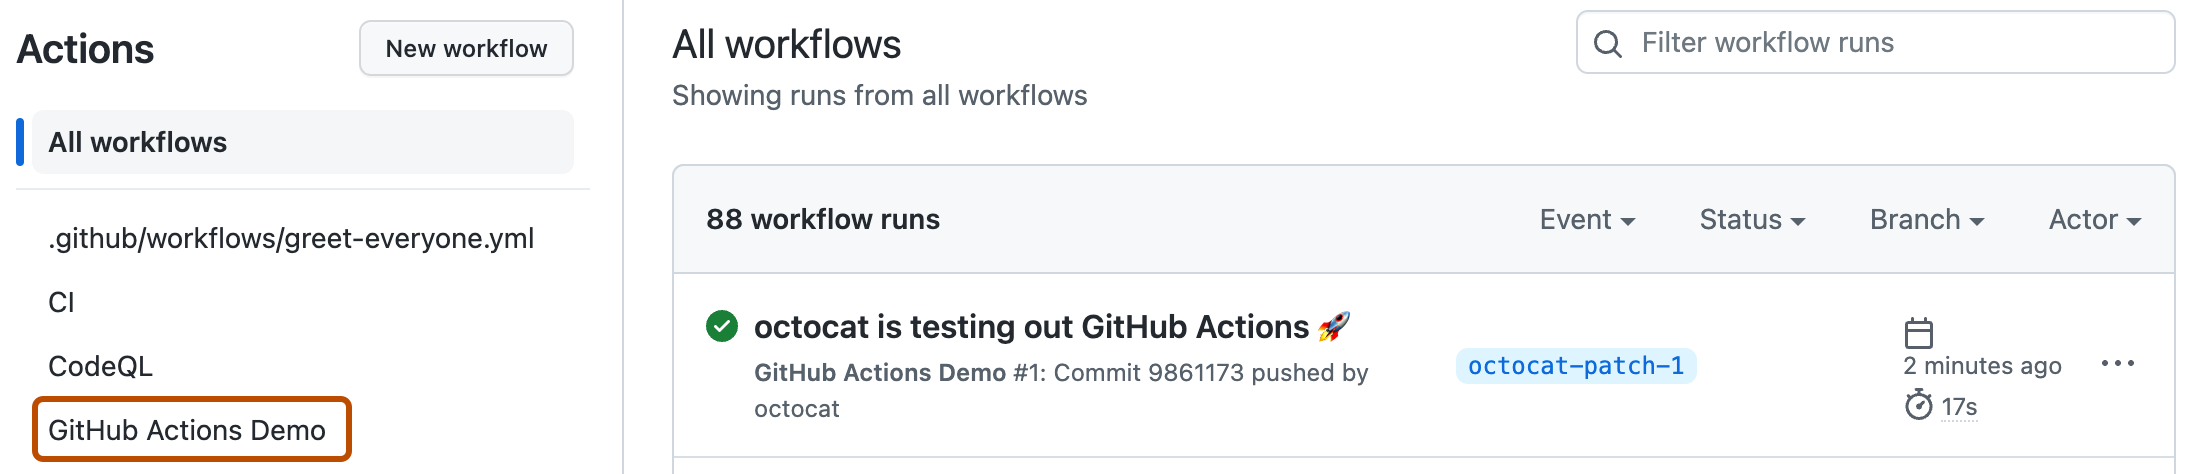
GitHub에서 리포지토리의 기본 페이지로 이동합니다.
-
리포지토리 이름 아래에서 작업을 클릭합니다.

-
In the left sidebar, click the workflow you want to display, in this example "GitHub Actions Demo."
-
From the list of workflow runs, click the name of the run you want to see, in this example "USERNAME is testing out GitHub Actions."
-
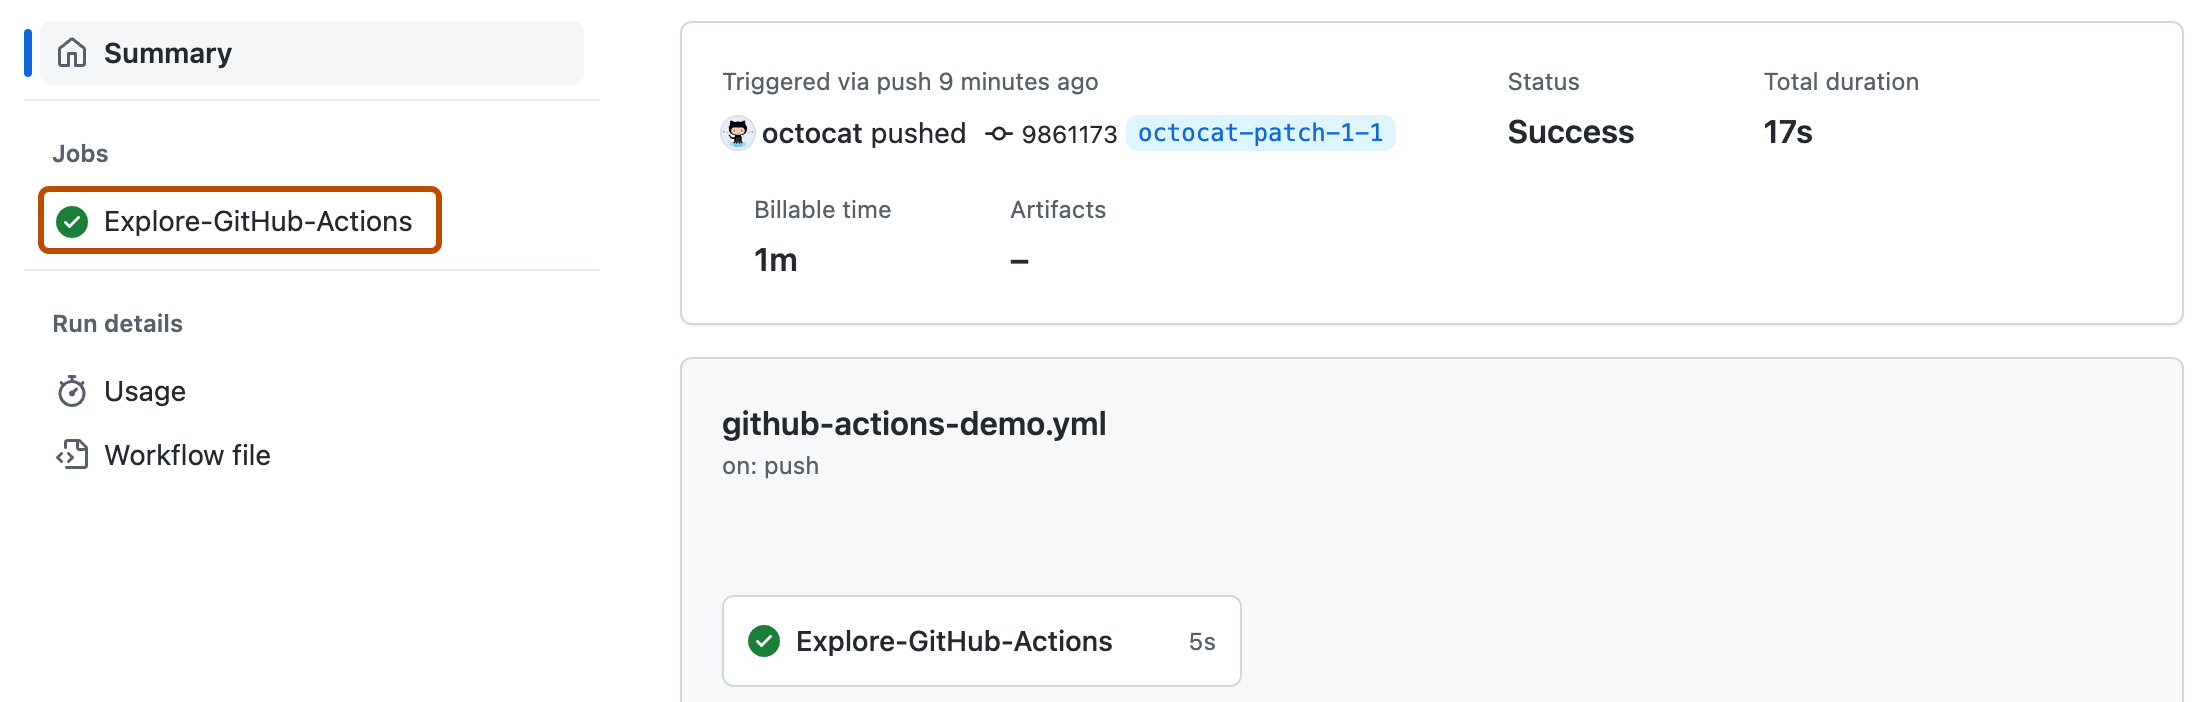
In the left sidebar of the workflow run page, under Jobs, click the Explore-GitHub-Actions job.
-
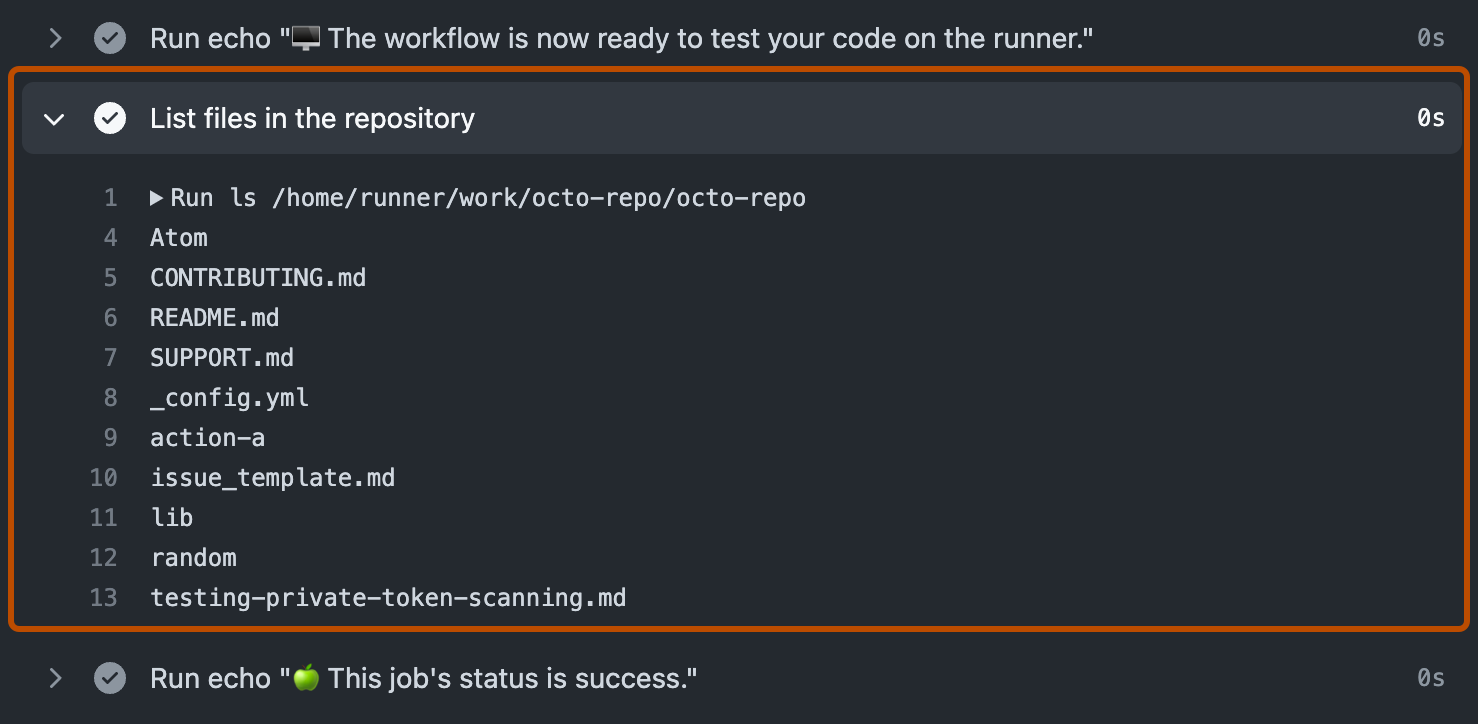
The log shows you how each of the steps was processed. Expand any of the steps to view its details.
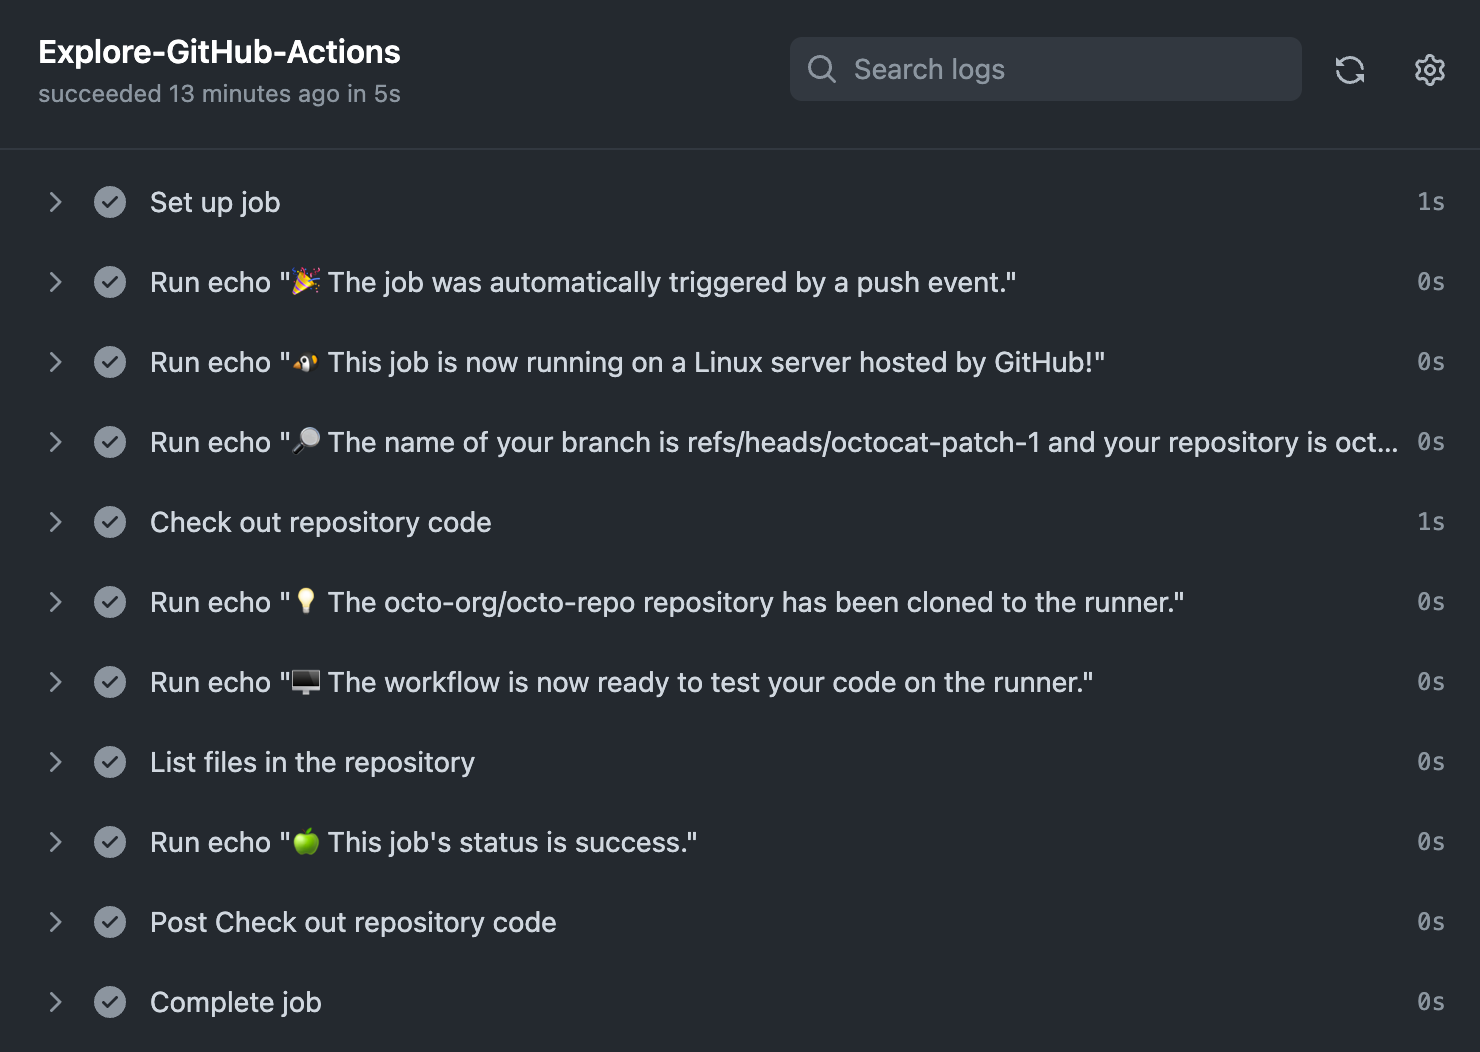
For example, you can see the list of files in your repository:


The example workflow you just added is triggered each time code is pushed to the branch, and shows you how GitHub Actions can work with the contents of your repository. For an in-depth tutorial, see Understanding GitHub Actions.
Next steps
GitHub Actions은(는) 애플리케이션 개발 프로세스의 거의 모든 측면을 자동화하는 데 도움이 될 수 있습니다. 시작할 준비가 되셨나요? GitHub Actions을(를) 사용하여 다음 단계를 수행하는 데 유용한 리소스는 다음과 같습니다.
- GitHub Actions 워크플로를 만드는 방법은 워크플로 템플릿 사용을(를) 참조하세요.
- CI(연속 통합) 워크플로는 Building and testing을(를) 참조하세요.
- 패키지를 빌드하고 게시하려면 패키지 게시을(를) 참조하세요.
- 프로젝트를 배포하려면 Managing deployments to third-party platforms을(를) 참조하세요.
- GitHub에서 작업 및 프로세스를 자동화하려면 프로젝트 관리을(를) 참조하세요.
- GitHub Actions의 더 복잡한 기능을 보여 주는 예제는 사용 사례 및 예제을(를) 참조하세요. 이러한 예제를 통해 실행기에서 코드를 테스트하고, GitHub CLI에 액세스하고, 동시성 및 테스트 매트릭스와 같은 고급 기능을 사용하는 방법을 볼 수 있습니다.