About self-hosted runners for GitHub Actions
GitHub Actions permet aux utilisateurs de votre instance GitHub Enterprise Server d'améliorer la productivité en automatisant chaque phase du workflow de développement logiciel. For more information, see "About GitHub Actions for enterprises."
With GitHub Actions, developers can write and combine individual tasks called actions to create custom workflows. To enable GitHub Actions for votre instance GitHub Enterprise Server, you must host at least one machine to execute jobs. This machine is called a self-hosted runner. Les exécuteurs auto-hébergés peuvent être physiques ou virtuels, et se trouver dans un conteneur, localement ou dans un cloud. Votre machine d’exécuteur se connecte à GitHub Enterprise Server à l’aide de l’application d’exécuteur autohébergé de GitHub Actions. Self-hosted runners can run Linux, Windows, or macOS. For more information, see "À propos des exécuteurs auto-hébergés."
This guide shows you how to apply a centralized management approach to self-hosted runners for GitHub Actions in your enterprise. In the guide, you'll complete the following tasks.
- Configure a limited policy to restrict the actions that can run within your enterprise
- Deploy a self-hosted runner for your enterprise
- Create a group to manage access to the runners available to your enterprise
- Optionally, further restrict the repositories that can use the runner
- Optionally, to build and scale self-hosted runners automatically, use Actions Runner Controller (ARC). For more information, see "À propos d’Actions Runner Controller."
You'll also find additional information about how to monitor and secure your self-hosted runners, how to access actions from GitHub.com, and how to customize the software on your runner machines.
After you finish the guide, users of votre instance GitHub Enterprise Server will be able to run workflow jobs from GitHub Actions on a self-hosted runner machine.
Prerequisites
-
GitHub Actions doit être activé pour GitHub Enterprise Server. Un administrateur de site peut activer et configurer GitHub Actions pour votre instance. Pour plus d’informations, consultez « Getting started with GitHub Actions for GitHub Enterprise Server ».
-
Vous devez avoir accès à la machine que vous allez utiliser en tant qu’exécuteur auto-hébergé dans votre environnement.
- La connexion entre exécuteurs auto-hébergés et GitHub Enterprise Server passe via HTTP (port 80) ou HTTPS (port 443). Pour garantir la connectivité via HTTPS, configurez le protocole TLS pour votre instance GitHub Enterprise Server. Pour plus d’informations, consultez « Configuring TLS ».
- Your enterprise must own at least one organization. For more information, see "À propos des organisations" and "Création d’une organisation à partir de zéro."
1. Configure policies for GitHub Actions
First, enable GitHub Actions for all organizations, and configure a policy to restrict the actions that can run on votre instance GitHub Enterprise Server. Optionally, organization owners can further restrict these policies for each organization.
-
Dans le coin supérieur droit de GitHub Enterprise Server, cliquez sur votre photo de profil, puis sur Paramètres d’entreprise.

-
Dans la barre latérale du compte d’entreprise, cliquez sur Stratégies.
-
Sous « Stratégies », cliquez sur Actions.
-
Under "Policies", select Enable for all organizations.
-
To enable local actions and actions created by GitHub, select Autoriser les actions sélectionnées, then select Allow actions created by GitHub.
-
Click Save.

You can configure additional policies to restrict the actions available to users of votre instance GitHub Enterprise Server. For more information, see "Enforcing policies for GitHub Actions in your enterprise."
2. Deploy the self-hosted runner for your enterprise
Next, add a self-hosted runner to your enterprise. GitHub Enterprise Server will guide you through installation of the necessary software on the runner machine. After you deploy the runner, you can verify connectivity between the runner machine and votre instance GitHub Enterprise Server.
Adding the self-hosted runner
-
Dans le coin supérieur droit de GitHub Enterprise Server, cliquez sur votre photo de profil, puis sur Paramètres d’entreprise.
-
Dans la barre latérale du compte d’entreprise, cliquez sur Stratégies.
-
Sous « Stratégies », cliquez sur Actions.
-
Cliquez sur l’onglet Exécuteurs.
-
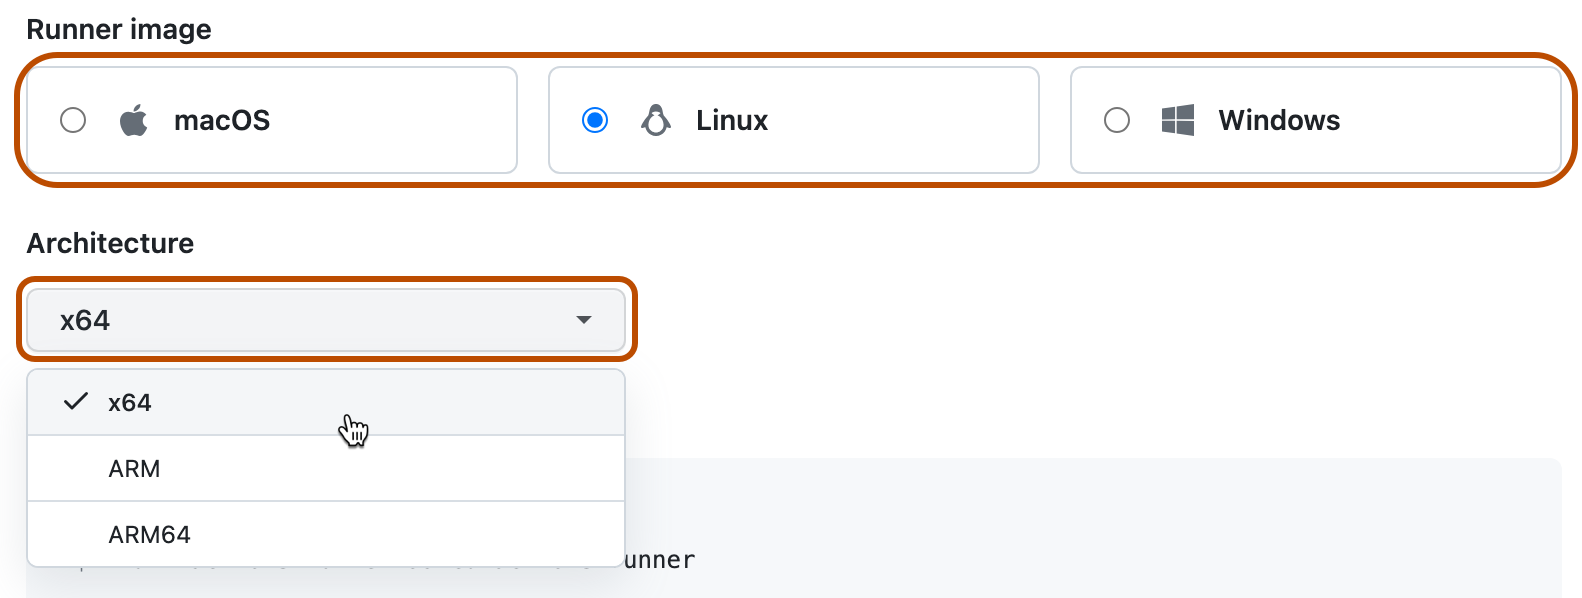
Cliquez sur Nouvel exécuteur. 1. Sélectionnez l’image et l’architecture du système d’exploitation de votre machine d’exécuteur auto-hébergée.
-
Des instructions vous montrent comment télécharger l’application d’exécuteur et l’installer sur votre machine d’exécuteur auto-hébergée.
Ouvrez un interpréteur de commandes sur votre machine d’exécuteur auto-hébergée et exécutez toutes les commandes shell dans l’ordre indiqué.
Remarque : Sur Windows, si vous souhaitez installer l’application d’exécuteur auto-hébergée en tant que service, vous devez ouvrir un interpréteur de commandes avec des privilèges d’administrateur. Nous vous recommandons également d’utiliser
C:\actions-runnercomme répertoire pour l’application de l’exécuteur auto-hébergé afin que les comptes système Windows puissent accéder au répertoire de l’exécuteur.Les instructions vous guident tout au long des tâches suivantes :
- Téléchargement et extraction de l’application d’exécuteur auto-hébergée.
- Exécution du script
configpour configurer l’application d’exécuteur auto-hébergée et l’inscrire auprès de GitHub Actions. L’URL de destination et un jeton limité dans le temps généré automatiquement sont nécessaires pour permettre au scriptconfigd’authentifier la demande.- Sur Windows, le script
configvous demande également si vous souhaitez installer l’application d’exécuteur auto-hébergée en tant que service. Pour Linux et macOS, vous pouvez installer un service une fois que vous avez terminé d’ajouter l’exécuteur. Pour plus d’informations, consultez « Configuration de l’application d’exécuteur auto-hébergé en tant que service ».
- Sur Windows, le script
- Exécution de l’application d’exécuteur auto-hébergée pour connecter la machine à GitHub Actions.

Vérification de la réussite de l’ajout de votre exécuteur autohébergé
Après avoir effectué les étapes pour ajouter un exécuteur autohébergé, l’exécuteur et son statut sont listés sous « Exécuteurs autohébergé ».
L’application de l’exécuteur autohébergée doit être active pour que l’exécuteur accepte les travaux. Quand l’application d’exécuteur est connectée à GitHub Enterprise Server et qu’elle est prête à recevoir des travaux, le message suivant s’affiche sur le terminal de la machine.
√ Connected to GitHub

2019-10-24 05:45:56Z: Listening for Jobs
3. Manage access to the self-hosted runner using a group
You can create a runner group to manage access to the runner that you added to your enterprise. You'll use the group to choose which organizations can execute jobs from GitHub Actions on the runner.
GitHub Enterprise Server adds all new runners to a group. Runners can be in one group at a time. By default, GitHub Enterprise Server adds new runners to the "Default" group.
-
Dans le coin supérieur droit de GitHub Enterprise Server, cliquez sur votre photo de profil, puis sur Paramètres d’entreprise.
-
Dans la barre latérale du compte d’entreprise, cliquez sur Stratégies.
-
Sous « Stratégies », cliquez sur Actions.
-
Cliquez sur l’onglet Groupes d’exécuteurs.
-
Cliquez sur Nouveau groupe d’exécuteurs.
-
Sous « Nom du groupe », tapez un nom pour votre groupe d’exécuteurs.
-
To choose a policy for organization access, under "Organization access", select the Organization access drop-down, and click Selected organizations.
-
To the right of the drop-down with the organization access policy, click .
-
Select the organizations you'd like to grant access to the runner group.
-
Optionally, to allow public repositories in the selected organizations to use runners in the group, select Allow public repositories.
Warning:
Nous vous recommandons d’utiliser uniquement des exécuteurs auto-hébergés avec des dépôts privés. En effet, les duplications (forks) de votre dépôt public peuvent exécuter du code potentiellement dangereux sur la machine de votre exécuteur auto-hébergé en créant une demande de tirage qui exécute le code dans un workflow.
For more information, see "À propos des exécuteurs auto-hébergés."
-
Cliquez sur Créer un groupe pour créer le groupe et appliquer la stratégie.
-
Click the "Runners" tab.
-
In the list of runners, click the runner that you deployed in the previous section.
-
Click Edit.
-
Click Runner groups .
-
In the list of runner groups, click the name of the group that you previously created.
-
Click Save to move the runner to the group.
You've now deployed a self-hosted runner that can run jobs from GitHub Actions within the organizations that you specified.
4. Further restrict access to the self-hosted runner
Optionally, organization owners can further restrict the access policy of the runner group that you created. For example, an organization owner could allow only certain repositories in the organization to use the runner group.
For more information, see "Gestion de l’accès aux exécuteurs auto-hébergés à l’aide de groupes."
5. Automatically scale your self-hosted runners
Optionally, you can use Actions Runner Controller (ARC) to automatically scale self-hosted runners. Actions Runner Controller (ARC) est un opérateur Kubernetes qui orchestre et met à l’échelle des exécuteurs auto-hébergés pour GitHub Actions. Pour plus d'informations, consultez Modèle d’opérateur dans la documentation de Kubernetes.
Avec ARC, vous pouvez créer des groupes identiques d’exécuteurs qui sont automatiquement mis à l’échelle en fonction du nombre de flux de travail en cours d’exécution dans votre référentiel, organisation ou entreprise. Étant donné que les exécuteurs contrôlés peuvent être éphémères et basés sur des conteneurs, les nouvelles instances de l’exécuteur peuvent effectuer un scale-up ou un scale-down rapide et propre. Pour plus d’informations sur la mise à l’échelle automatique, consultez « Mise à l’échelle automatique avec des exécuteurs auto-hébergés ».
Next steps
-
You can monitor self-hosted runners and troubleshoot common issues. For more information, see "Surveillance des exécuteurs auto-hébergés et résolution des problèmes."
-
GitHub recommends that you review security considerations for self-hosted runner machines. For more information, see "Durcissement de la sécurité pour GitHub Actions."
-
You can manually sync repositories on GitHub.com containing actions to your enterprise on GitHub Enterprise Server. Alternatively, you can allow members of your enterprise to automatically access actions from GitHub.com by using GitHub Connect. For more information, see the following.
-
You can customize the software available on your self-hosted runner machines, or configure your runners to run software similar to GitHub-hosted runners available for customers using GitHub.com. The software that powers runner machines for GitHub Actions is open source. For more information, see the
actions/runnerandactions/runner-imagesrepositories.