About your profile
Your profile page on GitHub is a place where people can find out more about you. You can use your profile to:
- Share your interests and skills.
- Showcase your projects and contributions.
- Express your identity and show the GitHub community who you are.
In this tutorial, you'll learn how to personalize your profile by adding a profile picture, bio, and a profile README.
You'll also learn the basics of Markdown syntax, which is what you'll use to format any writing you do on GitHub.
Prerequisites
- You must have a GitHub account. For more information, see "Creating an account on GitHub."
Adding a profile picture and bio
First, we'll add a picture to your profile. Your profile picture helps identify you across GitHub Enterprise Cloud.
Adding a profile picture
-
In the upper-right corner of any page, click your existing profile avatar, then, from the dropdown menu, click Settings.
-
Under "Profile Picture", select Edit, then click Upload a photo....

-
Select an image, then click Upload.
-
Crop your picture.
-
Click Set new profile picture.

Next, we'll add some basic information about yourself to share with other GitHub Enterprise Cloud users. This information will display below your profile picture on your profile page.
Adding a bio
-
On your profile page, under your profile picture, click Edit profile.
-
Under "Bio", write one or two sentences about yourself, such as who you are and what you do.
Note: Keep the bio short; we'll add a longer description of your interests in your profile README in the section below.
-
To add an emoji to your bio, visit "Emoji cheat sheet" and copy and paste an emoji into the "Bio" dialog box.
-
Optionally, add your preferred pronouns, workplace, location and timezone, and any links to your personal website and social accounts. Your pronouns will only be visible to users that are signed in to GitHub Enterprise Cloud.
-
Click Save.
Adding a profile README
Next, we'll create a special repository and README file that will be displayed directly on your profile page.
Your profile README contains information such as your interests, skills, and background, and it can be a great way to introduce yourself to other people on GitHub Enterprise Cloud and showcase your work.
As we learned in the "Hello World" tutorial, README.md files are written using Markdown syntax (note the .md file extension), which is just a way to format plain text.
In the following steps, we'll create and edit your profile README.
Step 1: Create a new repository for your profile README
-
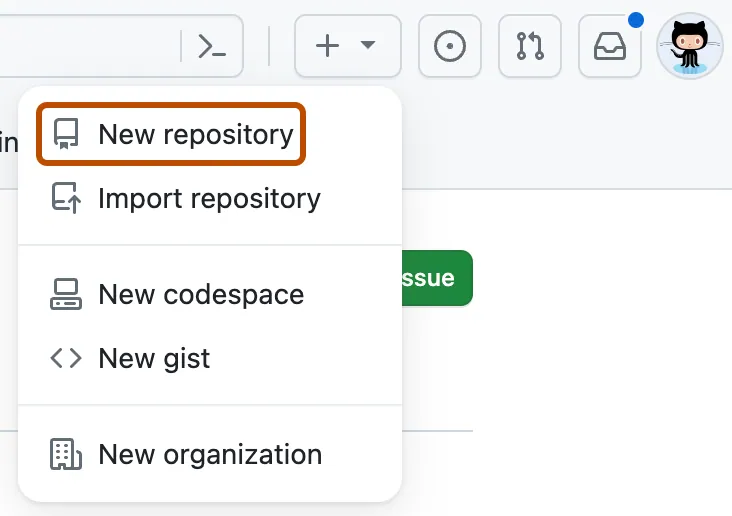
In the upper-right corner of any page, select , then click New repository.

-
Under "Repository name", type a repository name that matches your GitHub username. For example, if your username is "octocat", the repository name must be "octocat".
-
Optionally, in the "Description" field, type a description of your repository. For example, "My personal repository."
-
Select Public.
-
Select Initialize this repository with a README.
-
Click Create repository.
Step 2: Edit the README.md file
-
Click the next to your profile README.

-
In the "Edit" view, you'll see some pre-populated text to get you started. On line 1, delete the text that says
### Hi thereand type# About me.- In Markdown syntax,
###renders the plain text as a small ("third-level") heading, while##or#renders a second- and first-level heading respectively.
- In Markdown syntax,
-
Toggle to "Preview" to see how the plain text now renders. You should see the new text displayed as a much larger heading.
-
Toggle back to the "Edit" view.
-
Delete line 3 and line 16.
- This HTML syntax (e.g.
<!--) is keeping the other lines hidden when you toggle to "Preview".
- This HTML syntax (e.g.
-
Complete some of the prompts on lines 8 to 15, and delete any lines you don't want. For example, add your interests, skills, hobbies, or a fun fact about yourself.
-
Now, toggle to "Preview". You should see your completed prompts render as a bulleted list.
-
Toggle back to "Edit" and remove any other lines of text that you don't want displayed on your profile.
-
Keep customizing and editing your profile README.
- Use the "Emoji cheat sheet" to add emojis.
- Use the "Markdown cheat sheet to experiment with additional Markdown formatting.

Step 3: Publish your changes to your profile
- When you're happy with how your profile README looks in "Preview", and you're ready to publish it, click Commit changes...
- In the open dialog box, simply click again Commit changes.
- Navigate back to your profile page. You will see your new profile README displayed on your profile.
Next steps
- If you want to learn more Markdown syntax and add more sophisticated formatting to your profile README, see "Quickstart for writing on GitHub."
- Alternatively, try the GitHub Skills "Communicate using Markdown" course.
- In the next tutorial, "Finding inspiration on GitHub," we'll look at ways you can explore GitHub Enterprise Cloud to find projects and people that interest you.