Prerequisites
- Access to GitHub Copilot. See "GitHub Copilot."
- Latest version of Visual Studio Code. See the Visual Studio Code download page.
- GitHub Copilot Chat extension. This is automatically installed when you install the GitHub Copilot extension. See the GitHub Copilot extension in the Visual Studio Marketplace.
- Sign in to GitHub in Visual Studio Code. If you experience authentication issues, see "Dépannage des problèmes avec le Chat GitHub Copilot dans les IDE."
If you have access to GitHub Copilot via your organization or enterprise, you cannot use GitHub Copilot Chat if your organization owner or enterprise administrator has disabled GitHub Copilot Chat. See "Gestion des stratégies et caractéristiques pour Copilot dans votre organisation."
Submitting prompts
You can ask Copilot Chat to give code suggestions, explain code, generate unit tests, and suggest code fixes.
-
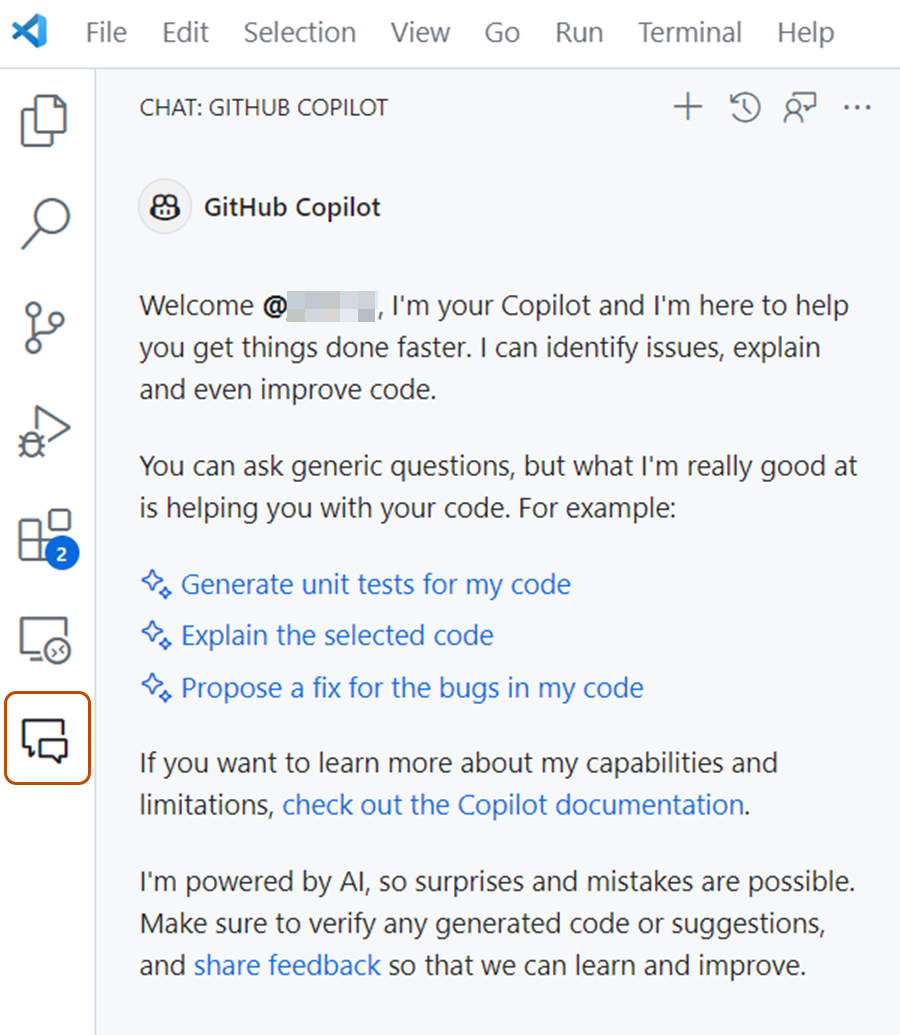
Open the chat view by clicking the chat icon in the activity bar or by entering Control+Command+i (Mac) / Ctrl+Alt+i (Windows/Linux).
Tip
For additional ways to access Copilot Chat, including inline with your code, see Additional ways to access Copilot Chat below.
-
Enter a prompt in the prompt box, or click one of the suggested prompts. For example prompts, see "Example prompts" below.
-
Evaluate Copilot's response, and make a follow up request if needed.
The response may contain text, code blocks, buttons, images, URIs, and file trees. The response often includes interactive elements. For example, the response may include a menu to insert a code block, or a button to invoke a Visual Studio Code command.
Using keywords in your prompt
You can use special keywords to help Copilot understand your prompt.
Chat participants
Use chat participants to scope your prompt to a specific domain. To use a chat participant, type @ in the chat prompt box, followed by a chat participant name. Chat participants include:
@workspace: Has context about the code in your workspace. Use@workspacewhen you want Copilot to consider the structure of your project, how different parts of your code interact, or design patterns in your project.@vscode: Has context about Visual Studio Code commands and features. Use@vscodewhen you want help with Visual Studio Code.@terminal: Has context about the Visual Studio Code terminal shell and its contents. Use@terminalwhen you want help creating or debugging terminal commands.
To see all available chat participants, type @ in the chat prompt box. See also Chat participants in the Visual Studio Code documentation.
Slash commands
Use slash commands to avoid writing complex prompts for common scenarios. To use a slash command, type / in the chat prompt box, followed by a command. Slash commands include:
/tests: Generate unit tests for the selected code/fix: Propose a fix for problems in the selected code/explain: Explain the selected code/clear: Start a new chat
To see all available slash commands, type / in the chat prompt box. See also Slash commands in the Visual Studio Code documentation.
Chat variables
Use chat variables to include specific context in your prompt. To use a chat variable, type # in the chat prompt box, followed by a chat variable. Chat variables include:
#file: Include a specific file as context in the chat.#git: Include information about the current Git repository.#terminalLastCommand: Include the last run command in the active Visual Studio Code terminal.
To see all available chat variables, type # in the chat prompt box. See also Chat variables in the Visual Studio Code documentation.
Example prompts
You can ask Copilot Chat specific questions about your project or general software questions. You can also ask Copilot Chat to write code, fix errors, write tests, and document code.
Ask general software questions
You can ask Copilot Chat general software questions. For example:
tell me about nodejs web server frameworkshow to create an express app@terminal how to update an npm package(uses the @terminal chat participant)
Ask questions about your project
You can ask Copilot Chat questions about your project.
what sorting algorithm does this function use@workspace how are notifications scheduled#file:gameReducer.js #file:gameInit.js how are these files related
To give Copilot the correct context, try some of these strategies:
- Highlight relevant lines of code
- Use chat variables like
#selection,#file,#editor,#codebase, or#git - Use the
@workspacechat participant
Write code
You can ask Copilot to write code for you. For example:
write a function to sum all numbers in a listadd error handling to this function@workspace add form validation, similar to the newsletter page
When Copilot returns a code block, the response includes options to copy the code, or to insert the code at your cursor, into a new file, or into the terminal.
Set up a new project
Use the /new slash command to set up a new project. For example:
/new react app with typescript/new python django web application/new node.js express server
Copilot will suggest a directory structure and provide a button to create the suggested files and contents. To preview a suggested file, select the file name in the suggested directory structure.
Use the /newNotebook slash command to set up a new Jupyter notebook. For example:
/newNotebook retrieve the titanic dataset and use Seaborn to plot the data
Fix, improve, and refactor code
If your active file contains an error, use the /fix slash command to ask Copilot to fix the error.
You can also make general requests to improve or refactor your code.
how would you improve this code?translate this code to C#add error handling to this function
Write tests
Use the /tests slash command to ask Copilot to write tests for the active file or selected code. For example:
/tests/tests using the Jest framework/tests ensure the function rejects an empty list
The /tests slash command writes tests for existing code. If you prefer to write tests before writing code (test driven development), omit the /tests command. For example:
Add tests for a JavaScript function that should sum a list of integers
Ask questions about Visual Studio Code
Use the @vscode chat participant to ask specific questions about Visual Studio Code. For example:
@vscode how to debug a node.js app@vscode how do I change my Visual Studio Code colors@vscode how to change key bindings
Ask questions about the command line
Use the @terminal chat participant to ask specific questions about the command line. For example:
@terminal find the largest file in the src directory@terminal #terminalLastCommandto explain the last command and any errors
Additional ways to access Copilot Chat
In addition to submitting prompts through the chat view, you can submit prompts in other ways:
- Inline: To start an inline chat directly in the editor or integrated terminal, enter Command+i (Mac) / Ctrl+i (Windows/Linux).
- Quick chat: To open the quick chat dropdown, enter Shift+Command+i (Mac) / Shift+Ctrl+i (Windows/Linux)
- Smart actions: To submit prompts via the context menu, right click in your editor, select Copilot in the menu that appears, then select one of the actions. Smart actions can also be accessed via the sparkle icon that sometimes appears when you select a line of code.
See inline chat, quick chat, and chat smart actions in the Visual Studio Code documentation for more details.
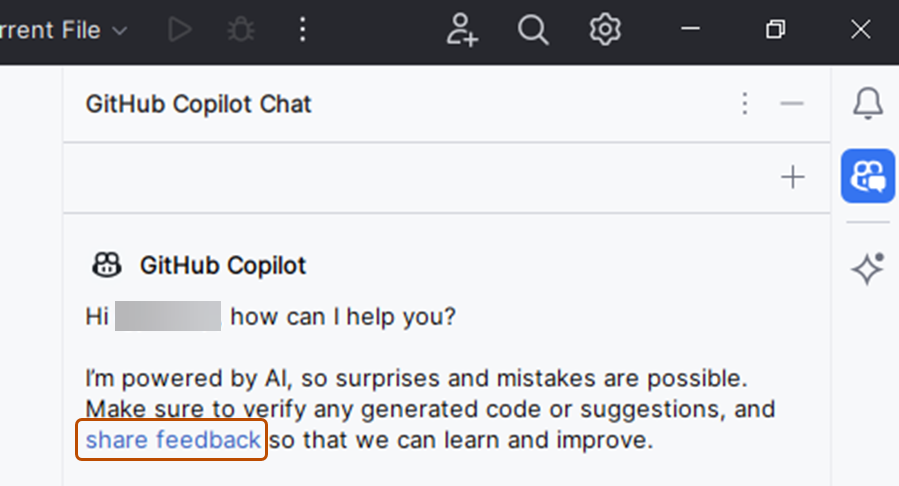
Sharing feedback
To indicate whether a response was helpful, use the thumbs up and thumbs down icons that appear next to the response.
To leave feedback about the GitHub Copilot Chat extension, open an issue in the microsoft/vscode-copilot-release repository.
Further reading
-
Using Copilot Chat in VS Code and Getting started with GitHub Copilot Chat in VS Code in the Visual Studio Code documentation
-
"Conditions GitHub pour les produits et fonctionnalités supplémentaires"
Important:
Tous les utilisateurs disposant d’un abonnement GitHub Copilot Individual peuvent accéder à GitHub Copilot Chat dans votre IDE.
Les propriétaires d’organisations avec un abonnement Copilot Business peuvent décider d’accorder l’accès à GitHub Copilot Chatdans votre IDE.
About GitHub Copilot Chat and Visual Studio
GitHub Copilot Chat est une interface de conversation qui vous permet de poser et de recevoir des réponses aux questions liées au codage directement dans un IDE pris en charge. Copilot Chat peut vous aider à effectuer diverses tâches liées au codage, comme vous proposer des suggestions de code, fournir des descriptions en langage naturel des fonctionnalités et de l’objectif d’un élément de code, générer des tests unitaires pour votre code et proposer des correctifs pour les bogues dans votre code. Pour plus d’informations, consultez « About GitHub Copilot Chat in your IDE ».
For more information about using GitHub Copilot Chat in Visual Studio, see the Visual Studio Copilot Chat documentation.
Prerequisites
-
Pour utiliser GitHub Copilot Chat, vous devez disposer d’un abonnement GitHub Copilot actif. Pour plus d’informations, consultez « À propos de la facturation de GitHub Copilot ».
-
To use GitHub Copilot Chat with Visual Studio, you must be running Visual Studio 2022 version 17.8 or higher. For more information, see the Visual Studio GitHub Copilot documentation.
-
To use GitHub Copilot Chat with Visual Studio, you must be signed into Visual Studio with the same GitHub ID that has access to GitHub Copilot.
Enabling or disabling GitHub Copilot Chat
Remarque : si vous disposez d’un abonnement GitHub Copilot Individual, vous êtes automatiquement autorisé à accéder à GitHub Copilot Chat.
GitHub Copilot Chat est disponible pour toutes les organisations qui ont un abonnement GitHub Copilot Business . Vous pouvez activer ou désactiver GitHub Copilot Chat pour votre organisation dans la page des paramètres pour Copilot.
Activation ou désactivation de GitHub Copilot Chat
-
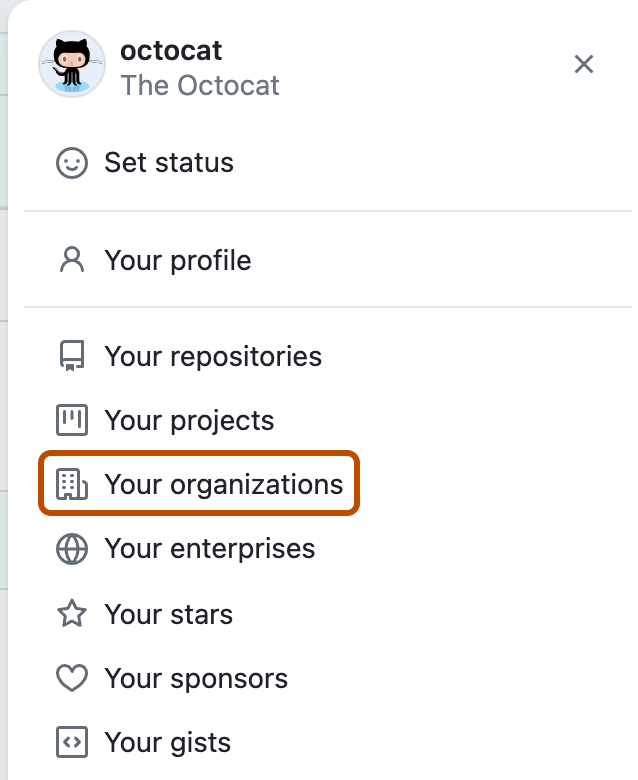
Dans l’angle supérieur droit de GitHub.com, sélectionnez votre photo de profil, puis sur Vos organisations.
-
En regard de l’organisation, cliquez sur Paramètres.
-
Dans la section « Code, planification et automatisation » de la barre latérale, cliquez sur Copilot, puis cliquez sur Stratégies.
-
À droite de Copilot Chat dans l’IDE, sélectionnez le menu déroulant, puis cliquez sur Activé ou Désactivé.

Installing the GitHub Copilot Chat extension in Visual Studio
With Visual Studio version 17.10 Preview 3 or later, you can install a single extension that combines GitHub Copilot and GitHub Copilot Chat. If you use Visual Studio 17.8 or 17.9, you must install the GitHub Copilot and GitHub Copilot Chat extensions separately. The GitHub Copilot extension is a prerequisite for using GitHub Copilot Chat. For more information about the Visual Studio 17.10 Preview 3 release, see the Visual Studio Release Notes in the Microsoft documentation.
Installing the combined Copilot and Copilot Chat extension in Visual Studio for versions 17.10 Preview 3 and later
-
Download the latest preview version of Visual Studio 2022 17.10 from Visual Studio Release Notes in the Microsoft documentation.
-
Follow the on-screen instructions to install Visual Studio.
-
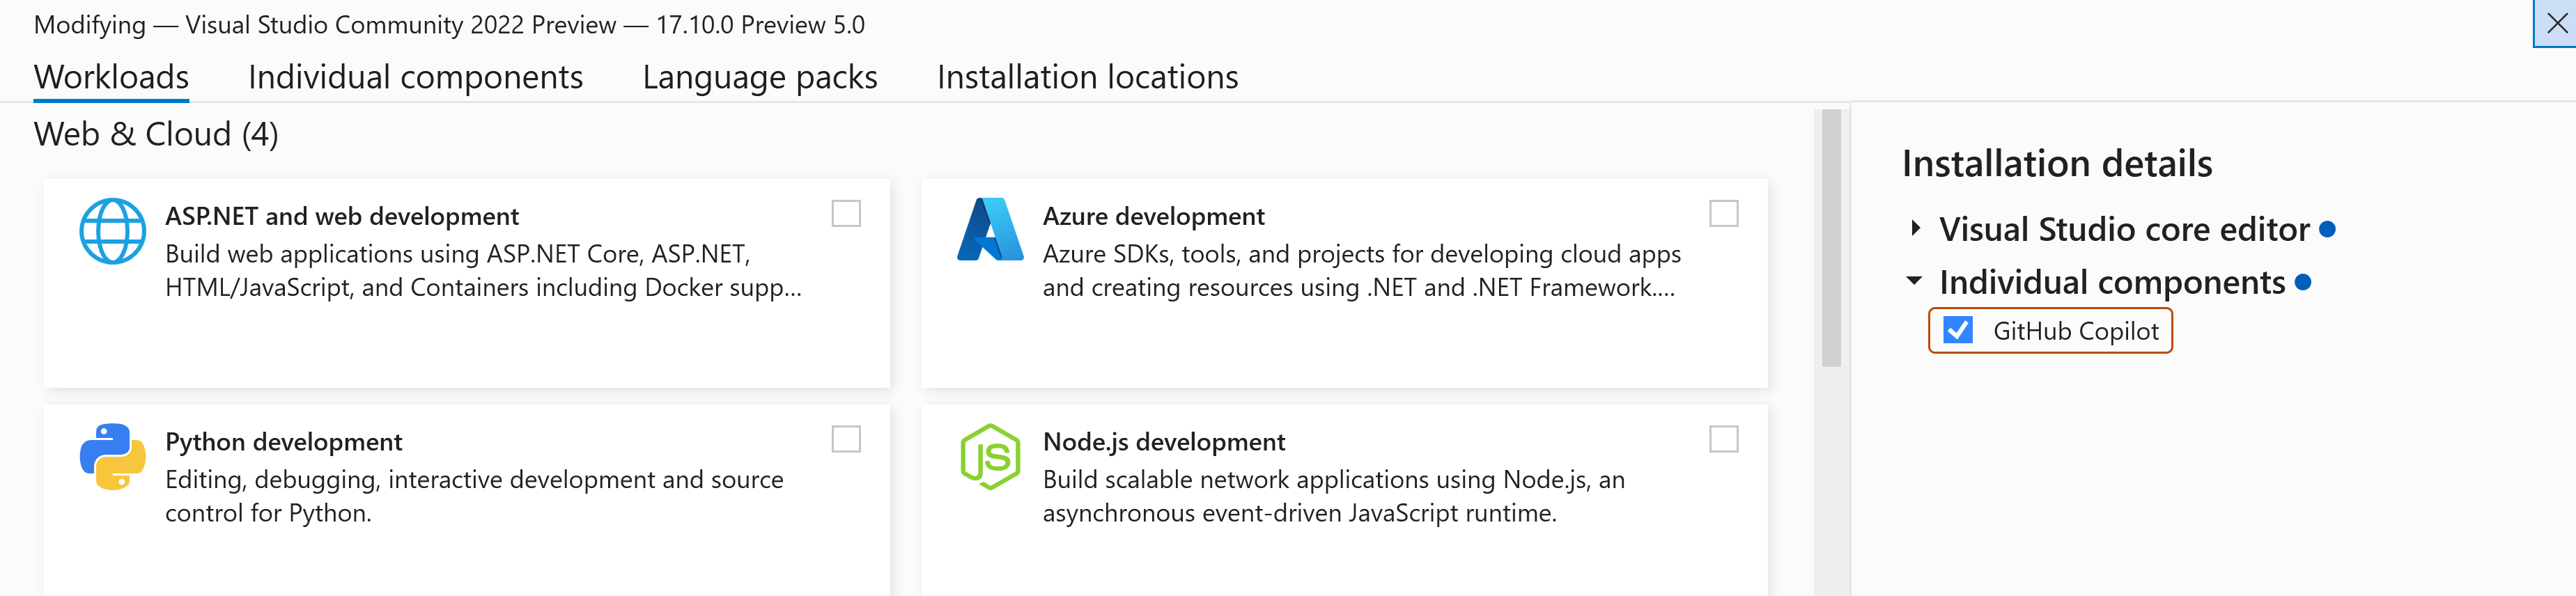
When Visual Studio Installer launches, select the workloads you require, and then under "Installation details", expand the Individual components details and select GitHub Copilot.
-
In the bottom-right corner of Visual Studio Installer, click Modify.
-
When the modification is complete, close the Visual Studio Installer and launch Visual Studio.
-
Optionally, to modify the installation or add more components, launch Visual Studio Installer from the Windows Start menu.
- To the right of your installed version of Visual Studio, click Modify.
- Make your desired changes, and in the bottom right corner click Modify again to apply them.

Installing the GitHub Copilot Chat extension in Visual Studio for versions 17.8 and 17.9
To use GitHub Copilot Chat with Visual Studio, you must install the Visual Studio extension.
Pour une méthode d’installation alternative, vous pouvez également utiliser les instructions Microsoft pour installer l’extension GitHub Copilot. Pour plus d’informations, consultez les Instructions d’installation dans la documentation Microsoft.
-
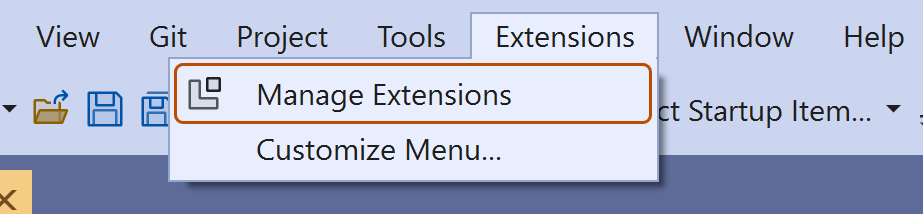
Dans la barre de menus Visual Studio, cliquez sur Extensions, puis sur Gérer les extensions.
-
In the "Manage Extensions" window, click Visual Studio Marketplace, search for "GitHub Copilot Chat", then click Download.
-
Fermez la fenêtre « Gérer les extensions », puis quittez et relancez Visual Studio.

Note: If you experience authentication issues after installing the extension, see "Dépannage des problèmes avec le Chat GitHub Copilot dans les IDE."
Asking your first question
GitHub Copilot Chat est destiné à répondre exclusivement aux questions liées au codage que vous posez en langage naturel. Par exemple, vous pouvez demander à GitHub Copilot Chat de vous aider à écrire une fonction qui retourne la somme de deux nombres.
-
Dans la barre de menus Visual Studio, pour lancer Copilot Chat, cliquez sur Afficher, puis sur GitHub Copilot Chat .
-
At the bottom of the Copilot Chat window, in the Ask Copilot: Type / for commands and # to reference text box, type a coding related question, then press Enter. For example, type "How do I write a function that returns the sum of two numbers?".
Note: If your question is outside the scope of GitHub Copilot Chat, it will tell you and may suggest an alternative question to ask.
-
If Copilot Chat offers a code suggestion that you want to use, click the Copy icon to copy the code suggestion to your clipboard.
-
Optionally, if Copilot Chat suggests a follow-up question under your last answer, click the follow-up question to ask it.
Asking GitHub Copilot Chat questions about your code
Copilot Chat can provide answers and support with a wide range of coding related topics.
-
In Visual Studio, open the file you want Copilot Chat to help you with.
-
Dans la barre de menus Visual Studio, pour lancer Copilot Chat, cliquez sur Afficher, puis sur GitHub Copilot Chat .
-
Pour poser une question sur le code actuellement visible dans l’éditeur, saisissez
#editorsuivi de votre question.Par exemple, vous pouvez saisir
#editor what does this code do?pour demander à Copilot Chat une description de l’objectif du code.Utilisez la commande
#editorn’importe où dans votre question pour indiquer à Copilot Chat de se concentrer sur le code actuellement visible dans l’éditeur. -
Si une seule méthode est visible en intégralité dans l’éditeur, vous pouvez demander à Copilot Chat de générer un test unitaire pour la méthode en saisissant
Write a unit test for the method in the #editor.Vous pouvez également sélectionner le code pour lequel vous souhaitez générer un test unitaire, puis demander à Copilot :
#selection write a unit test for this code.La commande
#selectionvérifie que Copilot se concentre sur le code sélectionné au moment de répondre à une question. -
Pour corriger un bogue dans un code, sélectionnez le code dans l’éditeur, puis demandez à Copilot :
#selection fix the bug in this code. -
Pour se concentrer Copilot sur un ou plusieurs fichiers spécifiques lorsque vous posez une question, utilisez la commande
#file.- Dans la fenêtre Copilot Chat, saisissez
#fileet appuyez sur la touche Entrée. La palette Quick Open s’ouvre alors en haut de l’éditeur. - Effectuez votre sélection dans la liste des fichiers récemment ouverts, ou recherchez le fichier sur lequel vous souhaitez vous concentrer et sélectionnez-le.
- Saisissez votre question. Par exemple :
#file:app.js What does this file do?.
Vous pouvez utiliser la commande
#fileplusieurs fois dans votre question pour que Copilot se concentre sur plusieurs fichiers. - Dans la fenêtre Copilot Chat, saisissez
Note: To find out about other special commands you can use with Copilot Chat, enter /help in the chat input box. For more information on slash commands, see Get better answers by setting the context for GitHub Copilot Chat in Visual Studio in the Visual Studio documentation.
Sharing feedback about GitHub Copilot Chat
To share feedback about Copilot Chat, you can use the Send feedback button in Visual Studio. For more information on providing feedback for Visual Studio, see the Visual Studio Feedback documentation.
-
In the top right corner of the Visual Studio window, click the Send feedback button.

-
Choose the option that best describes your feedback.
- To report a bug, click Report a problem.
- To request a feature, click Suggest a feature.

Further reading
Important:
Tous les utilisateurs disposant d’un abonnement GitHub Copilot Individual peuvent accéder à GitHub Copilot Chat dans votre IDE.
Les propriétaires d’organisations avec un abonnement Copilot Business peuvent décider d’accorder l’accès à GitHub Copilot Chatdans votre IDE.
About GitHub Copilot Chat and JetBrains
GitHub Copilot Chat est une interface de conversation qui vous permet de poser et de recevoir des réponses aux questions liées au codage directement dans un IDE pris en charge. Copilot Chat peut vous aider à effectuer diverses tâches liées au codage, comme vous proposer des suggestions de code, fournir des descriptions en langage naturel des fonctionnalités et de l’objectif d’un élément de code, générer des tests unitaires pour votre code et proposer des correctifs pour les bogues dans votre code. Pour plus d’informations, consultez « About GitHub Copilot Chat in your IDE ».
Prerequisites
-
Pour utiliser GitHub Copilot Chat, vous devez disposer d’un abonnement GitHub Copilot actif. Pour plus d’informations, consultez « À propos de la facturation de GitHub Copilot ».
-
To use GitHub Copilot Chat in JetBrains, you must have a compatible JetBrains IDE installed. Copilot Chat is compatible with the following IDEs:
- IntelliJ IDEA (Ultimate, Community, Educational)
- Android Studio
- AppCode
- CLion
- DataGrip
- DataSpell
- GoLand
- MPS
- PhpStorm
- PyCharm (Professional, Community, Educational)
- Rider
- RubyMine
- RustRover
- WebStorm
For more information, see the JetBrains IDEs tool finder.
Enabling or disabling GitHub Copilot Chat
Note: If you have a GitHub Copilot Individual subscription, you are automatically granted access to GitHub Copilot Chat.
GitHub Copilot Chat is available to all organizations and enterprises that have an active GitHub Copilot Business license. You can enable or disable GitHub Copilot Chat for your organization or enterprise in the GitHub Copilot settings page.
If Copilot Chat is enabled or disabled at the enterprise level, organizations within the enterprise cannot override the setting.
Enabling or disabling GitHub Copilot Chat at the organization level
-
Dans l’angle supérieur droit de GitHub.com, sélectionnez votre photo de profil, puis sur Vos organisations.
-
En regard de l’organisation, cliquez sur Paramètres.
-
In the "Code, planning, and automation" section of the sidebar, click Copilot, and then click Policies.
-
To the right of Copilot Chat in the IDE, select the dropdown menu, and then click Enabled or Disabled.
Enabling or disabling GitHub Copilot Chat at the enterprise level
- Dans la barre latérale du compte d’entreprise, cliquez sur Stratégies.
- Sous « Stratégies, cliquez sur Copilot.
- To the right of Copilot Chat in the IDE, select the dropdown menu, and then choose the appropriate option.
- Click Allowed to enable Copilot Chat for all organizations under your enterprise.
- Click Blocked to disable Copilot Chat for all organizations under your enterprise.
- Click No policy to allow each organization under your enterprise to set their own policy.
Installing or updating the GitHub Copilot plugin in JetBrains
To use Copilot Chat in a JetBrains IDE, you must install or update the GitHub Copilot plugin. If you have not yet installed the GitHub Copilot plugin, follow the steps in "Installing the GitHub Copilot plugin in your JetBrains IDE." If you have already installed the GitHub Copilot plugin, follow the steps in "Updating the GitHub Copilot plugin in JetBrains."
The following procedures will guide you through installing or updating the GitHub Copilot plugin in IntelliJ IDEA. Steps to install the plugin in another supported IDE may differ.
Installing the GitHub Copilot plugin in your JetBrains IDE
Pour utiliser GitHub Copilot dans un IDE JetBrains, vous devez installer le plug-in GitHub Copilot.
-
Dans votre IDE JetBrains, sous le menu Fichier pour Windows, ou sous le nom de votre IDE pour Mac (par exemple , PyCharm ou IntelliJ), cliquez sur Paramètres pour Windows ou Préférences pour Mac.
-
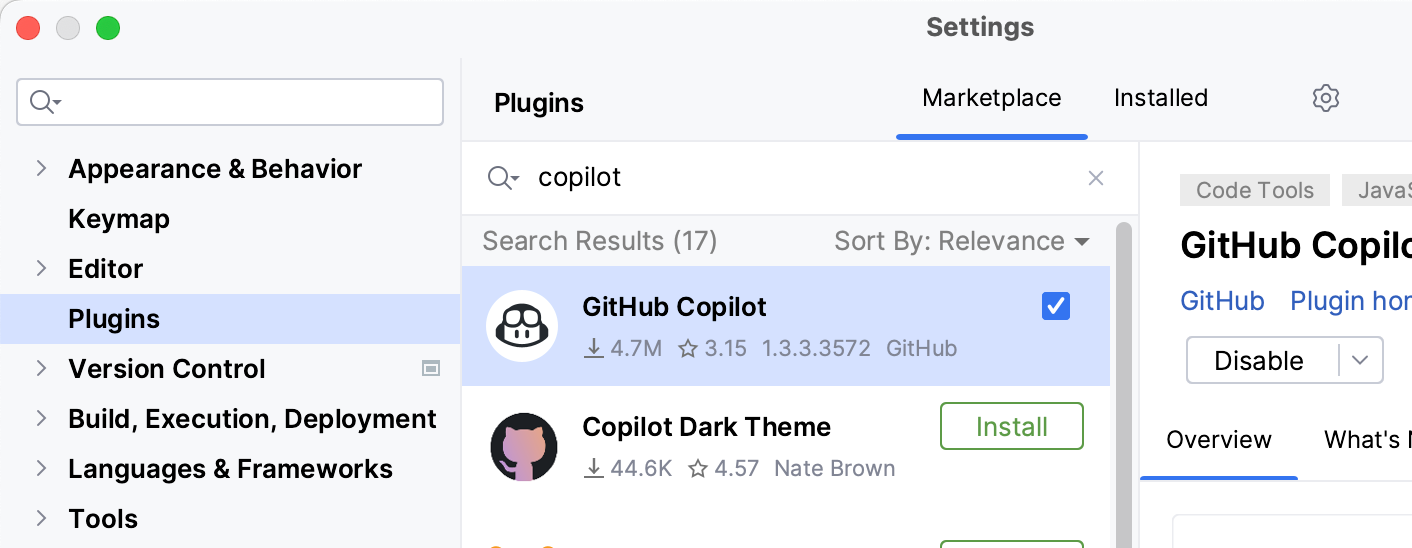
Dans le menu de gauche de la boîte de dialogue Paramètres/Préférences, cliquez sur Plug-ins.
-
En haut de la boîte de dialogue Paramètres/Préférences, cliquez sur Marketplace. Dans la barre de recherche, recherchez GitHub Copilot , puis cliquez sur Installer.
-
Une fois GitHub Copilot installé, cliquez sur Redémarrer l’IDE.
-
Une fois votre IDE JetBrains redémarré, cliquez sur le menu Outils. Cliquez sur GitHub Copilot , puis cliquez sur Se connecter à GitHub .

-
Dans la boîte de dialogue « Se connecter à GitHub », pour copier le code de l’appareil et ouvrir la fenêtre d’activation de l’appareil, cliquez sur Copier et ouvrir.
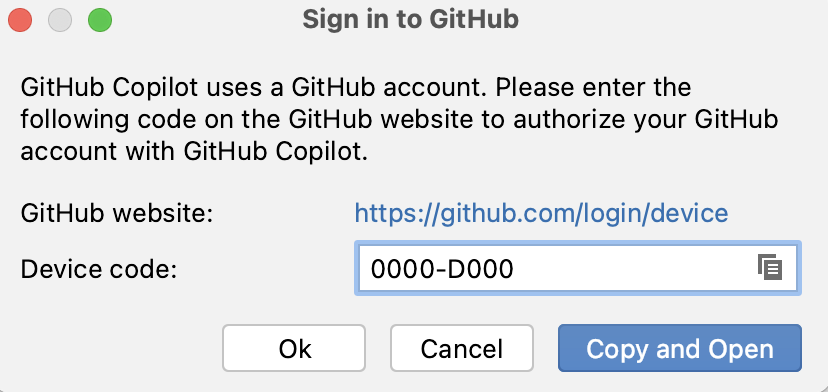
-
Une fenêtre d’activation d’appareil s’ouvrira dans votre navigateur. Collez le code de l’appareil, puis cliquez sur Continuer.
-
GitHub demandera les autorisations nécessaires pour GitHub Copilot. Pour approuver ces autorisations, cliquez sur Autoriser le plug-in GitHub Copilot .
-
Une fois les autorisations approuvées, votre IDE JetBrains affichera une confirmation. Pour commencer à utiliser GitHub Copilot, cliquez sur OK.


Updating the GitHub Copilot plugin in JetBrains
- Dans votre IDE JetBrains, sous le menu Fichier pour Windows, ou sous le nom de votre IDE pour Mac (par exemple , PyCharm ou IntelliJ), cliquez sur Paramètres pour Windows ou Préférences pour Mac.
- In the left-side menu of the Settings/Preferences dialog box, click Plugins.
- At the top of the Settings/Preferences dialog box, click Installed. In the search bar, search for GitHub Copilot, then click Update.
- After GitHub Copilot is updated, quit and relaunch your JetBrains IDE.
Asking your first question
GitHub Copilot Chat est destiné à répondre exclusivement aux questions liées au codage que vous posez en langage naturel. Par exemple, vous pouvez demander à GitHub Copilot Chat de vous aider à écrire une fonction qui retourne la somme de deux nombres.
-
At the right side of the JetBrains IDE window, click the Copilot Chat icon to open the Copilot Chat window.

-
At the bottom of the Copilot Chat window, in the Ask Copilot a question or type
/for commands text box, type a coding related question, then press Enter. For example, type "How do I write a function that returns the sum of two numbers?". -
Copilot Chat will process your question and provide an answer, with code suggestions when appropriate, in the chat window.
If your question is outside the scope of GitHub Copilot Chat, it will tell you and may suggest an alternative question to ask.
-
Optionally, if Copilot Chat suggests a follow-up question above the Ask Copilot a question or type
/for commands text box, click the follow-up question to ask it.
Asking GitHub Copilot Chat questions about your code
Copilot Chat can provide answers and support with a wide range of coding-related topics.
- In your JetBrains IDE, open the file you want Copilot Chat to help you with.
- Ask Copilot Chat a question about the file you have open. For example:
- To generate a description of the file's purpose, ask a question like, "What does this file do?"
- To generate a unit test for the file, type a request like, "Write a unit test for this file." Alternatively, highlight the code you want to generate a unit test for, then ask a question like, "Write a unit test for this code."
- To generate a fix for a bug in the file, type a request like, "Fix this bug."
- Optionally, you can prompt Copilot Chat to perform predefined tasks with slash commands. To see a list of all available slash commands and their definitions, in the Ask Copilot a question or type
/for commands text box, type/.
Sharing feedback about GitHub Copilot Chat
To share feedback about Copilot Chat, you can use the share feedback link in JetBrains.
-
At the right side of the JetBrains IDE window, click the Copilot Chat icon to open the Copilot Chat window.
-
At the top of the Copilot Chat window, click the share feedback link.