关于 GitHub Actions
的外部存储
GitHub Actions 使用外部 blob 存储来存储工作流运行生成的数据。 存储的数据包括工作流日志、缓存和用户上传的生成工件。 有关详细信息,请参阅“GitHub Actions for GitHub Enterprise Server 使用入门”。
可通过两个选项将 GitHub Enterprise Server 配置为连接到外部存储提供程序:
- OpenID Connect (OIDC)
- 使用机密的传统基于凭据的身份验证
建议尽可能使用 OIDC,因为不需要为存储提供程序创建或管理敏感且生存期较长的凭据机密,也不需要冒暴露这些机密的风险。 使用 OIDC 定义信任后,云存储提供程序会自动向 你的 GitHub Enterprise Server 实例 颁发短期访问令牌,这些令牌会自动过期。
先决条件
在启用 GitHub Actions 之前,请确保您已完成以下步骤:
-
创建用于存储工作流数据的 Azure 存储帐户。 GitHub Actions 将其数据存储为块 Blob,支持两种类型的存储帐户:
-
使用“标准”性能层的“常规用途”存储帐户(也称为
general-purpose v1或general-purpose v2) 。警告
不支持将“高级”性能层用于常规用途存储帐户****。 在创建存储帐户时必须选择“标准”性能层,并且以后不能更改。
-
BlockBlobStorage 存储帐户,使用“高级”性能层 。
有关 Azure 存储帐户类型和性能层的详细信息,请参阅 Azure 文档。
-
-
查看 GitHub Actions 的硬件要求。 有关详细信息,请参阅“GitHub Actions for GitHub Enterprise Server 使用入门”。
-
必须为 GitHub Enterprise Server 的域配置 TLS。 有关详细信息,请参阅“配置 TLS”。
注意
我们强烈建议您在 GitHub Enterprise Server 上配置 TLS,并有信任的机构签名的证书。 虽然自签名证书可以工作,但自托管的运行器需要额外的配置,不推荐用于生产环境。
-
如果在 GitHub 上配置了 HTTP 代理服务器:
-
必须将
.localhost、127.0.0.1和::1添加到“HTTP 代理排除”**** 列表(以此顺序)。 -
如果外部存储位置不可路由,则还必须将外部存储 URL 添加到排除列表中。
有关更改代理设置的详细信息,请参阅“配置出站 Web 代理服务器”。
-
如果使用 OIDC 连接到存储提供商,则必须将 你的 GitHub Enterprise Server 实例 上的以下 OIDC 令牌服务 URL 公开到公共 Internet:
https://HOSTNAME/_services/token/.well-known/openid-configuration
https://HOSTNAME/_services/token/.well-known/jwks
这确保存储提供商可以联系 你的 GitHub Enterprise Server 实例 进行身份验证。
使用 OIDC 通过 Azure Blob 存储启用 GitHub Actions(推荐)
要将 GitHub Enterprise Server 配置为结合使用 OIDC 与 Azure 存储帐户,必须先使用 OIDC 凭证注册 Microsoft Entra ID(以前称为 Azure AD)应用程序,然后配置存储帐户,最后将 GitHub Enterprise Server 配置为使用 Entra ID 访问存储容器。
1. 注册 Entra ID 注册应用程序
-
登录 Microsoft Entra 管理中心。
-
在 Entra ID 中注册一个新应用程序。 有关详细信息,请参阅 Microsoft Learn 上的快速入门:将应用程序注册到 Microsoft 标识平台。
-
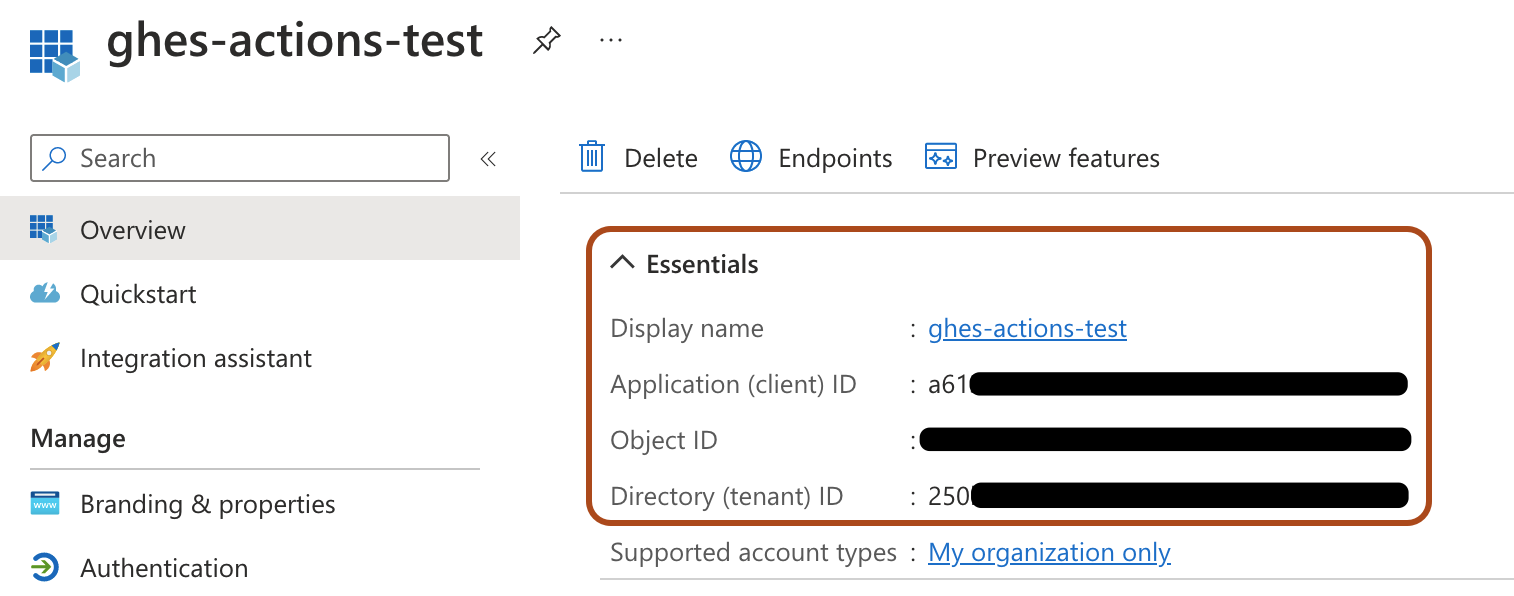
在 Entra ID 应用程序中的“基本信息”下,记下“应用程序(客户端)ID”和“目录(租户)ID”的值。 稍后将使用这些值。
-
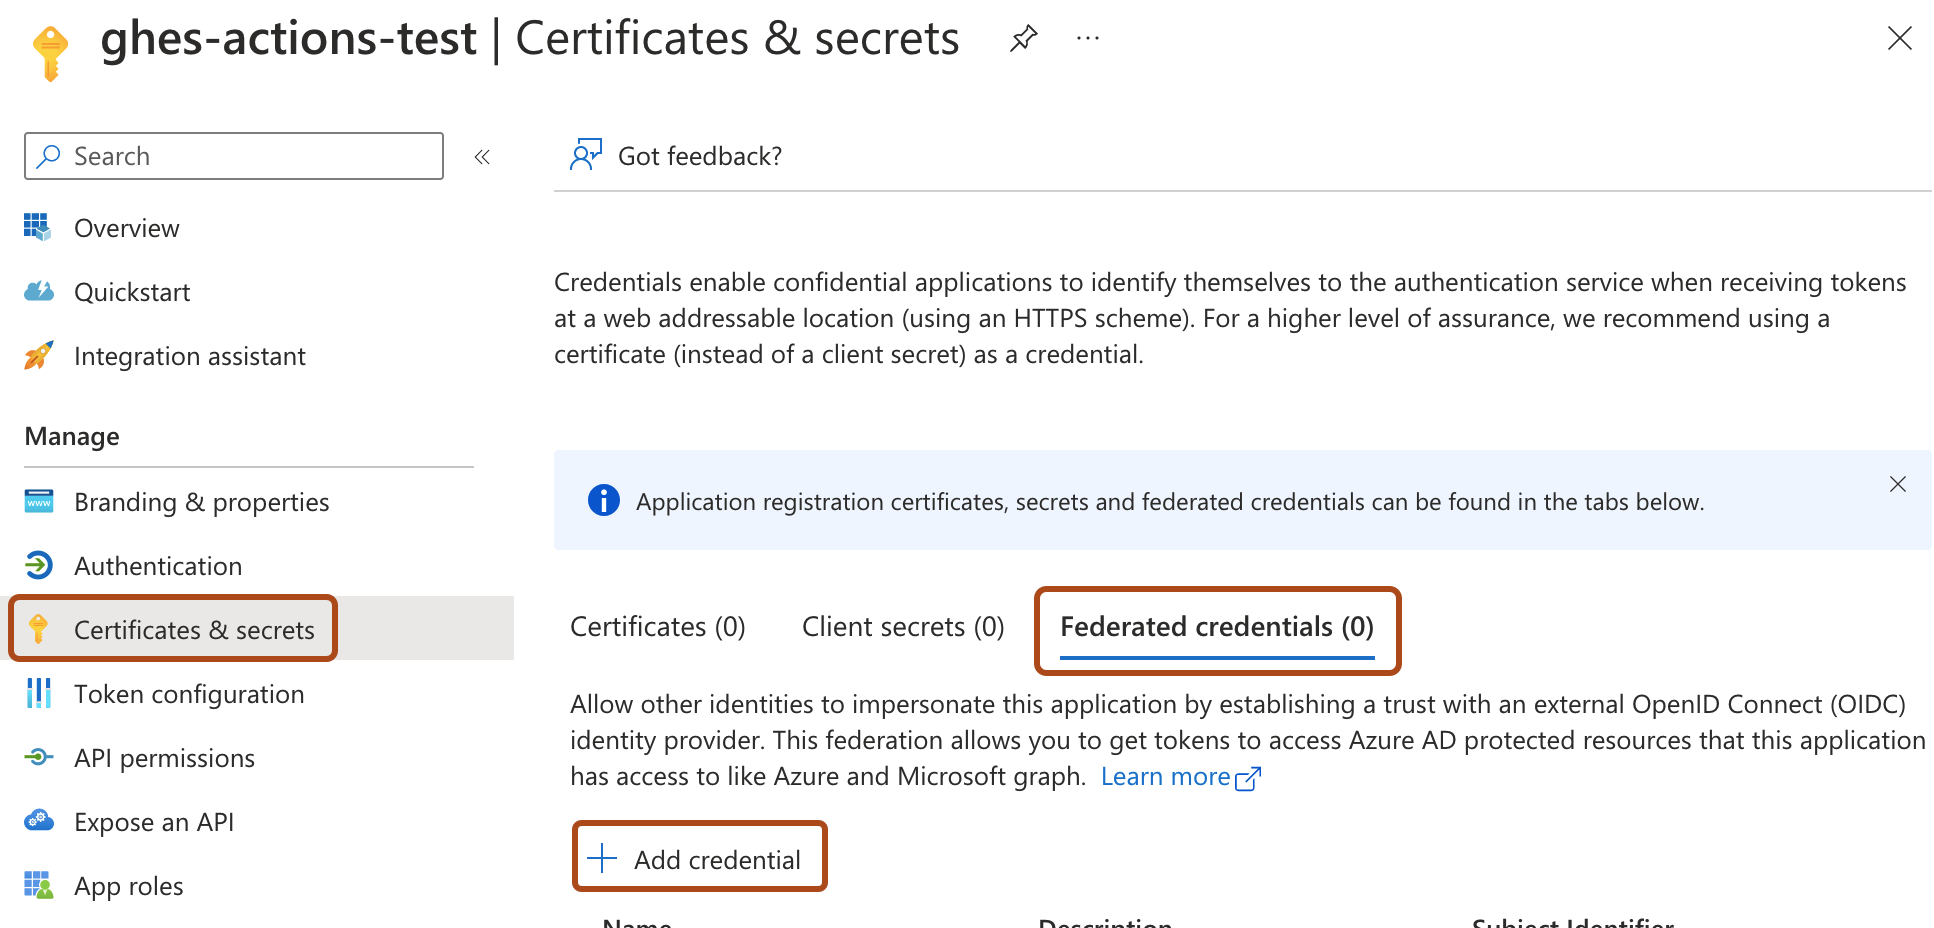
在 Entra ID 应用程序中的“管理”下,单击“证书和机密”,选择“联合身份验证凭证” 选项卡,然后单击“添加凭证”****。
-
输入凭据的以下详细信息:
-
对于“联合身份验证凭据方案”,选择“其他颁发者”。
-
对于“颁发者”,输入
https://HOSTNAME/_services/token,其中HOSTNAME是 你的 GitHub Enterprise Server 实例 的公共主机名。 例如,https://my-ghes-host.example.com/_services/token。 -
对于“主题标识符”,输入 你的 GitHub Enterprise Server 实例 的公共主机名。 例如,
my-ghes-host.example.com。注意
主题标识符只能包含 你的 GitHub Enterprise Server 实例 的主机名,并且不得包含协议__。
-
对于“名称”,输入凭据的名称。
-
单击“添加”。
-


2. 配置存储帐户
-
在 Microsoft Azure 门户中导航到你的存储帐户。
-
依次单击“访问控制(IAM)”和“添加”,然后选择“添加角色分配” 。
-
对于角色,选择“存储 Blob 数据所有者”,然后单击“下一步”。
-
对于成员,单击“选择成员”****,然后搜索并选择之前创建的 Entra ID 应用程序的名称。 单击“选择”。
-
单击“查看 + 分配”,查看角色分配,然后再次单击“查看 + 分配” 。
-
在左侧菜单中的“设置”下,单击“终结点”。
-
在“Blob 服务”下,记下“Blob 服务”的值,特别是 Blob 终结点后缀。 该值位于
https://<storageaccountname>.blob之后。 该值通常是core.windows.net,但可能会因 Azure 区域或帐户类型而有所不同。例如,如果 blob 服务 URL 是
https://my-storage-account.blob.core.windows.net,则 blob 终结点后缀是core.windows.net。记下你的存储帐户名称和 blob 终结点后缀,因为稍后将使用这些值。
3. 将 GitHub Enterprise Server 配置为使用 OIDC 连接到 Entra ID
-
在 GitHub Enterprise Server 上的管理帐户中,在任一页面的右上角,单击“”。
-
如果你尚未在“站点管理员”页上,请在左上角单击“站点管理员”。
-
在“ 站点管理”边栏中,单击“管理控制台”。
-
在“设置”边栏中,单击“操作”。
-
在“GitHub Actions”下,选择“启用 GitHub Actions”。
-
在“项目和日志存储”下的“Azure Blob 存储”旁,单击“设置”。
-
在“身份验证”下,选择“OpenID Connect (OIDC)”,然后输入在先前过程中记下的存储的值:
- Entra ID 租户 ID
- Entra ID 客户端 ID
- Azure 存储帐户名称
- Azure blob 终结点后缀 1. 单击“测试存储设置”按钮验证存储设置。
如果在验证存储设置时出现任何错误,请检查存储提供程序设置并重试。
-
在“设置”边栏下,单击“保存设置”。
注意
保存 管理控制台 中的设置会重启系统服务,这可能会导致用户可察觉的停机时间。
-
等待配置运行完毕。
使用连接字符串在 Azure Blob 存储中启用 GitHub Actions
-
在 GitHub Enterprise Server 上的管理帐户中,在任一页面的右上角,单击“”。
-
如果你尚未在“站点管理员”页上,请在左上角单击“站点管理员”。
-
在“ 站点管理”边栏中,单击“管理控制台”。
-
在“设置”边栏中,单击“操作”。
-
在“GitHub Actions”下,选择“启用 GitHub Actions”。
-
在“项目和日志存储”下的“Azure Blob 存储”旁,单击“设置”。
-
在“身份验证”下,选择“基于凭据”,然后输入 Azure 存储帐户的连接字符串。 有关获取存储帐户连接字符串的详细信息,请参阅 Azure 文档。
-
单击“测试存储设置”按钮验证存储设置。
如果在验证存储设置时出现任何错误,请检查存储提供程序设置并重试。
-
在“设置”边栏下,单击“保存设置”。
注意
保存 管理控制台 中的设置会重启系统服务,这可能会导致用户可察觉的停机时间。
-
等待配置运行完毕。
后续步骤
配置运行成功完成后,GitHub Actions 将在 GitHub 上启用。 对于后续步骤,例如管理 GitHub Actions 访问权限和添加自托管运行程序,请返回到“GitHub Actions for GitHub Enterprise Server 使用入门”。