Iniciar uma avaliação gratuita
Sobre o GitHub Copilot e IDEs JetBrains
O GitHub Copilot oferece sugestões de preenchimento automático de um programador de par de IA à medida que você cria o código. Para obter mais informações, confira "Sobre o GitHub Copilot Individual".
Se você usar um IDE JetBrains, poderá exibir e incorporar sugestões do GitHub Copilot diretamente no editor. Este guia demonstra como usar o GitHub Copilot dentro de um IDE JetBrains para macOS, Windows ou Linux.
Pré-requisitos
-
Para usar o GitHub Copilot, é preciso ter uma assinatura ativa do GitHub Copilot. Para obter mais informações, confira "Sobre a cobrança para o GitHub Copilot".
-
Para usar o GitHub Copilot no JetBrains, você deverá ter um IDE do JetBrains compatível instalado. O GitHub Copilot é compatível com as seguintes IDEs:
- IntelliJ IDEA (Ultimate, Community, Educational)
- Android Studio
- AppCode
- CLion
- Code With Me Guest
- DataGrip
- DataSpell
- GoLand
- JetBrains Client
- MPS
- PhpStorm
- PyCharm (Professional, Community, Educational)
- Rider
- RubyMine
- RustRover
- WebStorm
Para obter mais informações, confira o localizador de ferramentas JetBrains IDEs.
Instalar o plug-in do GitHub Copilot nos IDE do JetBrains
Para usar o GitHub Copilot em um IDE JetBrains, você deverá instalar a extensão do GitHub Copilot. O procedimento a seguir guiará você pela instalação do plug-in do GitHub Copilot no IntelliJ IDEA. As etapas para instalar o plug-in em outro IDE com suporte podem ser diferentes.
-
No seu IDE JetBrains, no menu Arquivo do Windows, ou sob o nome do IDE para Mac (por exemplo, PyCharm ou IntelliJ), clique em Configurações.
-
No menu esquerdo da caixa de diálogo Configurações, clique em Plug-ins.
-
Na parte superior da caixa de diálogo Configurações, clique em Marketplace. Na barra de pesquisa, procure por
copilote clique em Instalar.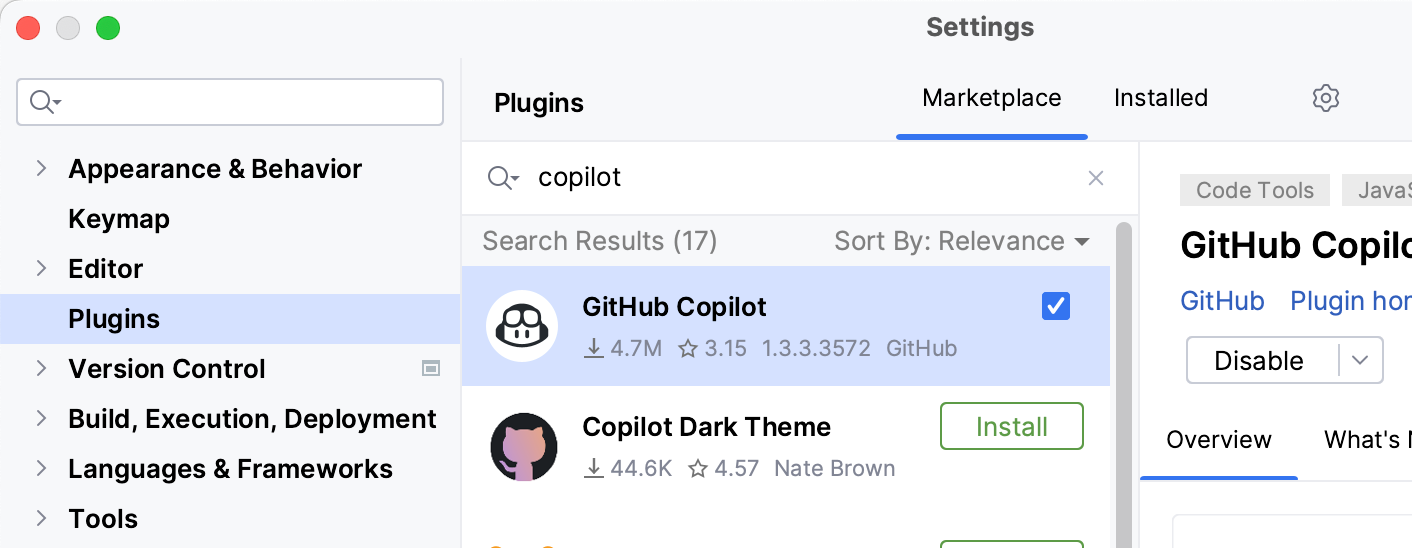
-
Depois que o GitHub Copilot estiver instalado, clique em Reiniciar IDE.
-
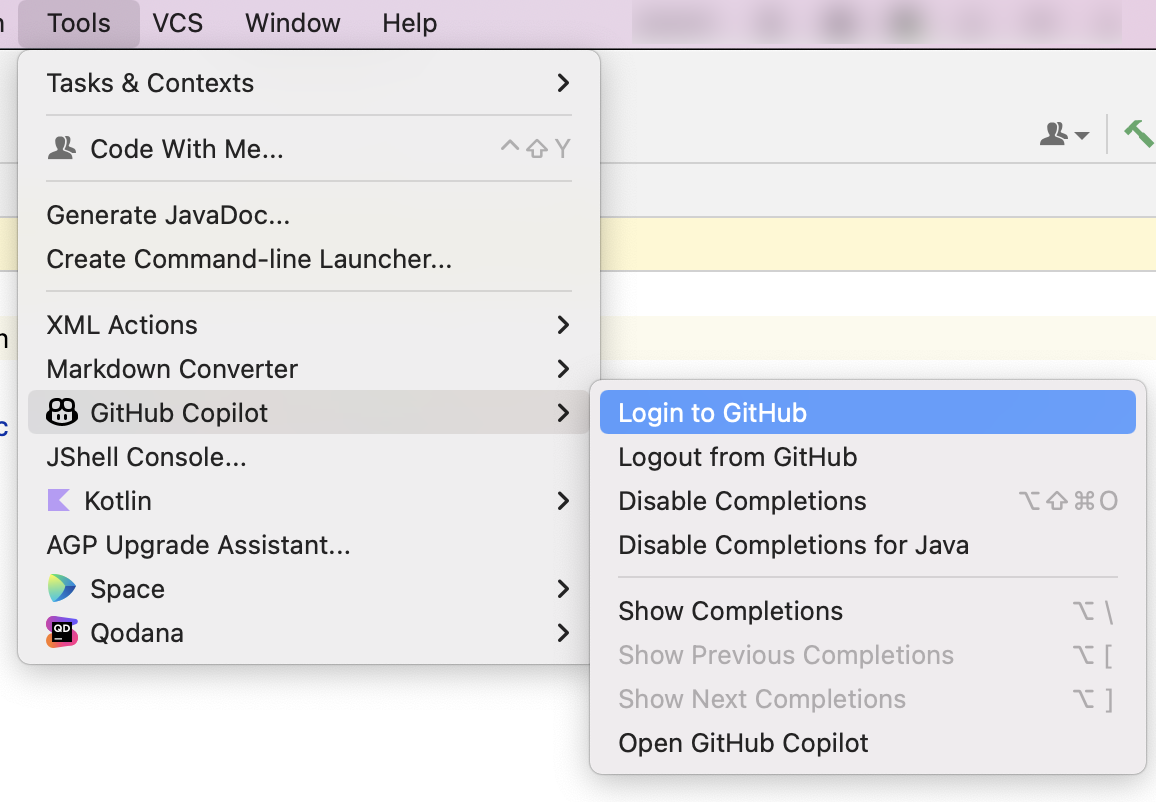
Depois que o IDE JetBrains for reiniciado, clique no menu Ferramentas. Clique em GitHub Copilot e clique Logon no GitHub .
-
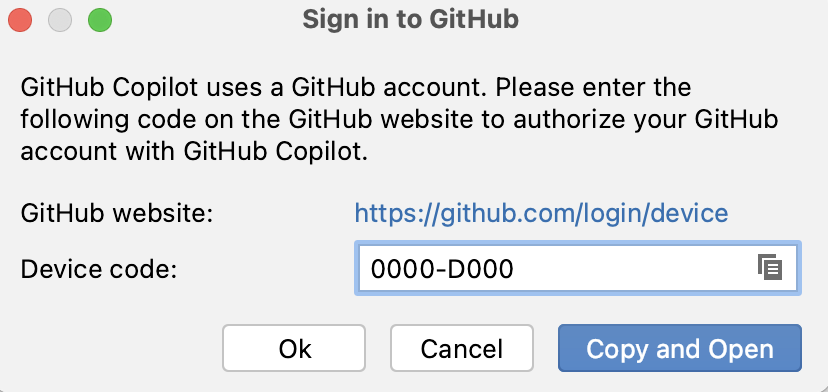
Na caixa de diálogo "Entrar no GitHub", para copiar o código do dispositivo e abrir a janela de ativação do dispositivo, clique em Copiar e Abrir.
-
Uma janela de ativação do dispositivo será aberta no navegador. Cole o código do dispositivo e clique em Continuar.
-
O GitHub solicitará as permissões necessárias para o GitHub Copilot. Para aprovar essas permissões, clique em Autorizar o plug-in do GitHub Copilot .
-
Depois que as permissões forem aprovadas, o IDE JetBrains mostrará uma confirmação. Para começar a usar o GitHub Copilot, clique em OK.
Como ver a primeira sugestão
Observação: quando a detecção de duplicação está habilitada para o GitHub Copilot, há a possibilidade de você receber sugestões limitadas ou nenhuma sugestão ao usar os exemplos de código fornecidos. Como alternativa, é possível começar digitando seu próprio código a fim de ver sugestões do GitHub Copilot. Para obter mais informações sobre a detecção de duplicação, confira "Como definir as configurações do GitHub Copilot no GitHub.com".
O GitHub Copilot oferece sugestões para várias linguagens e uma ampla variedade de estruturas, mas funciona melhor para Python, JavaScript, TypeScript, Ruby, Go, C# e C++. GitHub Copilot também pode ajudar na geração de consultas para bancos de dados. Os exemplos a seguir estão em Java, mas outras linguagens funcionarão da mesma forma.
-
No IDE da JetBrains, crie um arquivo Java ( *.java).
-
No arquivo Java, crie uma classe digitando
class Test. GitHub Copilot vai sugerir automaticamente um corpo de classe em texto esmaecido. A sugestão exata pode variar. -
Para aceitar a sugestão, pressione Tab.
-
Para solicitar que o GitHub Copilot sugira um corpo de função, digite a linha a seguir abaixo do colchete da função
main. A sugestão exata pode variar.Java private int calculateDaysBetweenDates(Date date1,
private int calculateDaysBetweenDates(Date date1, -
Para aceitar a sugestão, pressione Tab.
O GitHub Copilot tentará fazer a correspondência entre o contexto e o estilo do seu código. Você sempre poderá editar o código sugerido.
Como ver sugestões alternativas
Para qualquer entrada fornecida, GitHub Copilot podem oferecer várias sugestões. Você pode selecionar qual sugestão usar ou rejeitar todas as sugestões.
-
No IDE da JetBrains, crie um arquivo Java ( *.java).
-
Para solicitar que o GitHub Copilot mostre uma sugestão, digite a linha a seguir no arquivo Java.
Java private int calculateDaysBetweenDates(Date date1,
private int calculateDaysBetweenDates(Date date1, -
Opcionalmente, você pode ver sugestões alternativas, quando há alguma disponível.
Sistema operacional Ver a próxima sugestão Ver a sugestão anterior macOS Opção+] Opção+[ Windows Alt+] Alt+[ Linux Alt+] Alt+[ -
Para aceitar uma sugestão, pressione Tab. Para rejeitar todas as sugestões, pressione Esc.
Como aceitar parcialmente as sugestões
Talvez você não queira aceitar uma sugestão inteira do GitHub Copilot. Você pode usar atalhos de teclado para aceitar a próxima palavra ou a próxima linha de uma sugestão.
-
No IDE da JetBrains, crie um arquivo Java ( *.java).
-
Para solicitar que o GitHub Copilot mostre uma sugestão, digite a linha a seguir no arquivo Java.
Java private int calculateDaysBetweenDates(Date date1,
private int calculateDaysBetweenDates(Date date1, -
Para aceitar uma parte da sugestão, use um dos seguintes atalhos de teclado.
SO Aceitar a próxima palavra Aceitar próxima linha macOS Command+→ Command+Control+→ Windows Control+→ Control+Alt+→ Linux Control+→ Control+Alt+→ -
Como alternativa, você pode focalizar a sugestão para ver a paleta de comandos do GitHub Copilot e escolher sugestões.
Como ver várias sugestões em uma nova guia
Você pode não querer nenhuma das sugestões iniciais que o GitHub Copilot oferece. Você pode usar um atalho de teclado para solicitar que GitHub Copilot mostre várias sugestões em uma nova guia.
-
No IDE da JetBrains, crie um arquivo Java ( *.java).
-
Para solicitar que o GitHub Copilot mostre uma sugestão, digite a linha a seguir no arquivo Java.
Java private int calculateDaysBetweenDates(Date date1,
private int calculateDaysBetweenDates(Date date1, -
Abra uma nova guia com várias sugestões adicionais.
- No macOS, pressione Command+Shift+A e clique em Abrir o GitHub Copilot ou pressione Command+Shift+\ para abrir a nova guia imediatamente.
- No Windows ou Linux, pressione Ctrl+Enter e clique em Abrir o GitHub Copilot.
-
Para aceitar uma sugestão, abaixo da sugestão, clique em Aceitar sugestão NÚMERO. Para rejeitar todas as sugestões, feche a guia.
Como gerar sugestões de código por meio de comentários
Você pode descrever algo que deseja fazer usando linguagem natural em um comentário e o GitHub Copilot sugerirá o código para atingir sua meta.
-
No IDE da JetBrains, crie um arquivo Java ( *.java).
-
Para solicitar que o GitHub Copilot sugira uma implementação de uma função no arquivo Java, digite as linhas a seguir.
Java // find all images without alternate text // and give them a red border void process () {// find all images without alternate text // and give them a red border void process () {
Como habilitar e desabilitar o GitHub Copilot
Você pode habilitar ou desabilitar o GitHub Copilot para todas as linguagens ou para linguagens individuais. O ícone de status do GitHub Copilot no painel inferior da janela do IDE JetBrains indica se o GitHub Copilot está habilitado ou desabilitado. Quando habilitado, o ícone fica realçado. Quando desabilitado, o ícone fica esmaecido.
-
Para habilitar ou desabilitar o GitHub Copilot, clique no ícone de status no painel inferior da janela JetBrains.

-
Se você estiver desabilitando o GitHub Copilot, será perguntado se deseja desabilitá-lo globalmente ou para a linguagem do arquivo que está editando no momento.
- Para desabilitar as sugestões do GitHub Copilot globalmente, clique em Desabilitar Preenchimentos.
- Para desabilitar as sugestões do GitHub Copilot para a linguagem especificada, clique em Desabilitar Preenchimentos para LINGUAGEM.

Sobre o GitHub Copilot no Visual Studio
O GitHub Copilot oferece sugestões de preenchimento automático de um programador de par de IA à medida que você cria o código. Para obter mais informações, confira "Sobre o GitHub Copilot Individual".
Usando o Visual Studio, você pode ver e incorporar sugestões do GitHub Copilot diretamente no editor. Este guia demonstra como usar o GitHub Copilot dentro do Visual Studio para Windows.
Pré-requisitos
-
Para usar o GitHub Copilot, é preciso ter uma assinatura ativa do GitHub Copilot. Para obter mais informações, confira "Sobre a cobrança para o GitHub Copilot".
-
Para usar o GitHub Copilot no Visual Studio, é preciso ter o Visual Studio 2022 17.6 ou posterior instalado. Para obter mais informações sobre o uso do GitHub Copilot Chat no Visual Studio, consulte a documentação do Visual Studio Copilot Chat.
Observação: o GitHub Copilot não está disponível no momento para uso com Visual Studio para Mac.
Instalação da extensão GitHub Copilot no Visual Studio
Para usar o GitHub Copilot, primeiro você deve instalar a extensão GitHub Copilot.
Para obter um método de instalação alternativo, você também pode usar as instruções da Microsoft para instalar a extensão GitHub Copilot. Para obter mais informações, confira as instruções de instalação na documentação da Microsoft.
-
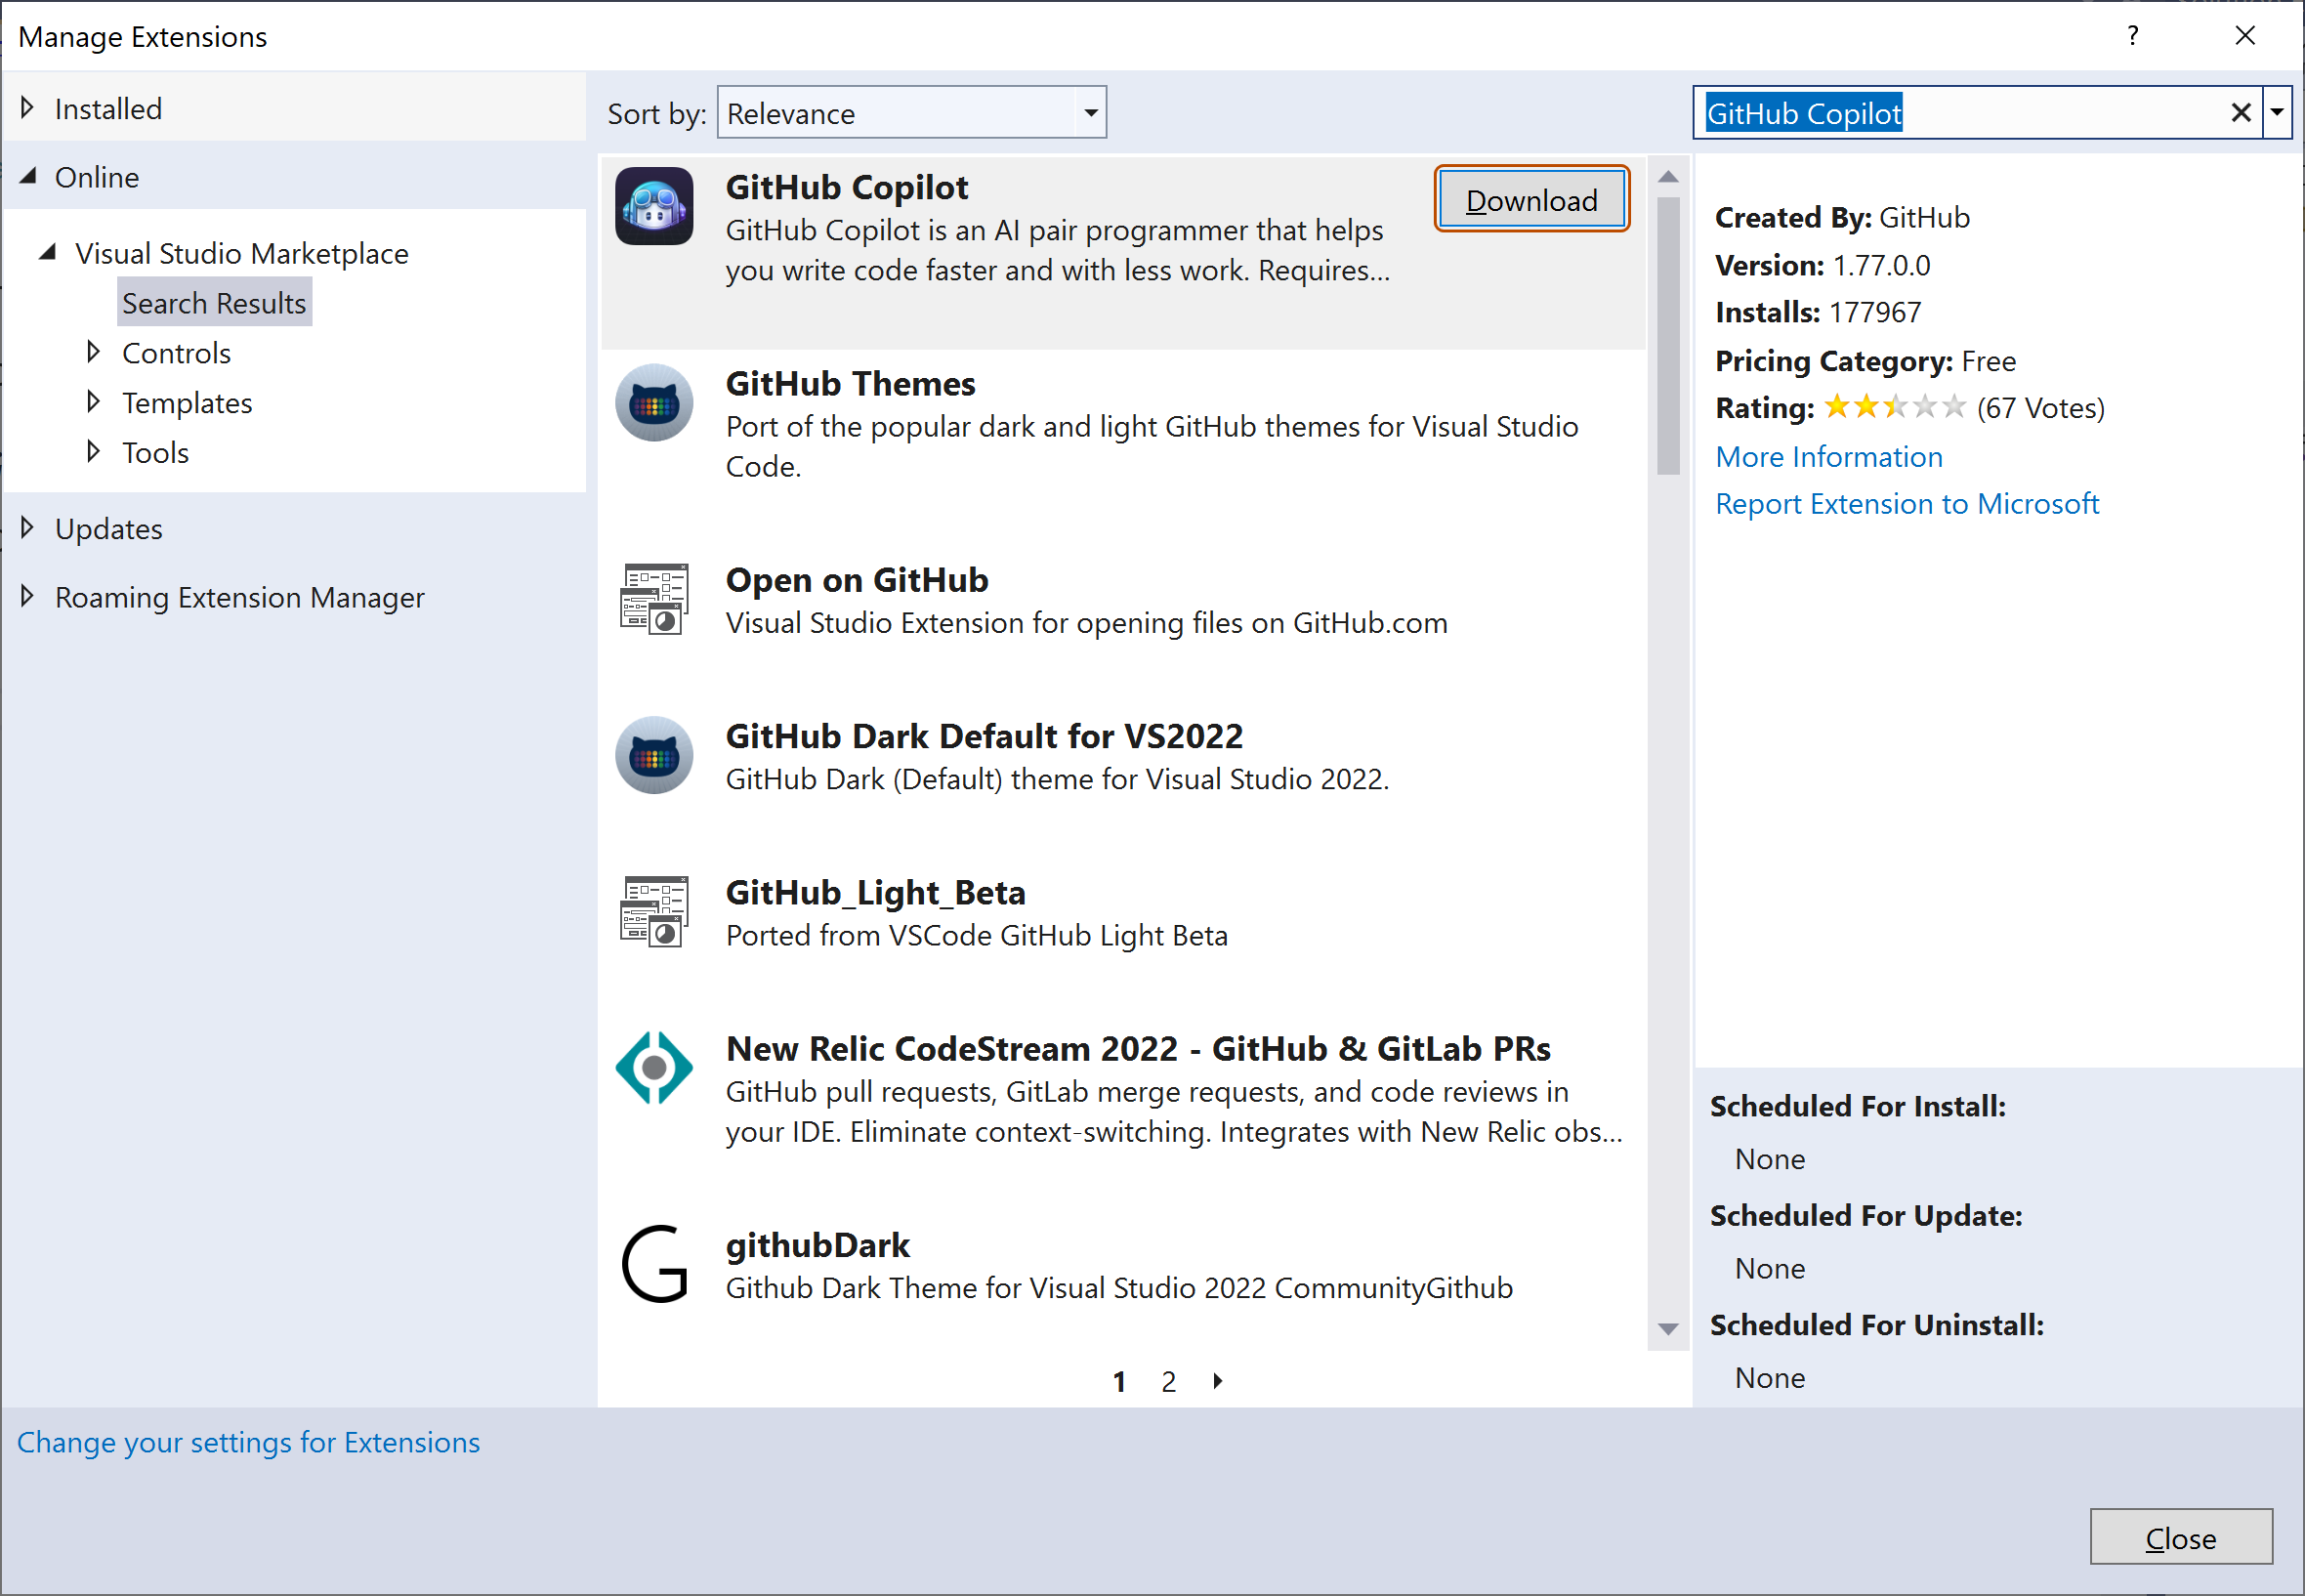
Na barra de menus do Visual Studio, clique em Extensões e depois em Gerenciar Extensões.

-
Na janela "Gerenciar extensões", clique em Visual Studio Marketplace, procure a extensão GitHub Copilot e clique em Baixar.
-
Feche a janela "Gerenciar Extensões", saia e inicie Visual Studio.
-
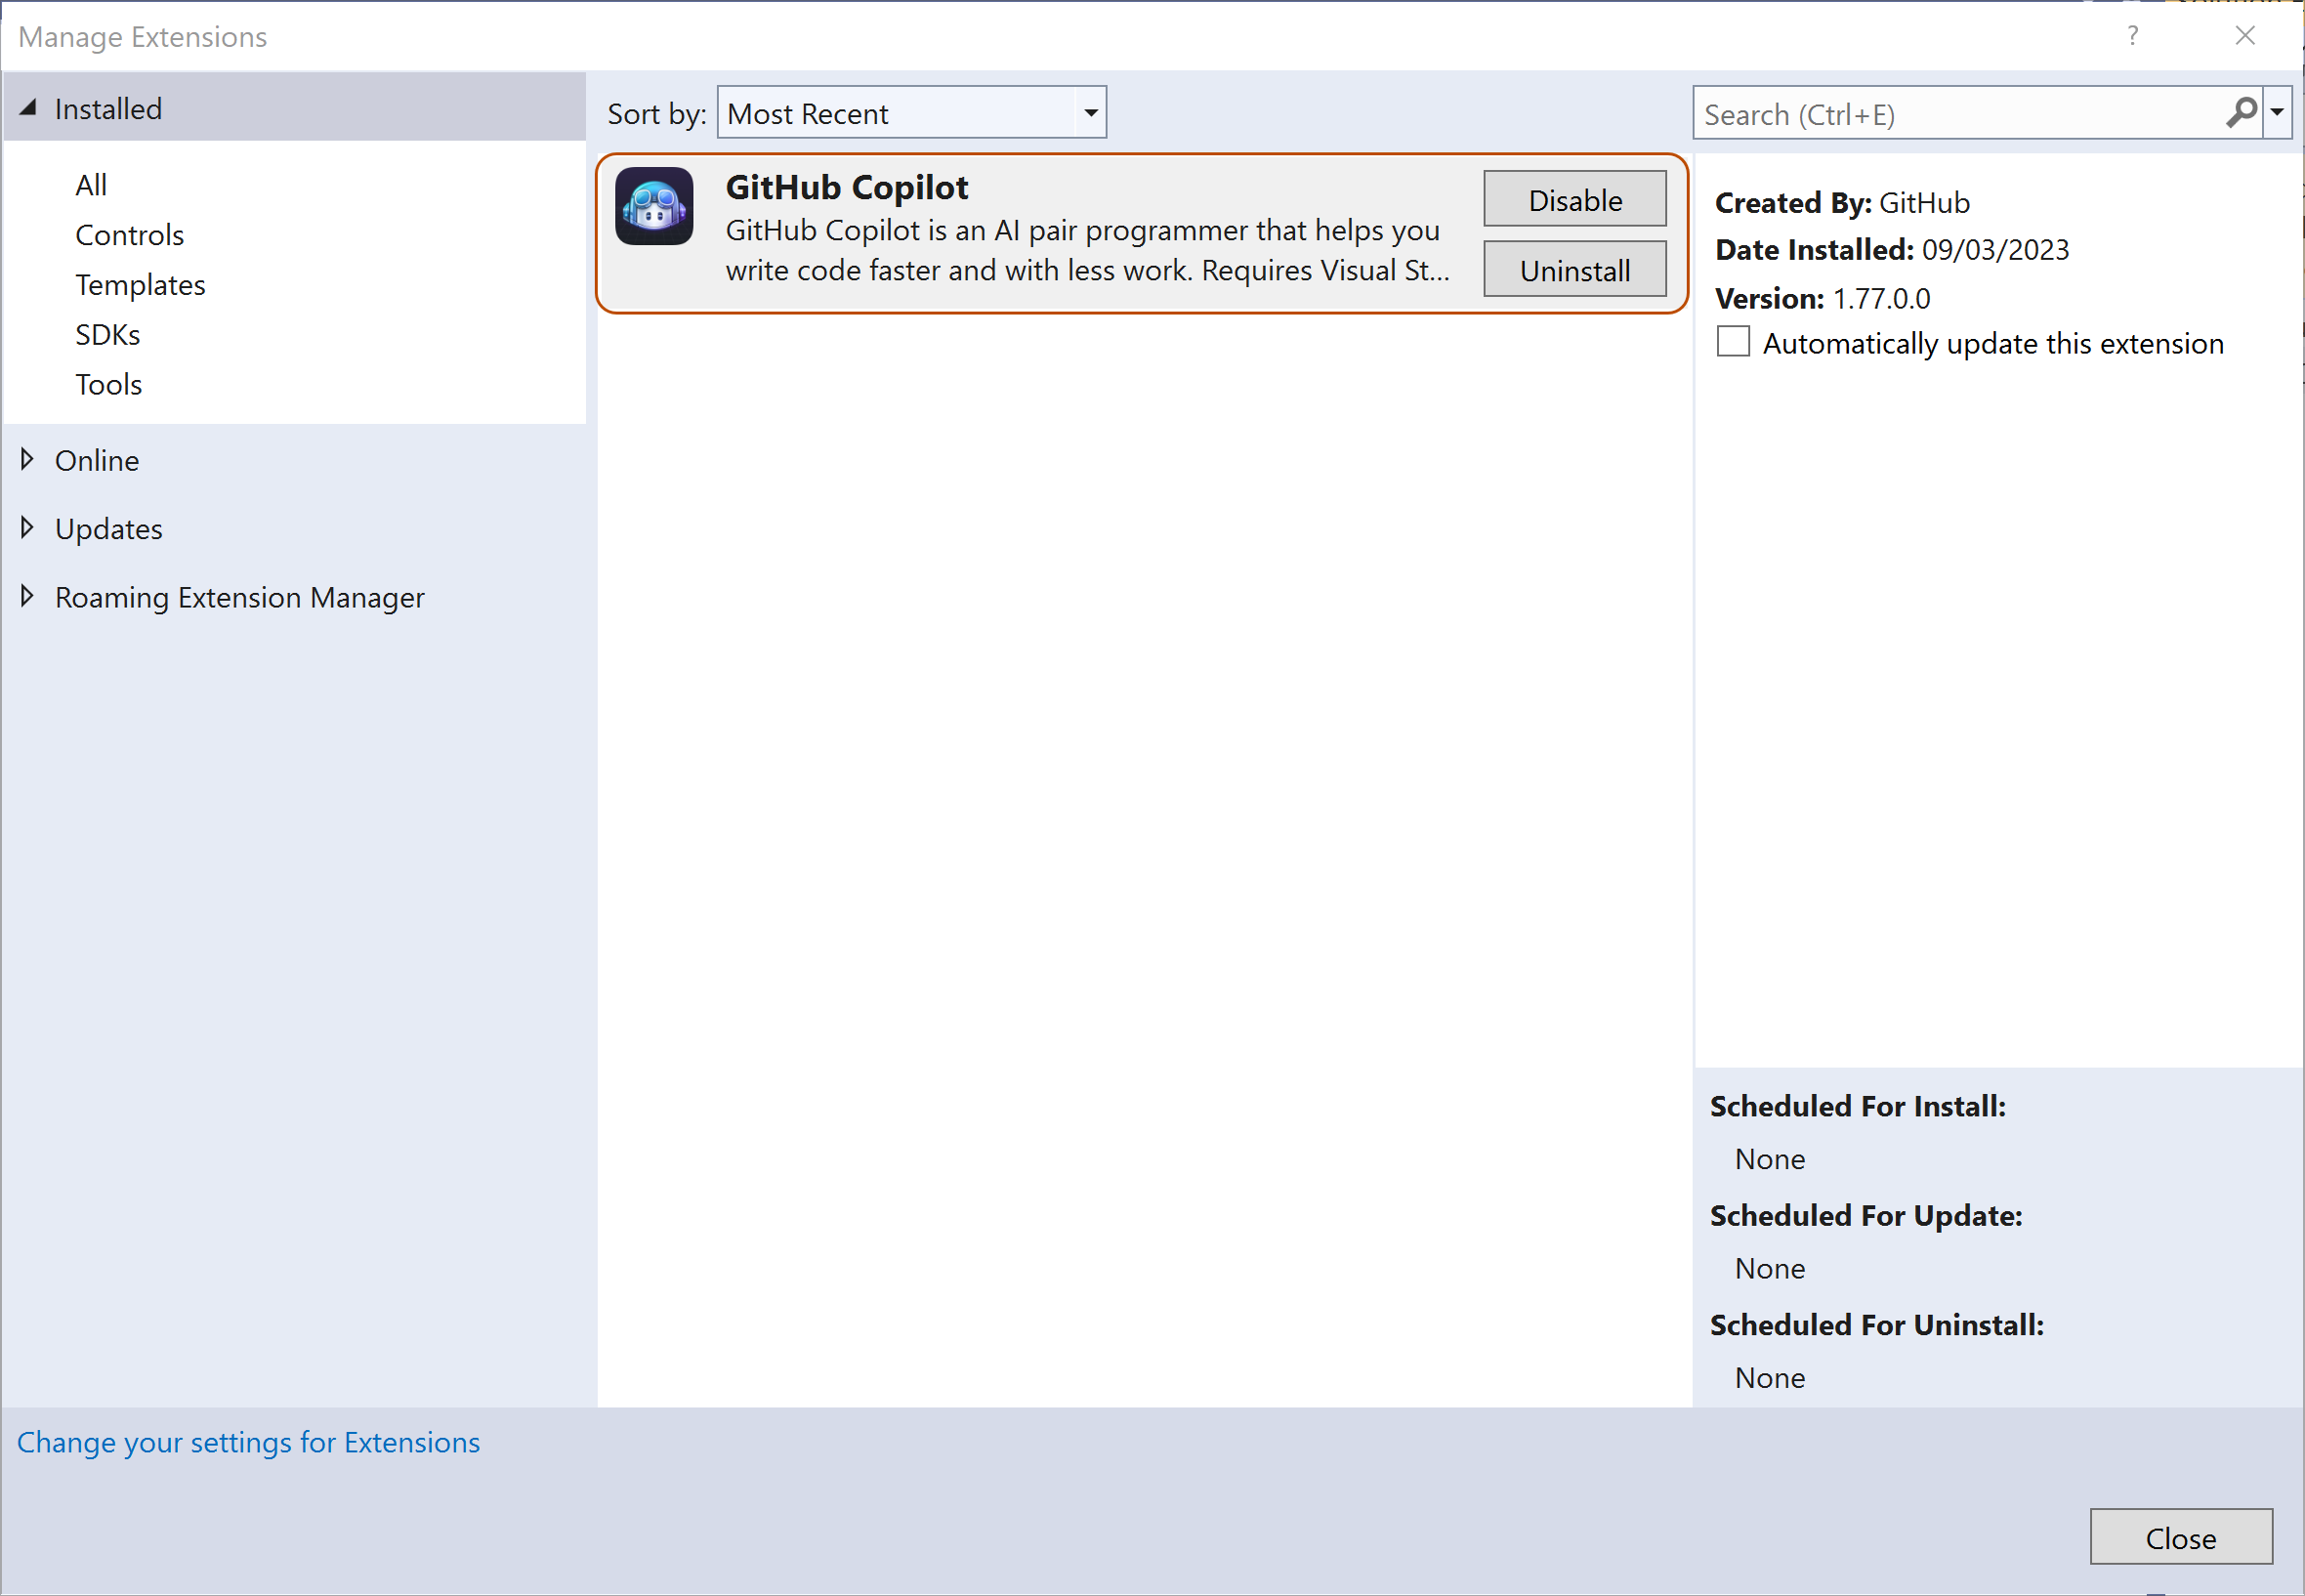
Opcionalmente, para verificar se o GitHub Copilot está instalado e habilitado, volte para Gerenciar Extensões, clique em Instalado para exibir suas extensões instaladas no momento e clique em GitHub Copilot para ver informações de status.
-
Abra ou crie um novo projeto no Visual Studio.
-
Para habilitar o GitHub Copilot, verifique se adicionou sua conta do GitHub ao Visual Studio. Para obter mais informações, confira Trabalhar com contas do GitHub no Visual Studio na documentação da Microsoft.
Como ver a primeira sugestão
Observação: quando a detecção de duplicação está habilitada para o GitHub Copilot, há a possibilidade de você receber sugestões limitadas ou nenhuma sugestão ao usar os exemplos de código fornecidos. Como alternativa, é possível começar digitando seu próprio código a fim de ver sugestões do GitHub Copilot. Para obter mais informações sobre a detecção de duplicação, confira "Como definir as configurações do GitHub Copilot no GitHub.com".
-
No Visual Studio, crie um arquivo C# ( *.cs).
-
No arquivo #C, digite a seguinte assinatura de função. O GitHub Copilot sugerirá automaticamente um corpo inteiro da função em texto esmaecido, como é mostrado abaixo. A sugestão exata pode variar.
C# int CalculateDaysBetweenDates(
int CalculateDaysBetweenDates( -
Para aceitar a sugestão, pressione Tab.
Como ver sugestões alternativas
Para qualquer entrada fornecida, GitHub Copilot podem oferecer várias sugestões. Você pode selecionar qual sugestão usar ou rejeitar todas as sugestões.
-
No Visual Studio, crie um arquivo C# ( *.cs).
-
No arquivo #C, digite a seguinte assinatura de função. GitHub Copilot will show you a suggestion.
C# int CalculateDaysBetweenDates(
int CalculateDaysBetweenDates( -
Se sugestões alternativas estiverem disponíveis, você poderá ver essas alternativas pressionando Alt+. (ou Alt+,).
-
Como opção, você pode focalizar a sugestão para ver a paleta de comandos do GitHub Copilot e escolher sugestões.
- Para aceitar uma sugestão, pressione Tab. Para rejeitar todas as sugestões, pressione Esc.
Gerar sugestões de código por meio de comentários
Você pode descrever algo que deseja fazer usando linguagem natural em um comentário e o GitHub Copilot sugerirá o código para atingir sua meta.
-
No Visual Studio, crie um arquivo C# ( *.cs).
-
No arquivo C#, digite o comentário a seguir. O GitHub Copilot sugerirá uma implementação da função.
C# using System.Xml.Linq; var doc = XDocument.Load("index.xhml"); // find all imagesusing System.Xml.Linq; var doc = XDocument.Load("index.xhml"); // find all images -
Para aceitar a sugestão, pressione Tab.
Como habilitar ou desabilitar o GitHub Copilot
O ícone de status do GitHub Copilot no painel inferior da janela do Visual Studio indica se o GitHub Copilot está habilitado ou desabilitado. Quando ele estiver habilitado, a cor da tela de fundo do ícone corresponderá à cor da barra de status. Quando desabilitado, haverá uma linha diagonal ao longo dele.
-
Para habilitar ou desabilitar o GitHub Copilot, clique no ícone GitHub Copilot no painel inferior da janela do Visual Studio.

-
Quando você estiver desabilitando o GitHub Copilot, será perguntado se deseja desabilitar as sugestões globalmente ou para a linguagem do arquivo em edição no momento.
- Para desabilitar as sugestões do GitHub Copilot globalmente, clique em Habilitar Globalmente.
- Para desabilitar as sugestões do GitHub Copilot para a linguagem especificada, clique em Habilitar para LINGUAGEM.
Sobre o GitHub Copilot e o Visual Studio Code
O GitHub Copilot oferece sugestões de preenchimento automático de um programador de par de IA à medida que você cria o código. Para obter mais informações, confira "Sobre o GitHub Copilot Individual".
Usando o Visual Studio Code, você pode ver e incorporar sugestões do GitHub Copilot diretamente no editor. Este guia demonstra como usar o GitHub Copilot dentro do Visual Studio Code para macOS, Windows ou Linux.
Pré-requisitos
-
Para usar o GitHub Copilot, é preciso ter uma assinatura ativa do GitHub Copilot. Para obter mais informações, confira "Sobre a cobrança para o GitHub Copilot".
-
Para usar o GitHub Copilot no Visual Studio Code, o Visual Studio Code precisa estar instalado. Para obter mais informações, confira a página de download do Visual Studio Code.
Instalação da extensão GitHub Copilot no Visual Studio Code
Para usar o GitHub Copilot, primeiro você deve instalar a extensão GitHub Copilot.
-
No Visual Studio Code Marketplace, acesse a página Extensão do GitHub Copilot e clique em Instalar.
-
Um pop-up será exibido, solicitando que você abra o Visual Studio Code. Clique em Abrir o Visual Studio Code .
-
Na guia "Extensão: GitHub Copilot" no Visual Studio Code, clique em Instalar.
-
Se você ainda não tiver autorizado o Visual Studio Code na conta do GitHub, será solicitado que você entre no GitHub no Visual Studio Code.
-
Se você já tiver autorizado o Visual Studio Code para sua conta no GitHub, o GitHub Copilot será autorizado automaticamente.
-
Se você não receber o prompt para autorização, clique no ícone de sino no painel inferior da janela do Visual Studio Code.

-
-
No navegador, o GitHub solicitará as permissões necessárias para o GitHub Copilot. Para aprovar essas permissões, clique em Autorizar o Visual Studio Code .
-
Para confirmar a autenticação, no Visual Studio Code, na caixa de diálogo "Visual Studio Code", clique em Abrir.
Como ver a primeira sugestão
Observação: quando a detecção de duplicação está habilitada para o GitHub Copilot, há a possibilidade de você receber sugestões limitadas ou nenhuma sugestão ao usar os exemplos de código fornecidos. Como alternativa, é possível começar digitando seu próprio código a fim de ver sugestões do GitHub Copilot. Para obter mais informações sobre a detecção de duplicação, confira "Como definir as configurações do GitHub Copilot no GitHub.com".
O GitHub Copilot oferece sugestões para várias linguagens e uma ampla variedade de estruturas, mas funciona melhor para Python, JavaScript, TypeScript, Ruby, Go, C# e C++. GitHub Copilot também pode ajudar na geração de consultas para bancos de dados. Os exemplos a seguir estão em JavaScript, mas as outras linguagens funcionarão da mesma forma.
-
No Visual Studio Code, crie um novo arquivo JavaScript ( *.js).
-
No arquivo JavaScript, digite o cabeçalho da função a seguir. O GitHub Copilot vai sugerir automaticamente um corpo inteiro da função em texto esmaecido, como é mostrado abaixo. A sugestão exata pode variar.
JavaScript function calculateDaysBetweenDates(begin, end) {function calculateDaysBetweenDates(begin, end) { -
Para aceitar a sugestão, pressione Tab.
Nota: se não vir uma sugestão, certifique-se de que o GitHub Copilot esteja ativado. Você verá o ícone do Copilot no canto inferior direito da janela Visual Studio Code.
Se um arquivo tiver sido configurado como conteúdo excluído no GitHub Copilot, o ícone na barra de status terá uma linha diagonal por todo ele. Passe o mouse sobre o ícone para ver uma dica de ferramenta que informa quais configurações aplicaram essa restrição.

Para obter mais informações, confira "Configurar exclusões de conteúdo no GitHub Copilot".
Como ver sugestões alternativas
Para qualquer entrada fornecida, GitHub Copilot podem oferecer várias sugestões. Você pode selecionar qual sugestão usar ou rejeitar todas as sugestões.
-
No Visual Studio Code, crie um novo arquivo JavaScript ( *.js).
-
No arquivo JavaScript, digite o cabeçalho da função a seguir. GitHub Copilot mostrará uma sugestão.
JavaScript function calculateDaysBetweenDates(begin, end) {function calculateDaysBetweenDates(begin, end) { -
Opcionalmente, você pode ver sugestões alternativas, quando há alguma disponível.
Sistema operacional Ver a próxima sugestão Ver a sugestão anterior macOS Opção (⌥) ou Alt+] Opção (⌥) ou Alt+[ Windows Alt+] Alt+[ Linux Alt+] Alt+[ -
Como alternativa, você pode focalizar a sugestão para ver a paleta de comandos do GitHub Copilot e escolher sugestões.
-
Para aceitar uma sugestão, pressione Tab. Para rejeitar todas as sugestões, pressione Esc.
Como aceitar parcialmente as sugestões
Talvez você não queira aceitar uma sugestão inteira do GitHub Copilot. Você pode usar atalhos de teclado para aceitar a próxima palavra ou a próxima linha de uma sugestão.
-
No Visual Studio Code, crie um novo arquivo JavaScript ( *.js).
-
No arquivo JavaScript, digite o cabeçalho da função a seguir. O GitHub Copilot vai sugerir automaticamente um corpo inteiro da função em texto esmaecido, como é mostrado abaixo. A sugestão exata pode variar.
JavaScript function calculateDaysBetweenDates(begin, end) {function calculateDaysBetweenDates(begin, end) { -
Se você quiser aceitar apenas a próxima palavra da sugestão, use um dos seguintes atalhos de teclado.
SO Aceitar a próxima palavra macOS Command+→ Windows Control+→ Linux Control+→ -
Se você quiser aceitar a próxima linha da sugestão, será necessário definir um atalho de teclado personalizado para o comando
editor.action.inlineSuggest.acceptNextLine. Para obter mais informações sobre a configuração de atalhos de teclado personalizados, confira "Como configurar o GitHub Copilot no seu ambiente". -
Como alternativa, você pode focalizar a sugestão para ver a paleta de comandos do GitHub Copilot e escolher sugestões.
Como ver várias sugestões em uma nova guia
Você pode não querer nenhuma das sugestões iniciais que o GitHub Copilot oferece. Você pode usar um atalho de teclado para solicitar que GitHub Copilot mostre várias sugestões em uma nova guia.
-
No Visual Studio Code, crie um novo arquivo JavaScript ( *.js).
-
No arquivo JavaScript, digite o cabeçalho da função a seguir. GitHub Copilot mostrará uma sugestão.
JavaScript function calculateDaysBetweenDates(begin, end) {function calculateDaysBetweenDates(begin, end) { -
Para abrir uma nova guia com várias opções adicionais, pressione Ctrl+Enter.
-
Para aceitar uma sugestão, abaixo da sugestão, clique em Aceitar sugestão NÚMERO. Para rejeitar todas as sugestões, feche a guia.
Como gerar sugestões de código por meio de comentários
Você pode descrever algo que deseja fazer usando linguagem natural em um comentário e o GitHub Copilot sugerirá o código para atingir sua meta.
-
No Visual Studio Code, crie um novo arquivo JavaScript ( *.js).
-
No arquivo JavaScript, digite o comentário a seguir. O GitHub Copilot vai sugerir uma implementação da função.
JavaScript // find all images without alternate text // and give them a red border function process() {// find all images without alternate text // and give them a red border function process() {
Como usar uma estrutura
Você também pode usar o GitHub Copilot para gerar sugestões de APIs e estruturas. O exemplo a seguir usa o GitHub Copilot para criar um servidor Express simples que retorna a hora atual.
-
No Visual Studio Code, crie um novo arquivo JavaScript ( *.js).
-
No arquivo JavaScript, digite o comentário a seguir e pressione Enter. O GitHub Copilot vai sugerir uma implementação do aplicativo Express.
JavaScript // Express server on port 3000
// Express server on port 3000 -
Para aceitar cada linha, pressione Tab e depois Enter.
-
Digite o comentário a seguir e pressione Enter. O GitHub Copilot sugerirá uma implementação para o manipulador padrão.
JavaScript // Return the current time
// Return the current time -
Para aceitar cada linha, pressione Tab.
Como habilitar ou desabilitar o GitHub Copilot
Você pode habilitar ou desabilitar o GitHub Copilot de dentro do Visual Studio Code. O ícone de status do GitHub Copilot no painel inferior da janela do Visual Studio Code indica se o GitHub Copilot está habilitado ou desabilitado. Quando ele estiver habilitado, a cor da tela de fundo do ícone corresponderá à cor da barra de status. Quando ele estiver desabilitado, a cor da tela de fundo do ícone se contrastará com a cor da barra de status.
-
Para habilitar ou desabilitar o GitHub Copilot, clique no ícone de status no painel inferior da janela do Visual Studio Code.

-
Quando você estiver desabilitando o GitHub Copilot, será perguntado se deseja desabilitar as sugestões globalmente ou para a linguagem do arquivo em edição no momento.
- Para desabilitar as sugestões do GitHub Copilot globalmente, clique em Desabilitar Globalmente.
- Para desabilitar as sugestões do GitHub Copilot para a linguagem especificada, clique em Desabilitar para a LINGUAGEM.

Sobre o GitHub Copilot e o Vim/Neovim
O GitHub Copilot oferece sugestões de preenchimento automático de um programador de par de IA à medida que você cria o código. Para obter mais informações, confira "Sobre o GitHub Copilot Individual".
Ao usar o Vim/Neovim, é possível exibir e incorporar sugestões do GitHub Copilot diretamente no editor.
Pré-requisitos
-
Para usar o GitHub Copilot, é preciso ter uma assinatura ativa do GitHub Copilot. Para obter mais informações, confira "Sobre a cobrança para o GitHub Copilot".
-
Para usar o GitHub Copilot no Vim/Neovim, é necessário ter o Vim 9.0.0185 / Neovim 0.6 ou posterior e o Node.js versão 18 ou superior instalados. Para obter mais informações, confira a documentação do Vim / Neovim e o site do Node.js.
Instalação da extensão GitHub Copilot no Vim/Neovim no macOS
- O GitHub recomenda que você instale o plug-in do GitHub Copilot com o gerenciador de plug-ins interno do Vim/Neovim. Como alternativa, você pode usar um gerenciador de plug-ins de sua escolha para instalar o
github/copilot.vim.
-
Para instalar o GitHub Copilot com o gerenciador de plug-ins interno do Vim, insira o seguinte comando no terminal:
git clone https://github.com/github/copilot.vim \ ~/.vim/pack/github/start/copilot.vim -
Para instalar o GitHub Copilot com o gerenciador de plug-ins interno do Neovim, insira o seguinte comando no terminal:
git clone https://github.com/github/copilot.vim \
   ~/.config/nvim/pack/github/start/copilot.vim
-
Para configurar o GitHub Copilot, abra o Vim/Neovim e insira o comando a seguir.
:Copilot setup -
Habilite o GitHub Copilot na configuração do Vim/Neovim ou com o comando Vim/Neovim.
:Copilot enable
Instalação da extensão GitHub Copilot no Vim/Neovim no Windows
- O GitHub recomenda que você instale o plug-in do GitHub Copilot com o gerenciador de plug-ins interno do Vim/Neovim. Como alternativa, você pode usar um gerenciador de plug-ins de sua escolha para instalar o
github/copilot.vim.
-
Para instalar o GitHub Copilot com o gerenciador de plug-ins interno do Vim, insira o seguinte comando no Git Bash:
git clone https://github.com/github/copilot.vim.git \ $HOME/vimfiles/pack/github/start/copilot.vim -
Para instalar o GitHub Copilot com o gerenciador de plug-ins interno do Neovim, insira o seguinte comando no Git Bash:
  git clone https://github.com/github/copilot.vim.git \
   $HOME/AppData/Local/nvim/pack/github/start/copilot.vim
-
Para configurar o GitHub Copilot, abra o Vim/Neovim e insira o comando a seguir.
:Copilot setup -
Habilite o GitHub Copilot na configuração do Vim/Neovim ou com o comando Vim/Neovim.
:Copilot enable
Instalação da extensão GitHub Copilot no Vim/Neovim no Linux
- O GitHub recomenda que você instale o plug-in do GitHub Copilot com o gerenciador de plug-ins interno do Vim/Neovim. Como alternativa, você pode usar um gerenciador de plug-ins de sua escolha para instalar o
github/copilot.vim.
-
Para instalar o GitHub Copilot com o gerenciador de plug-in interno do Vim, insira o seguinte comando:
git clone https://github.com/github/copilot.vim \ ~/.vim/pack/github/start/copilot.vim -
Para instalar o GitHub Copilot com o gerenciador de plug-in interno do Neovim, insira o seguinte comando:
git clone https://github.com/github/copilot.vim \
   ~/.config/nvim/pack/github/start/copilot.vim
-
Para configurar o GitHub Copilot, abra o Vim/Neovim e insira o comando a seguir.
:Copilot setup -
Habilite o GitHub Copilot na configuração do Vim/Neovim ou com o comando Vim/Neovim.
:Copilot enable
Aprendendo a usar o GitHub Copilot no Vim/Neovim
Para obter diretrizes sobre como usar o GitHub Copilot no Vim/Neovim, exiba a documentação do plug-in. Para ver a documentação, abra o Vim/Neovim e execute o seguinte comando:
:help copilot
Sobre o GitHub Copilot e o Azure Data Studio
O GitHub Copilot oferece sugestões de preenchimento automático de um programador de par de IA à medida que você cria o código. Para obter mais informações, confira "Sobre o GitHub Copilot Individual".
Se você usar o Azure Data Studio, poderá exibir e incorporar sugestões do GitHub Copilot diretamente no editor. Este guia demonstra como usar o GitHub Copilot com o Azure Data Studio para macOS, Windows ou Linux.
Pré-requisitos
-
Para usar o GitHub Copilot, é preciso ter uma assinatura ativa do GitHub Copilot. Para obter mais informações, confira "Sobre a cobrança para o GitHub Copilot".
-
Para usar o GitHub Copilot no Azure Data Studio, você deve ter o Azure Data Studio versão 1.44.0 ou posterior instalado. Para obter mais informações, consulte a página de download do Azure Data Studio na documentação do Azure Data Studio.
Instalação da extensão GitHub Copilot no Azure Data Studio
Para usar o GitHub Copilot, primeiro você deve instalar a extensão GitHub Copilot.
-
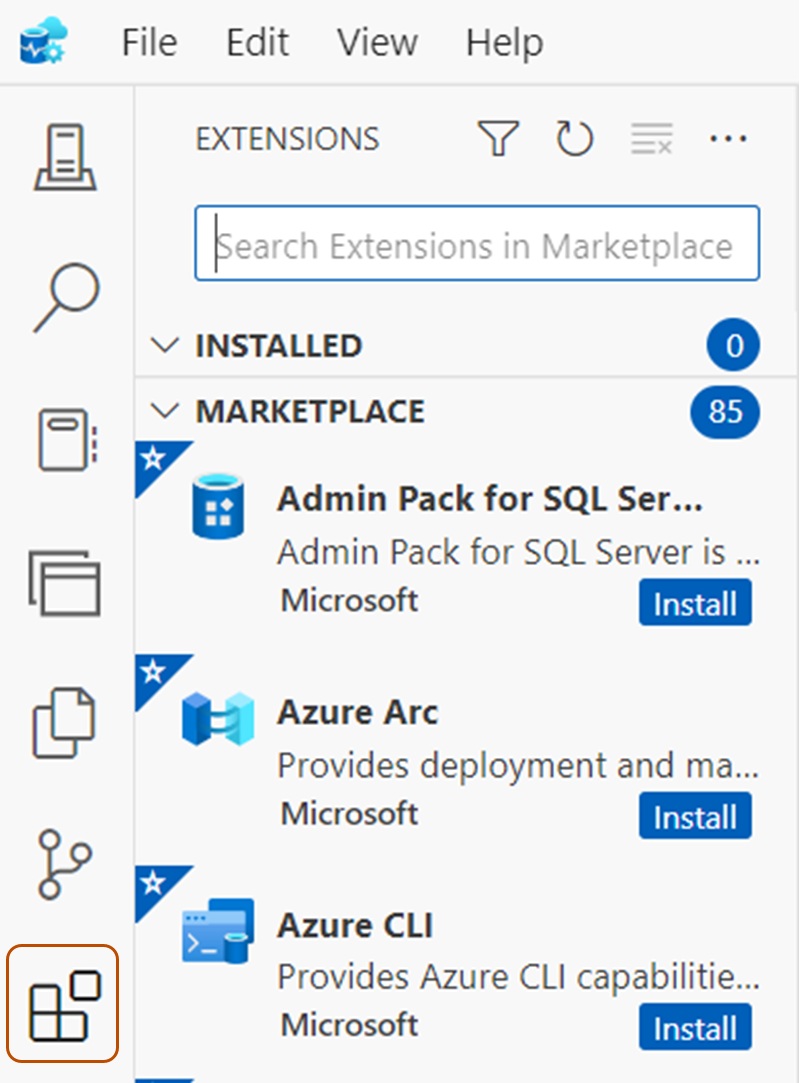
No Azure Data Studio, clique no ícone Extensões no menu do lado esquerdo.
-
Na guia "Extensões", pesquise GitHub Copilot e clique em Instalar.
-
Se uma janela pop-up no Azure Data Studio solicitar que você entre para usar o GitHub Copilot, clique em Entrar no GitHub e siga as instruções na tela.
- Se você tiver autorizado anteriormente o Azure Data Studio para sua conta no GitHub, o GitHub Copilot será automaticamente autorizado.
- Se você não receber o prompt para autorização, poderá exibir notificações clicando no ícone de sino no painel inferior da janela do Azure Data Studio.
-
Se você estiver seguindo as etapas de autorização, no seu navegador, o GitHub solicitará as permissões necessárias para o GitHub Copilot. Para aprovar essas permissões, clique em Autorizar o Azure Data Studio.
Como ver a primeira sugestão
Observação: quando a detecção de duplicação está habilitada para o GitHub Copilot, há a possibilidade de você receber sugestões limitadas ou nenhuma sugestão ao usar os exemplos de código fornecidos. Como alternativa, é possível começar digitando seu próprio código a fim de ver sugestões do GitHub Copilot. Para obter mais informações sobre a detecção de duplicação, confira "Como definir as configurações do GitHub Copilot no GitHub.com".
O GitHub Copilot pode fornecer sugestões embutidas ao criar bancos de dados SQL no Azure Data Studio. Por exemplo, se você estiver escrevendo uma consulta que une duas tabelas, o Copilot poderá sugerir a condição de junção de colunas no editor aberto, outros arquivos no espaço de trabalho e padrões de sintaxe comuns.
-
In Azure Data Studio, create a new SQL file.
-
No arquivo SQL, digite a consulta a seguir. O GitHub Copilot sugerirá automaticamente uma condição de junção em texto esmaecido. A sugestão exata pode variar.
SQL SELECT [UserId], [Red], [Orange], [Yellow], [Green], [Blue], [Purple], [Rainbow] FROM [Tag].[Scoreboard] INNER JOIN
SELECT [UserId], [Red], [Orange], [Yellow], [Green], [Blue], [Purple], [Rainbow] FROM [Tag].[Scoreboard] INNER JOIN -
Para aceitar a sugestão, pressione Tab.
Como ver sugestões alternativas
Para algumas sugestões, o GitHub Copilot pode fornecer várias alternativas. Você pode selecionar qual sugestão deseja usar ou rejeitar todas as sugestões.
-
In Azure Data Studio, create a new SQL file.
-
No arquivo SQL, digite a consulta a seguir. GitHub Copilot will show you a suggestion.
SQL SELECT [UserId], [Red], [Orange], [Yellow], [Green], [Blue], [Purple], [Rainbow] FROM [Tag].[Scoreboard] INNER JOIN
SELECT [UserId], [Red], [Orange], [Yellow], [Green], [Blue], [Purple], [Rainbow] FROM [Tag].[Scoreboard] INNER JOIN -
Opcionalmente, você pode ver sugestões alternativas, quando há alguma disponível.
Sistema operacional Ver a próxima sugestão Ver a sugestão anterior Windows Alt+[ Alt+] Linux Alt+[ Alt+] macOS Opção+[ Opção+]
Como aceitar parcialmente as sugestões
Talvez você não queira aceitar uma sugestão inteira do GitHub Copilot. Você pode usar atalhos de teclado para aceitar a próxima palavra ou a próxima linha de uma sugestão.
-
In Azure Data Studio, create a new SQL file.
-
No arquivo SQL, digite a consulta a seguir. GitHub Copilot will show you a suggestion.
SQL SELECT [UserId], [Red], [Orange], [Yellow], [Green], [Blue], [Purple], [Rainbow] FROM [Tag].[Scoreboard] INNER JOIN
SELECT [UserId], [Red], [Orange], [Yellow], [Green], [Blue], [Purple], [Rainbow] FROM [Tag].[Scoreboard] INNER JOIN -
Se você quiser aceitar apenas a próxima palavra da sugestão, use um dos seguintes atalhos de teclado.
SO Aceitar a próxima palavra macOS Command+→ Windows Control+→ Linux Control+→ -
Se você quiser aceitar a próxima linha da sugestão, será necessário definir um atalho de teclado personalizado para o comando
editor.action.inlineSuggest.acceptNextLine. Para obter mais informações sobre como definir atalhos de teclado personalizados, consulte "Atalhos de teclado no Azure Data Studio", na documentação da Microsoft. -
Como alternativa, você pode focalizar a sugestão para ver a paleta de comandos do GitHub Copilot e escolher sugestões.
Gerar sugestões de código por meio de comentários
Você pode descrever algo que deseja fazer usando linguagem natural em um comentário e o GitHub Copilot sugerirá o código para atingir sua meta.
-
In Azure Data Studio, create a new SQL file.
-
No arquivo SQL, digite a consulta e o comentário a seguir. O GitHub Copilot sugerirá uma implementação da consulta.
SQL SELECT TokenColor, COUNT(UserID) AS UserCount FROM Tag.Users GROUP BY TokenColor -- pivot that query on tokencolor for Purple, Blue, Green, Yellow, Orange, Red -- and rename the columns to match the colors SELECT [Purple], [Blue], [Green], [Yellow], [Orange], [Red]
SELECT TokenColor, COUNT(UserID) AS UserCount
FROM Tag.Users
GROUP BY TokenColor
-- pivot that query on tokencolor for Purple, Blue, Green, Yellow, Orange, Red
-- and rename the columns to match the colors
SELECT [Purple], [Blue], [Green], [Yellow], [Orange], [Red]
Como habilitar ou desabilitar o GitHub Copilot
Você pode habilitar ou desabilitar o GitHub Copilot no Azure Data Studio. O ícone de status do GitHub Copilot no painel inferior da janela do Azure Data Studio indica se o GitHub Copilot está habilitado ou desabilitado. Quando ele estiver habilitado, a cor da tela de fundo do ícone corresponderá à cor da barra de status. Quando ele estiver desabilitado, a cor da tela de fundo do ícone se contrastará com a cor da barra de status.
-
Para habilitar ou desabilitar o GitHub Copilot, clique no ícone de status no painel inferior da janela do Azure Data Studio.

-
Quando você estiver desabilitando o GitHub Copilot, será perguntado se deseja desabilitar as sugestões globalmente ou para a linguagem do arquivo em edição no momento.
- Para desabilitar as sugestões do GitHub Copilot globalmente, clique em Desabilitar Globalmente.
- Para desabilitar as sugestões do GitHub Copilot para a linguagem especificada, clique em Desabilitar para a LINGUAGEM.

Próximas etapas
Você instalou com êxito o GitHub Copilot e recebeu sua primeira sugestão, mas isso é apenas o começo! Confira alguns recursos úteis para dar seus próximos passos com o GitHub Copilot.
- GitHub Copilot: confira exemplos práticos de como o GitHub Copilot pode ajudar você a trabalhar.
- "Usando o GitHub Copilot Chat em seu IDE" e "Usar o GitHub Copilot Chat no GitHub.com": Saiba como pedir informações e assistência ao GitHub Copilot.
- "Como configurar o GitHub Copilot": estes guias fornecem detalhes sobre como configurar o GitHub Copilot para suas preferências pessoais.
- "Como gerenciar a cobrança do GitHub Copilot": saiba mais sobre a cobrança do GitHub Copilot.
- "Solução de problemas do GitHub Copilot": estes guias fornecem informações para solução de problemas do GitHub Copilot.