ノート: GitHubホストランナーは、現在GitHub Enterprise Serverでサポートされていません。 GitHubパブリックロードマップで、計画されている将来のサポートに関する詳しい情� �を見ることができます。
はじめに
このガイドでは、パッケージ化されたJavaScriptのアクションを作成して使うために必要な、基本的コンポーネントについて学びます。 アクションのパッケージ化に必要なコンポーネントのガイドに焦点を当てるため、アクションのコードの機能は最小限に留めます。 このアクションは、ログに "Hello World" を出力するものです。また、カスタ� 名を指定した� �合は、"Hello [who-to-greet]" を出力します。
このガイドでは、開発の速度を高めるためにGitHub Actions ToolkitのNode.jsモジュールを使います。 詳しい情� �については、actions/toolkit リポジトリ以下を参照してく� さい。
このプロジェクトを完了すると、あなたの JavaScript コンテナのアクションをビルドして、ワークフローでテストする方法が理解できます
JavaScriptのアクションがGitHubがホストするすべてのランナー(Ubuntu、Windows、macOS)と互換性があることを保証するためには、作成するパッケージ化されたJacScriptのコードは純粋なJavaScriptであり、他のバイナリに依存していてはなりません。 JavaScriptのアクションはランナー上で直接実行され、仮想環境内にすでに存在するバイナリを利用します。
警告: ワークフローやアクションを作る際には、攻撃者からの信� �できない入力をコードが実行するかもしれないことを、常に意識しなければなりません。 攻撃者が悪意あるコンテンツを挿入してくるかもしれないので、特定のコンテキストは信� �できない入力として扱うべきです。 詳しい情� �については「スクリプトインジェクションのリスクを理解する」を参照してく� さい。
必要な環境
Before you begin, you'll need to download Node.js and create a public GitHub repository.
-
Download and install Node.js 12.x, which includes npm.
-
Create a new public repository on GitHub Enterprise Serverインスタンス and call it "hello-world-javascript-action". 詳しい情� �については、「新しいリポジトリの作成」を参照してく� さい。
-
リポジトリをお手元のコンピューターにクローンします。 詳しい情� �についてはリポジトリのクローンを参照してく� さい。
-
ターミナルから、ディレクトリを新しいリポジトリに変更します。
Shell cd hello-world-javascript-action -
From your terminal, initialize the directory with npm to generate a
package.jsonfile.Shell npm init -y
アクションのメタデータファイルの作成
Create a new file named action.yml in the hello-world-javascript-action directory with the following example code. 詳しい情� �については、「GitHub Actions のメタデータ構文」を参照してく� さい。
name: 'Hello World'
description: 'Greet someone and record the time'
inputs:
  who-to-greet:  # id of input
    description: 'Who to greet'
    required: true
    default: 'World'
outputs:
  time: # id of output
    description: 'The time we greeted you'
runs:
  using: 'node12'
main: 'index.js'このファイルは、who-to-greet 入力と time 出力を定義しています。 また、アクションのランナーに対して、この JavaScript アクションの実行を開始する方法を伝えています。
アクションツールキットのパッケージの追�
アクションのツールキットは、Node.js パッケージのコレクションで、より一貫性を保ちつつ、JavaScript を� 早く作成するためのものです。
ツールキットの @actions/core パッケージは、ワークフローコマンド、入力変数と出力変数、終了ステータス、およびデバッグメッセージへのインターフェースを提供します。
このツールキットは、認証された Octokit REST クライアントと GitHub Actions コンテキストへのアクセスを返す @actions/github パッケージも提供します。
ツールキットは、core や github パッケージ以外のものも提供しています。 詳しい情� �については、actions/toolkit リポジトリ以下を参照してく� さい。
ターミナルで、アクションツールキットの core および github パッケージをインストールします。
npm install @actions/core
npm install @actions/githubこれで、node_modules ディレクトリと先ほどインストールしたモジュール、package-lock.json ファイルとインストールしたモジュールの依存関係、およびインストールした各モジュールのバージョンが表示されるはずです。
アクションのコードの記述
このアクションは、ツールキットを使って、アクションのメタデータファイルに必要な who-to-greet 入力変数を取得し、ログのデバッグメッセージに "Hello [who-to-greet]" を出力します。 次に、スクリプトは現在の時刻を取得し、それをジョブ内で後に実行するアクションが利用できる出力変数に設定します。
GitHub Actions は、webhook イベント、Git ref、ワークフロー、アクション、およびワークフローをトリガーした人に関するコンテキスト情� �を提供します。 コンテキスト情� �にアクセスするために、github パッケージを利用できます。 あなたの書くアクションが、webhook イベントペイロードをログに出力します。
以下のコードで、index.js と名付けた新しいファイルを追� してく� さい。
const core = require('@actions/core');
const github = require('@actions/github');

try {
  // `who-to-greet` input defined in action metadata file
  const nameToGreet = core.getInput('who-to-greet');
  console.log(`Hello ${nameToGreet}!`);
  const time = (new Date()).toTimeString();
  core.setOutput("time", time);
  // Get the JSON webhook payload for the event that triggered the workflow
  const payload = JSON.stringify(github.context.payload, undefined, 2)
  console.log(`The event payload: ${payload}`);
} catch (error) {
  core.setFailed(error.message);
}
上記の index.js の例でエラーがスローされた� �合、core.setFailed(error.message); はアクションツールキット @actions/core パッケージを使用してメッセージをログに記録し、失敗の終了コードを設定します。 詳しい情� �については「アクションの終了コードの設定」を参照してく� さい。
READMEの作成
アクションの使用方法を説明するために、README ファイルを作成できます。 README はアクションの公開を計画している時に非常に役立ちます。また、アクションの使い方をあなたやチー� が覚えておく方法としても優れています。
hello-world-javascript-action ディレクトリの中に、以下の情� �を指定した README.md ファイルを作成してく� さい。
- アクションが実行する内容の詳細
- 必� �の入力引数と出力引数
- オプションの入力引数と出力引数
- アクションが使用するシークレット
- アクションが使用する環境変数
- ワークフローでアクションを使う使用方法の例
# Hello world javascript action

This action prints "Hello World" or "Hello" + the name of a person to greet to the log.

## Inputs

## `who-to-greet`

**Required** The name of the person to greet. デフォルトは `"World"`。

## Outputs

## `time`

The time we greeted you.

## 使用例

uses: actions/hello-world-javascript-action@v1.1
with:
  who-to-greet: 'Mona the Octocat'
アクションの GitHub へのコミットとタグ、プッシュ
GitHub Enterprise Server が、動作時にワークフロー内で実行される各アクションをダウンロードし、コードの完全なパッケージとして実行すると、ランナーマシンを操作するためのrun などのワークフローコマンドが使えるようになります。 つまり、JavaScript コードを実行するために必要なあらゆる依存関係を含める必要があります。 アクションのリポジトリに、ツールキットの core および github パッケージをチェックインする必要があります。
ターミナルから、action.yml、index.js、node_modules、package.json、package-lock.json、および README.md ファイルをコミットします。 node_modules を一覧表示する .gitignore ファイルを追� した� �合、node_modules ディレクトリをコミットするため、その行を削除する必要があります。
アクションのリリースにはバージョンタグを� えることもベストプラクティスです。 アクションのバージョン管理の詳細については、「アクションについて」を参照してく� さい。
git add action.yml index.js node_modules/* package.json package-lock.json README.md
git commit -m "My first action is ready"
git tag -a -m "My first action release" v1.1
git push --follow-tags
node_modules ディレクトリをチェックインすると、問題が発生する可能性があります。 別の方法として、@vercel/ncc というツールを使用して、コードとモジュールを配布に使用する 1 つのファイルにコンパイルできます。
-
ターミナルで次のコマンドを実行し、
vercel/nccをインストールします:npm i -g @vercel/ncc -
次のコマンドで、
index.jsファイルをコンパイルします:ncc build index.js --license licenses.txtコードの書かれた、新しい
dist/index.jsファイルと、コンパイルされたモジュールが表示されます。 また、使用しているnode_modulesのすべてのライセンスを含む、dist/licenses.txtファイルも表示されます。 -
新しい
dist/index.jsファイルを利用するため、次のコマンドでaction.ymlのmainキーワードを変更します:main: 'dist/index.js' -
すでに
node_modulesディレクトリをチェックインしていた� �合、次のコマンドで削除します:rm -rf node_modules/* -
ターミナルから、
action.yml、dist/index.js、およびnode_modulesファイルをコミットします。
git add action.yml dist/index.js node_modules/*
git commit -m "Use vercel/ncc"
git tag -a -m "My first action release" v1.1
git push --follow-tags
ワークフローでアクションをテストする
これで、ワークフローでアクションをテストできるようになりました。 プライベートリポジトリにあるアクションは、同じリポジトリのワークフローでしか使用できません。 パブリックアクションは、どのリポジトリのワークフローでも使用できます。
Note: GitHub Actions on GitHub Enterprise Serverインスタンス may have limited access to actions on GitHub.com or GitHub Marketplace. For more information, see "Managing access to actions from GitHub.com" and contact your GitHub Enterprise site administrator.
パブリックアクションを使用する例
This example demonstrates how your new public action can be run from within an external repository.
Copy the following YAML into a new file at .github/workflows/main.yml, and update the uses: octocat/hello-world-javascript-action@v1.1 line with your username and the name of the public repository you created above. who-to-greetの入力を自分の名前に置き換えることもできます。
on: [push]

jobs:
  hello_world_job:
    runs-on: ubuntu-latest
    name: A job to say hello
    steps:
      - name: Hello world action step
        id: hello
        uses: octocat/hello-world-javascript-action@v1.1
        with:
          who-to-greet: 'Mona the Octocat'
      # Use the output from the `hello` step
      - name: Get the output time
        run: echo "The time was ${{ steps.hello.outputs.time }}"
When this workflow is triggered, the runner will download the hello-world-javascript-action action from your public repository and then execute it.
プライベートアクションを使用する例
ワークフローコードを、あなたのアクションのリポジトリの .github/workflows/main.yml ファイルにコピーします。 who-to-greetの入力を自分の名前に置き換えることもできます。
.github/workflows/main.yml
on: [push]
jobs:
hello_world_job:
runs-on: ubuntu-latest
name: A job to say hello
steps:
# To use this repository's private action,
# you must check out the repository
- name: Checkout
uses: actions/checkout@v2
- name: Hello world action step
uses: ./ # Uses an action in the root directory
id: hello
with:
who-to-greet: 'Mona the Octocat'
# Use the output from the `hello` step
- name: Get the output time
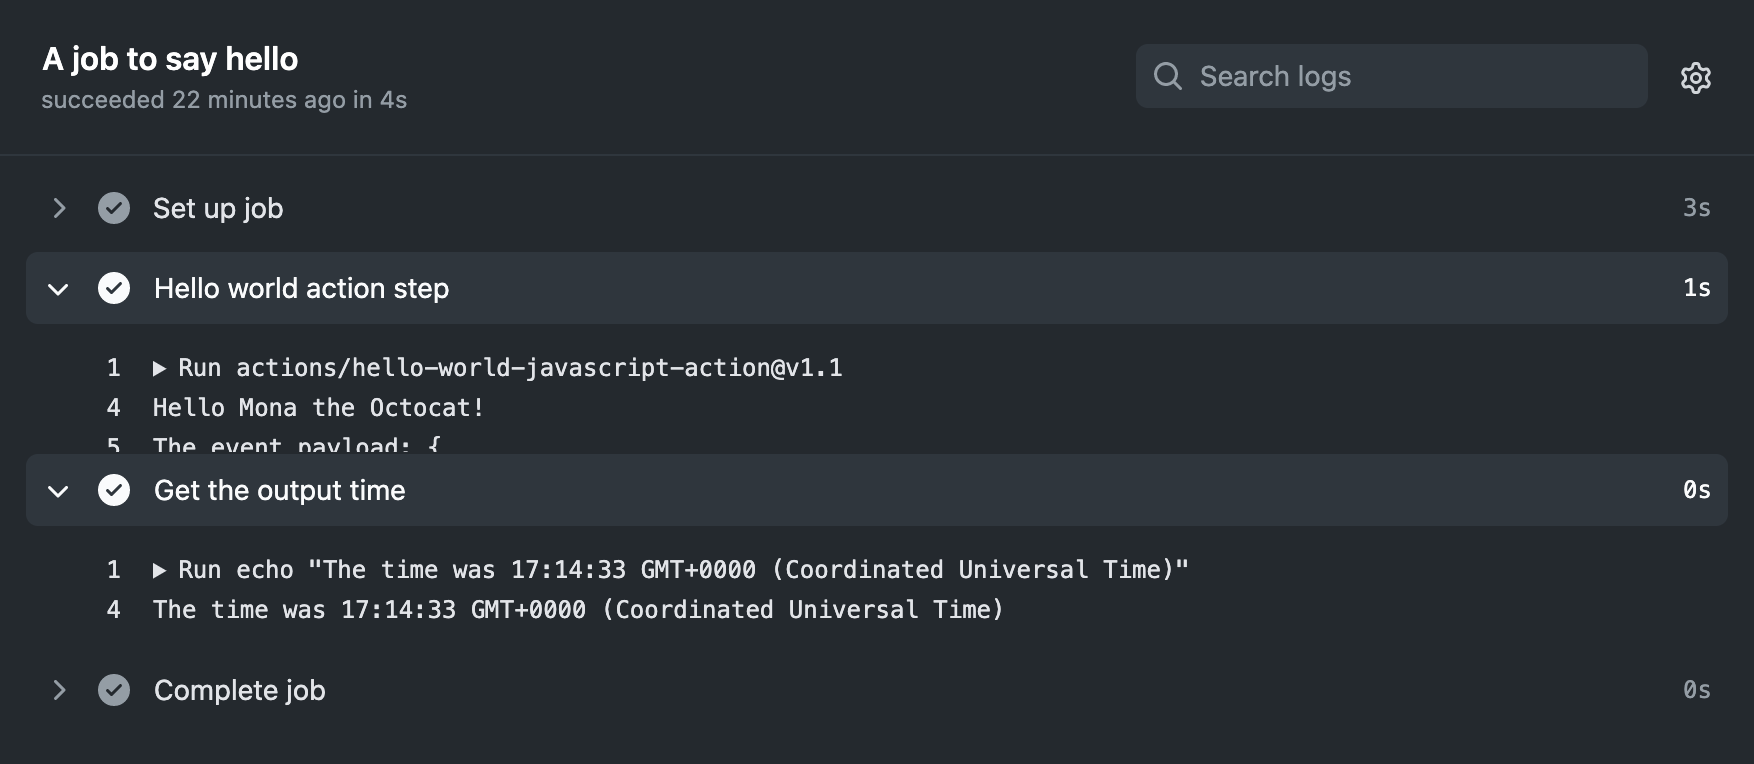
run: echo "The time was ${{ steps.hello.outputs.time }}"リポジトリから [Actions] タブをクリックして、最新のワークフロー実行を選択します。 Under Jobs or in the visualization graph, click A job to say hello. "Hello Mona the Octocat"、またはwho-to-greet 入力に指定した名前とタイ� スタンプがログに出力されます。