Visual Studio Code の GitHub Codespaces について
Visual Studio Code のローカル インストールを使用して、codespace の作成、管理、作業、削除を行うことができます。 VS Code で GitHub Codespaces を使用するには、Codespaces 拡張機能をインストールする必要があります。 VS Code での GitHub Codespaces の設定について詳しくは、「前提条件」をご覧ください。
既定では、GitHub.com で作成した新しい codespace は、ブラウザーで開きます。 VS Code で新しい codespace を自動的に開きたい場合は、既定のエディターを VS Code に設定できます。 詳しくは、「GitHub Codespaces の既定のエディターを設定する」を参照してください。
ブラウザーで作業したいが、既存の VS Code 拡張機能、テーマ、ショートカットを引き続き使用する場合は、[設定の同期] を有効にすることができます。詳細については、「アカウントの GitHub Codespaces をパーソナライズする」を参照してください。
前提条件
VS Code の codespace で直接開発するには、GitHub Codespaces 拡張機能をインストールして、GitHub Enterprise Cloud 資格情報を使用してサインインする必要があります。 GitHub Codespaces 拡張機能には、VS Code October 2020 Release 1.51 以降が必要です。
Visual Studio Code Marketplace を使用して GitHub Codespaces 拡張機能をインストールします。 詳細については、VS Code ドキュメントの「拡張機能マーケットプレース」を参照してください。
-
VS Code のアクティビティ バーで、[リモート エクスプローラー] アイコンをクリックします。
![アクティビティ バーのスクリーンショット。 [リモート エクスプローラー] サイド バーのアイコン (四角形の上に円が重なっている) がオレンジ色の枠線で強調表示されています。](/assets/cb-48475/images/help/codespaces/click-remote-explorer-icon-vscode.png)
注: リモート エクスプローラーがアクティビティ バーに表示されない場合:
- コマンド パレットにアクセスします。 たとえば、Shift + Command + P (Mac) / Ctrl + Shift + P (Windows/Linux) を押します。
- 次のコマンドを入力します:
details - [コードスペース: 詳細] をクリックします。
-
まだ選んでいない場合、[リモート エクスプローラー] サイド バーの上部にあるドロップダウンから [GitHub Codespaces] を選んでください。
-
[GitHub にサインイン] をクリックします。
![[リモート エクスプローラー] サイド バーの [GitHub Codespaces] のスクリーンショット。[GitHub にサインイン] ボタンが表示されています。](/assets/cb-63149/images/help/codespaces/sign-in-to-view-codespaces-vscode.png)
-
現在 GitHub にサインインしていない場合、サインインするように求めるメッセージが表示されます。 要求に従ってサインインしてください。
-
承認する内容を指定するように求められたら、[GitHub] の [承認] ボタンをクリックします。
-
承認ページが表示されたら、 [Visual-Studio-Code の承認] をクリックします。
![[リモート エクスプローラー] サイド バーの [GitHub Codespaces] のスクリーンショット。[GitHub にサインイン] ボタンが表示されています。](/assets/cb-63149/mw-1440/images/help/codespaces/sign-in-to-view-codespaces-vscode.webp)
VS Code で Codespaces を作成する
GitHub.com のアカウントを GitHub Codespaces 拡張機能に接続したら、新しい codespace を作成することができます。 GitHub Codespaces 拡張機能の詳しい情報については、VS Code Marketplace に関するページを参照してください。
-
VS Code のアクティビティ バーで、[リモート エクスプローラー] アイコンをクリックします。
注: リモート エクスプローラーがアクティビティ バーに表示されない場合:
- コマンド パレットにアクセスします。 たとえば、Shift + Command + P (Mac) / Ctrl + Shift + P (Windows/Linux) を押します。
- 次のコマンドを入力します:
details - [コードスペース: 詳細] をクリックします。
-
[リモート エクスプローラー] サイド バーの上にマウス ポインターを合わせ、[] をクリックします。
![GitHub Codespaces の [リモート エクスプローラー] サイド バーのスクリーンショット。 プラス記号ボタンの横に [新しい codespace の作成] というヒントが表示されています。](/assets/cb-26869/images/help/codespaces/create-codespace-vscode.png)
-
テキスト ボックスに開発を行うリポジトリの名前を入力し、それを選択します。
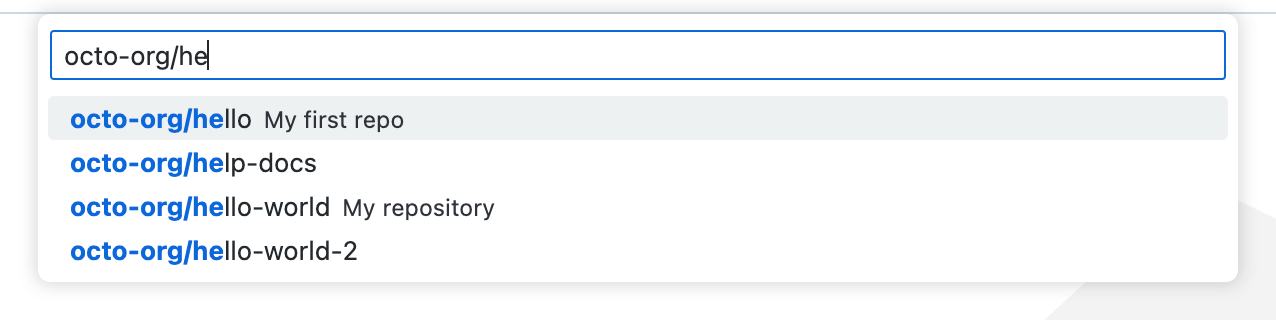
後続のプロンプトの右側に、codespace の料金を支払うユーザーを示すメッセージが表示されます。

-
開発するブランチをクリックします。
-
開発コンテナー構成ファイルの選択を求められたら、一覧からファイルを選びます。
-
使用するマシンの種類をクリックします。
注: 使用可能なマシンは、数多くの要因によって、選択の幅が制限されます。 これには、Organization に対して構成されているポリシーや、リポジトリでの最低限の種類のマシン仕様が含まれます。 詳細については、「コンピューターの種類へのアクセスを制限する」および「codespace コンピューターに対して最小仕様を設定する」を参照してください。
![GitHub Codespaces の [リモート エクスプローラー] サイド バーのスクリーンショット。 プラス記号ボタンの横に [新しい codespace の作成] というヒントが表示されています。](/assets/cb-26869/mw-1440/images/help/codespaces/create-codespace-vscode.webp)


VS Code で codespace を開く
-
VS Code のアクティビティ バーで、[リモート エクスプローラー] アイコンをクリックします。
注: リモート エクスプローラーがアクティビティ バーに表示されない場合:
- コマンド パレットにアクセスします。 たとえば、Shift + Command + P (Mac) / Ctrl + Shift + P (Windows/Linux) を押します。
- 次のコマンドを入力します:
details - [コードスペース: 詳細] をクリックします。
-
[GitHub Codespaces] の下で、開発を行う codespace の上にマウス ポインターを合わせます。
-
接続アイコン (プラグの記号) をクリックします。
![[リモート エクスプローラー] サイド バーのスクリーンショット。 codespace の接続アイコン (プラグの記号) が濃いオレンジ色の枠線で強調表示されています。](/assets/cb-44647/images/help/codespaces/click-connect-to-codespace-icon-vscode.png)
VS Code のマシンの種類の変更
通常、任意の種類のリモート マシン上で codespace を実行できます。 これらのマシンの種類には、2 コアから 32 コアまでのハードウェア仕様が用意されていますが、すべての種類のマシンが常に使用できるわけではありません。 マシンの各種類には、それぞれ異なるレベルのリソースと異なる請求レベルが用意されています。 詳しくは、「GitHub Codespaces の請求について」をご覧ください。
既定では、codespace を作成するときに、有効なリソースが最も少ないマシンの種類が使われます。 codespace のマシンの種類はいつでも変更できます。
注: 使用可能なマシンは、数多くの要因によって、選択の幅が制限されます。 これには、Organization に対して構成されているポリシーや、リポジトリでの最低限の種類のマシン仕様が含まれます。 詳細については、「コンピューターの種類へのアクセスを制限する」および「codespace コンピューターに対して最小仕様を設定する」を参照してください。
-
VS Code で、Command + Shift + P (Mac) または Ctrl + Shift + P (Windows/Linux) を使ってコマンド パレットを開きます。
-
「Codespaces: マシンの種類の変更」を検索して選択します。
![検索文字列として「change machine」と入力され、ドロップダウン リストに [Codespaces: マシンの種類の変更] と表示されているスクリーンショット。](/assets/cb-12982/images/help/codespaces/vscode-change-machine-type-option.png)
-
codespace 内でこれらの手順に従っていない場合は、変更する codespace をクリックします。
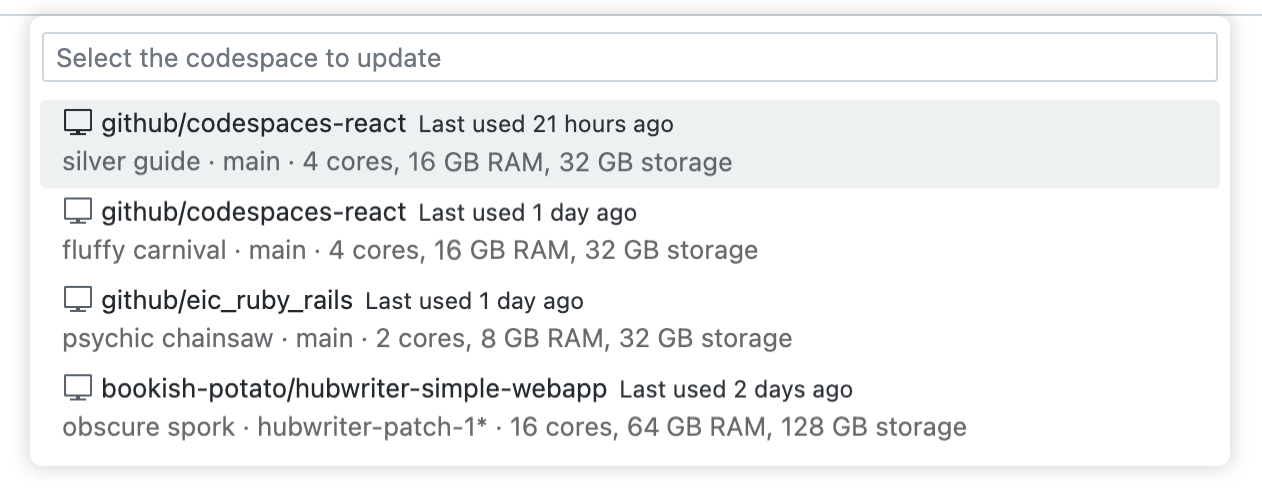
codespace でこれらの手順に従っている場合は、作業中の codespace に変更が適用されます。
-
使用するマシンの種類を選択びます。
-
異なるストレージ容量を持つマシンの種類に変更する場合は、続行するかどうかを確認するプロンプトが表示されます。 そのプロンプトを読み、 [はい] をクリックして同意します。
![検索文字列として「change machine」と入力され、ドロップダウン リストに [Codespaces: マシンの種類の変更] と表示されているスクリーンショット。](/assets/cb-12982/mw-1440/images/help/codespaces/vscode-change-machine-type-option.webp)

ストレージ容量が異なる仮想マシンに変更した場合 (たとえば、64 GB から 32 GB)、そのマシンの種類が変更される間の短い期間には codespace を使用できなくなります。 codespace が現在アクティブの場合は、自動的に停止されます。 変更が完了すると、新しい種類のマシンで実行されている codespace を再起動できます。
同じストレージ容量を持つ仮想マシンに変更した場合は、次回 codespace を再起動するときに変更が適用されます。 アクティブな codespace は自動的に停止されません。 codespace の再起動の詳細については、「codespace の停止と開始」を参照してください。
VS Code で Codespaces を削除する
現在 codespace で作業していない場合、VS Code 内から codespace を削除できます。
-
VS Code のアクティビティ バーで、[リモート エクスプローラー] アイコンをクリックします。
注: リモート エクスプローラーがアクティビティ バーに表示されない場合:
- コマンド パレットにアクセスします。 たとえば、Shift + Command + P (Mac) / Ctrl + Shift + P (Windows/Linux) を押します。
- 次のコマンドを入力します:
details - [コードスペース: 詳細] をクリックします。
-
[GitHub Codespaces] の下で、削除したい codespace を右クリックします。
-
[Codespace の削除] をクリックします。
Web クライアントで VS Code Insiders に切り替える
VS Code Web クライアントを使用している場合は、Insiders バージョンのアプリケーションに切り替えることができます。 このバージョンの VS Code について詳しくは、VS Code ブログの「Insiders ビルドの概要」を参照してください。
codespace でバージョンを切り替えた後は、codespace を停止して再起動しても、Web クライアントでは引き続き Insiders バージョンが使用されます。 VS Code Web クライアントで作成して開いた新しい codespace でも、Insiders バージョンが使用されます。
-
codespace を表示しているブラウザー ウィンドウの左下にある [] をクリックします。
-
メニューで、[Insiders バージョンに切り替える] を選択します。
![VS Code Web クライアントのスクリーンショット。 歯車アイコンがオレンジ色の枠線で強調表示されています。 [Insiders バージョンに切り替える] がメニューに表示されています。](/assets/cb-40929/images/help/codespaces/codespaces-insiders-vscode.png)
-
[再読み込み] をクリックします。
![VS Code Web クライアントのスクリーンショット。 歯車アイコンがオレンジ色の枠線で強調表示されています。 [Insiders バージョンに切り替える] がメニューに表示されています。](/assets/cb-40929/mw-1440/images/help/codespaces/codespaces-insiders-vscode.webp)
安定バージョンの VS Code に戻すには、同じプロセスを繰り返して [安定バージョンへの切り替え] を選択します。 戻した後は、codespace を停止して再起動しても、codespace では引き続き安定バージョンが使用されます。 VS Code Web クライアントで作成して開いた新しい codespace でも、安定バージョンが使用されます。
Codespaces
の Insiders デスクトップ アプリケーションを使用する
VS Code デスクトップ アプリケーションの Insiders バージョンで GitHub Codespaces を使用するには、VS Code Insiders アプリケーションないから codespace を起動するか、作成します。 詳しくは、この記事に出てきた「VS Code で codespace を作成する」と「VS Code で codespace を開く」をご覧ください。