To add CPU or memory resources to an existing GitHub Enterprise instance, shut down the instance and use the underlying virtual platform's tools to allocate the resources to the virtual machine. The newly allocated resources are automatically recognized on boot and no additional configuration is necessary.
Warning: The process for allocating new system resources will vary by virtualization platform and resource type, but the first step is always to configure monitoring and alerting of key system resources.
OpenStack KVM
It's not possible to allocate additional CPU or memory resources individually to an existing OpenStack KVM instance. Instead, you must:
- Take a snapshot of the current instance.
- Stop the instance.
- Select a new instance flavor that has the desired CPU and/or memory resources.
AWS
It's not possible to allocate additional CPU or memory resources individually to an existing AWS/EC2 instance. Instead, you must resize the instance as a whole by first stopping the instance and then selecting a different instance type that includes the desired CPU and/or memory resources.
Choosing a new instance type
The following table lists instance types supported by GitHub Enterprise and their CPU/memory specifications. Use it to determine the instance type you would like to upgrade to.
| Instance Type | Family | vCPU | Memory |
|---|---|---|---|
| m3.xlarge | General Purpose | 4 | 15 GB |
| m3.2xlarge | General Purpose | 8 | 30 GB |
| c3.2xlarge | Compute Optimized | 8 | 15 GB |
| c3.4xlarge | Compute Optimized | 16 | 30 GB |
| c3.8xlarge | Compute Optimized | 32 | 60 GB |
| r3.large | Memory Optimized | 2 | 15 GB |
| r3.xlarge | Memory Optimized | 4 | 30 GB |
| r3.2xlarge | Memory Optimized | 8 | 61 GB |
| r3.4xlarge | Memory Optimized | 16 | 122 GB |
| r3.8xlarge | Memory Optimized | 32 | 244 GB |
See the AWS EC2 instance type overview page for additional information on the hardware specifications and costs associated with each instance type.
About the instance's public IP address
An important consideration when resizing your instance is the public IP address behavior once the instance has been restarted. If the instance was launched into a VPC, the Elastic IP (EIP) will be retained automatically. If the instance was launched into EC2-Classic, the Elastic IP must be re-associated manually.
Regardless of whether you are using EC2-Classic or VPC, it's important to verify that an Elastic IP has been assigned to the instance before resizing or DNS A records for your GitHub Enterprise host will need to be adjusted post-restart to account for the change in public IP address.
Resizing the instance
The following assumes you are familiar with using either the AWS management console or the aws ec2 command line interface to manage EC2 instances. Review the AWS documentation on Resizing an Amazon EBS-backed Instance for background and details on using the AWS tools of your choice to perform the resize.
- If the instance was launched in EC2-Classic, write down the Elastic IP address associated with the instance and also the instance's id. You will need to re-associate this address once the instance has restarted.
- Stop the instance.
- Change the instance type.
- Start the instance.
- [EC2-Classic] Re-associate the Elastic IP address you wrote down in step 1.
Once the instance has fully restarted and is reachable, use the SSH administrative shell to verify the new resource configuration has been recognized properly:
$ ssh -p 122 admin@<hostname>
$ ghe-system-info
VMware
If operations on your GitHub Enterprise instance are slow, you may need to allocate additional CPU or memory resources.
Use the vSphere Client to connect to the VMware ESXi host.
Shut down the GitHub Enterprise virtual machine.
Select the virtual machine and click Edit Settings.
-
Under the Hardware tab, adjust the CPU and/or memory resources allocated to the virtual machine as needed:
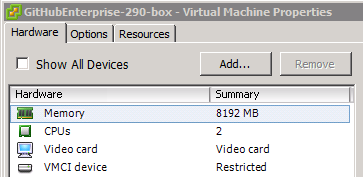
To start the virtual machine, click OK.
Once the instance has fully restarted and is reachable, use the SSH administrative shell to verify the new resource configuration has been properly recognized:
$ ssh -p 122 admin@<hostname>
$ ghe-system-info