To configure your GitHub account to use your new (or existing) SSH key, you'll also need to add it to your GitHub account.
Before adding a new SSH key to your GitHub Enterprise account, you should have:
After adding a new SSH key to your GitHub Enterprise account, you can reconfigure any local repositories to use SSH. For more information, see "Switching remote URLs from HTTPS to SSH."
Note: DSA keys were deprecated in OpenSSH 7.0. If your operating system uses OpenSSH, you'll need to use an alternate type of key when setting up SSH, such as an RSA key. For instance, if your operating system is MacOS Sierra, you can set up SSH using an RSA key.
-
Copy the SSH key to your clipboard.
If your SSH key file has a different name than the example code, modify the filename to match your current setup. When copying your key, don't add any newlines or whitespace.
pbcopy < ~/.ssh/id_rsa.pub
# Copies the contents of the id_rsa.pub file to your clipboard
Tip: If
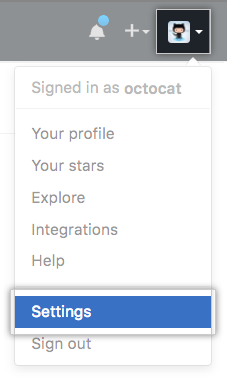
pbcopyisn't working, you can locate the hidden.sshfolder, open the file in your favorite text editor, and copy it to your clipboard. In the upper-right corner of any page, click your profile photo, then click Settings.

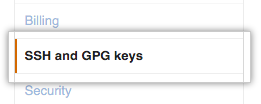
In the user settings sidebar, click SSH and GPG keys.

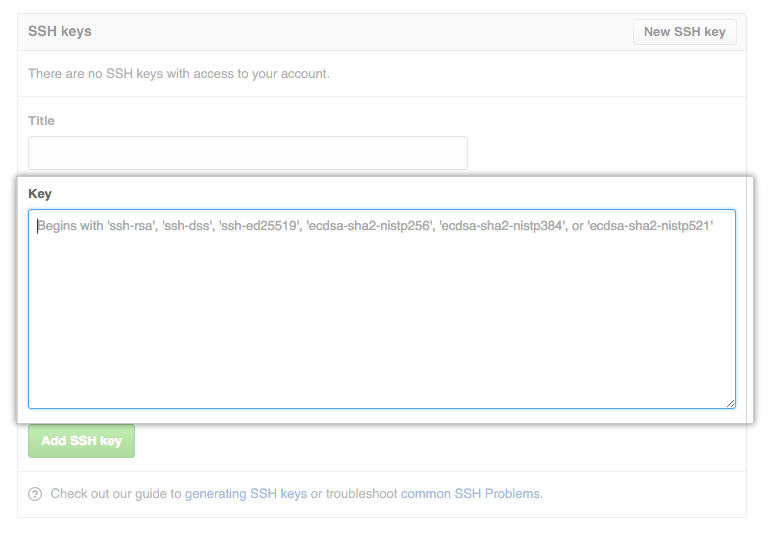
Click New SSH key or Add SSH key.

- In the "Title" field, add a descriptive label for the new key. For example, if you're using a personal Mac, you might call this key "Personal MacBook Air".
- Paste your key into the "Key" field.

- Click Add SSH key.

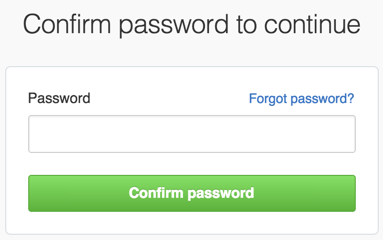
- If prompted, confirm your GitHub Enterprise password.

-
Copy the SSH key to your clipboard.
If your SSH key file has a different name than the example code, modify the filename to match your current setup. When copying your key, don't add any newlines or whitespace.
clip < ~/.ssh/id_rsa.pub
# Copies the contents of the id_rsa.pub file to your clipboard
Tip: If
clipisn't working, you can locate the hidden.sshfolder, open the file in your favorite text editor, and copy it to your clipboard. In the upper-right corner of any page, click your profile photo, then click Settings.

In the user settings sidebar, click SSH and GPG keys.

Click New SSH key or Add SSH key.

- In the "Title" field, add a descriptive label for the new key. For example, if you're using a personal Mac, you might call this key "Personal MacBook Air".
- Paste your key into the "Key" field.

- Click Add SSH key.

- If prompted, confirm your GitHub Enterprise password.

-
Copy the SSH key to your clipboard.
If your SSH key file has a different name than the example code, modify the filename to match your current setup. When copying your key, don't add any newlines or whitespace.
sudo apt-get install xclip
# Downloads and installs xclip. If you don't have `apt-get`, you might need to use another installer (like `yum`)
xclip -sel clip < ~/.ssh/id_rsa.pub
# Copies the contents of the id_rsa.pub file to your clipboard
Tip: If
xclipisn't working, you can locate the hidden.sshfolder, open the file in your favorite text editor, and copy it to your clipboard. In the upper-right corner of any page, click your profile photo, then click Settings.

In the user settings sidebar, click SSH and GPG keys.

Click New SSH key or Add SSH key.

- In the "Title" field, add a descriptive label for the new key. For example, if you're using a personal Mac, you might call this key "Personal MacBook Air".
- Paste your key into the "Key" field.

- Click Add SSH key.

- If prompted, confirm your GitHub Enterprise password.
