About network traffic restrictions
By default, authorized users can access your enterprise's resources from any IP address. You can restrict access to your enterprise's private resources by configuring a list that allows or denies access from specific IP addresses. For example, you can allow access to the private resources exclusively from the IP address of your office network.
If the list allows an IP address, an authenticated user connecting to GitHub.com from that address can access private resources. If the user's IP address is not allowed, that user cannot access private resources until they connect from an allowed address.
After you configure an IP allow list, the list determines whether users can access protected resources through the web UI, APIs, or Git, using any of the following authentication methods.
- Username and password, using GitHub authentication or SAML SSO
- Personal access token
- SSH key
The IP allow list applies to users with any role or access, including enterprise and organization owners, repository administrators, and external collaborators.
If a user is signed into GitHub.com, the IP allow list determines whether the user can access the organization's public resources. The list does not apply to anonymous access to public resources.
Only access to organization-owned repositories is determined by an IP allow list. The list does not control access to repositories or forks of repositories owned by a managed user account.
If your enterprise uses Enterprise Managed Users with Microsoft Entra ID (previously known as Azure AD) and OIDC, you can choose whether to use GitHub's IP allow list feature or to use the allow list restrictions for your identity provider (IdP). If your enterprise does not use Enterprise Managed Users with Azure and OIDC, you can use GitHub's allow list feature.
About GitHub's IP allow list
You can use GitHub's IP allow list to control access to your enterprise and assets owned by organizations in your enterprise.
You can approve access for a single IP address, or a range of addresses, using CIDR notation. For more information, see "CIDR notation" on Wikipedia.
To enforce the IP allow list, you must first add IP addresses to the list, then enable the IP allow list. After you complete your list, you can check whether a particular IP address would be allowed by any of the enabled entries in the list.
You must add your current IP address, or a matching range, before you enable the IP allow list. When you enable the allow list, the IP addresses you have configured are immediately added to the allow lists of organizations in your enterprise. If you disable the allow list, the addresses are removed from the organization allow lists.
Organization owners can add additional entries to the allow list for their organizations, but they cannot manage entries that are inherited from the enterprise account's allow list, and enterprise owners cannot manage entries added to the organization's allow list. For more information, see "Managing allowed IP addresses for your organization."
You can choose to automatically add to your allow list any IP addresses configured for GitHub Apps installed in your enterprise. The creator of a GitHub App can configure an allow list for their application, specifying the IP addresses at which the application runs. By inheriting their allow list into yours, you avoid connection requests from the application being refused. For more information, see "Allowing access by GitHub Apps."
About your IdP's allow list
If you are using Enterprise Managed Users with Entra ID and OIDC, you can use your IdP's allow list.
Using your IdP's allow list deactivates the GitHub IP allow list configurations for all organizations in your enterprise and deactivates the GraphQL APIs for enabling and managing IP allow lists.
By default, your IdP runs the CAP on the initial interactive SAML or OIDC sign-in to GitHub for any IP allow list configuration you choose.
The OIDC CAP only applies for requests to the API using a user token, such as an OAuth token for an OAuth app or a user access token for a GitHub App acting on behalf of a user. The OIDC CAP does not apply when a GitHub App uses an installation access token. For more information, see "About authentication with a GitHub App" and "About support for your IdP's Conditional Access Policy."
To ensure seamless use of the OIDC CAP while still applying the policy to OAuth tokens and user access tokens, you must copy all of the IP ranges from each GitHub App that your enterprise uses to your IdP policy.
Using GitHub's IP allow list
Enabling GitHub's IP allow list
-
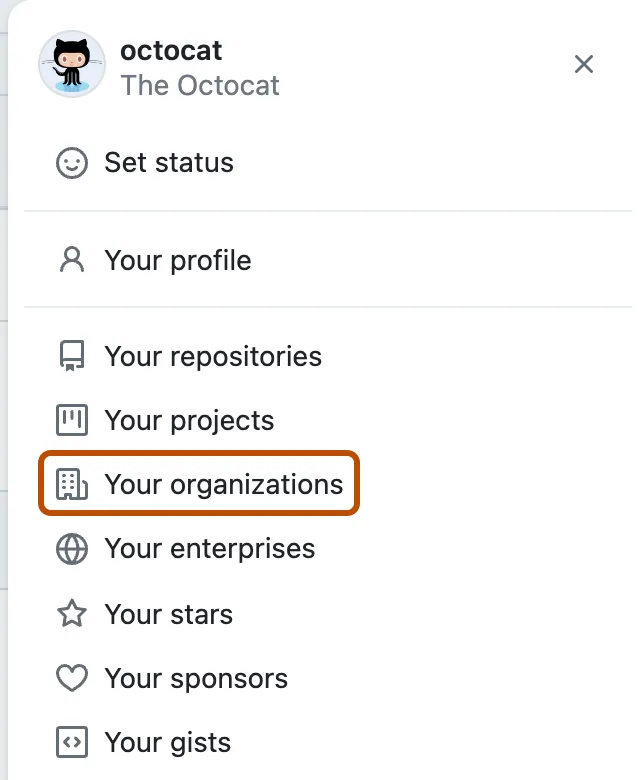
In the upper-right corner of GitHub.com, select your profile photo, then click Your organizations.

-
Next to the organization, click Settings.
-
In the "Security" section of the sidebar, click Authentication security.
-
If you're using Enterprise Managed Users with OIDC, under "IP allow list", select the IP allow list configuration dropdown menu and click GitHub.
-
Under "IP allow list", select Enable IP allow list.
-
Click Save.
Adding an allowed IP address
You can create an IP allow list by adding entries that each contain an IP address or address range. After you finish adding entries, you can check whether a particular IP address would be allowed by any of the enabled entries in your list.
Before the list restricts access to private assets owned by organizations in your enterprise, you must also enable allowed IP addresses.
Note: GitHub is gradually rolling out support for IPv6. As GitHub services continue to add IPv6 support, we will start recognizing IPv6 addresses of GitHub users. To prevent possible access interruptions, please ensure you have added any necessary IPv6 addresses to your IP allow list.
Note: Due to caching, adding or removing IP addresses can take a few minutes to fully take effect.
-
In the top-right corner of GitHub.com, click your profile photo, then click Your enterprises.
-
In the list of enterprises, click the enterprise you want to view.
-
In the enterprise account sidebar, click Settings.
-
Under Settings, click Authentication security.
-
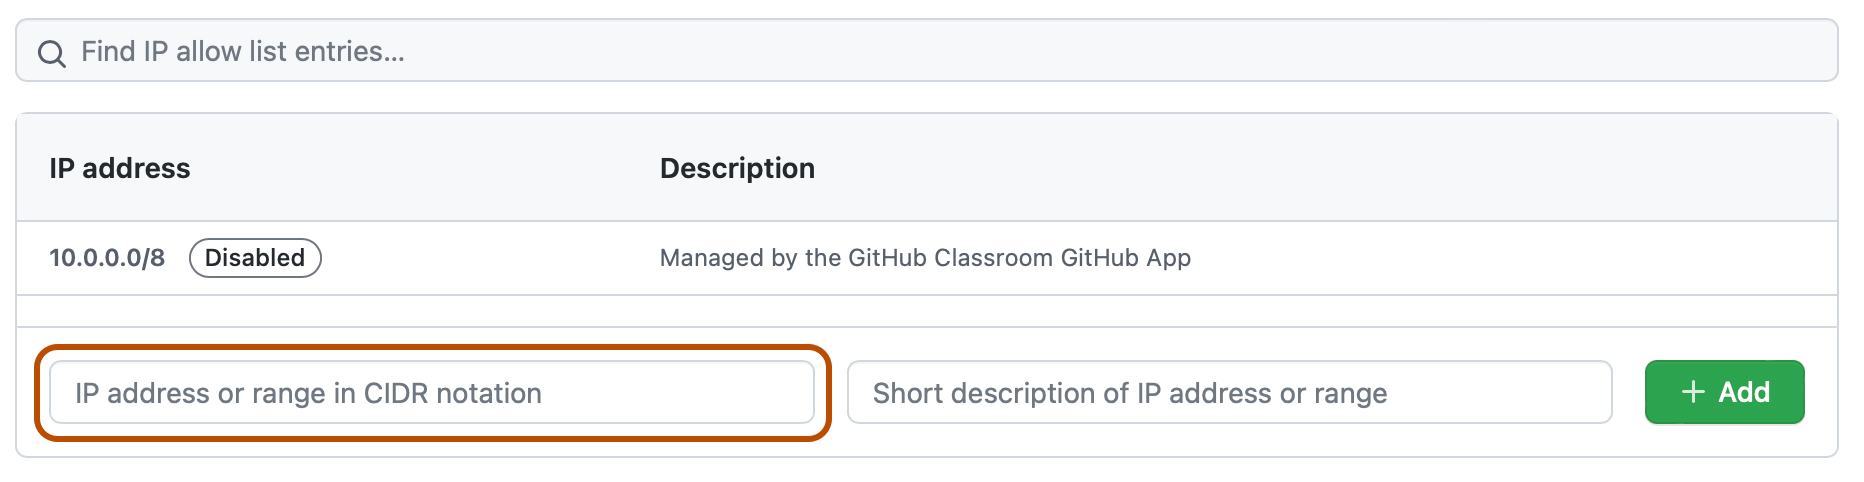
At the bottom of the "IP allow list" section, in the "IP address or range in CIDR notation" field, type an IP address, or a range of addresses in CIDR notation.
-
Optionally, in the "Short description of IP address or range" field, enter a description of the allowed IP address or range.
-
Click Add.
-
Optionally, check if a particular IP address would be allowed by any of the enabled entries in your list. For more information, see "Checking if an IP address is permitted."

Allowing access by GitHub Apps
If you're using an allow list, you can also choose to automatically add to your allow list any IP addresses configured for GitHub Apps that are installed in your enterprise.
If you select Enable IP allow list configuration for installed GitHub Apps in your allow list settings, then IP addresses from installed GitHub Apps are added to your allow list. This happens irrespective of whether your allow list is currently enabled. If you install a GitHub App and then the creator of that application changes the addresses in its allow list, your allow list is automatically updated with those changes.
You can identify the IP addresses that have been automatically added from GitHub Apps by reviewing the description field. The description for these IP addresses is: "Managed by the NAME GitHub App." Unlike addresses you add manually, you cannot edit, delete, or disable IP addresses that are automatically added from GitHub Apps.
Note: The addresses in the IP allow list of a GitHub App only affect requests made by installations of the GitHub App. The automatic addition of a GitHub App's IP address to an organization's allow list does not allow access to a GitHub Enterprise Cloud user who connects from that IP address.
For more information about how to create an allow list for a GitHub App you have created, see "Managing allowed IP addresses for a GitHub App."
To enable automatic addition of IP addresses for GitHub Apps:
-
In the top-right corner of GitHub.com, click your profile photo, then click Your enterprises.
-
In the list of enterprises, click the enterprise you want to view.
-
In the enterprise account sidebar, click Settings.
-
Under Settings, click Authentication security.
-
Under "IP allow list", select Enable IP allow list configuration for installed GitHub Apps.
Note: If you're using Enterprise Managed Users with OIDC, you can only allow access by GitHub Apps if you use GitHub for your IP allow list configuration.
-
Click Save.
Editing an allowed IP address
You can edit an entry in your IP allow list. If you edit an enabled entry, changes are enforced immediately.
After you finish editing entries, you can check whether your allow list will permit a connection from a particular IP address after you enable the list.
-
In the top-right corner of GitHub.com, click your profile photo, then click Your enterprises.
-
In the list of enterprises, click the enterprise you want to view.
-
In the enterprise account sidebar, click Settings.
-
Under Settings, click Authentication security.
-
Under "IP allow list", next to the entry you want to edit, click Edit.
-
In the "IP address" field, type an IP address, or range of addresses, in CIDR notation.
-
In the "Description" field, type a description of the allowed IP address or range.
-
Click Update.
-
Optionally, check if a particular IP address would be allowed by any of the enabled entries in your list. For more information, see "Checking if an IP address is permitted."
Checking if an IP address is permitted
You can check whether a particular IP address would be allowed by any of the enabled entries in your IP allow list, even if the list is not currently enabled.
-
In the top-right corner of GitHub.com, click your profile photo, then click Your enterprises.
-
In the list of enterprises, click the enterprise you want to view.
-
In the enterprise account sidebar, click Settings.
-
Under Settings, click Authentication security.
-
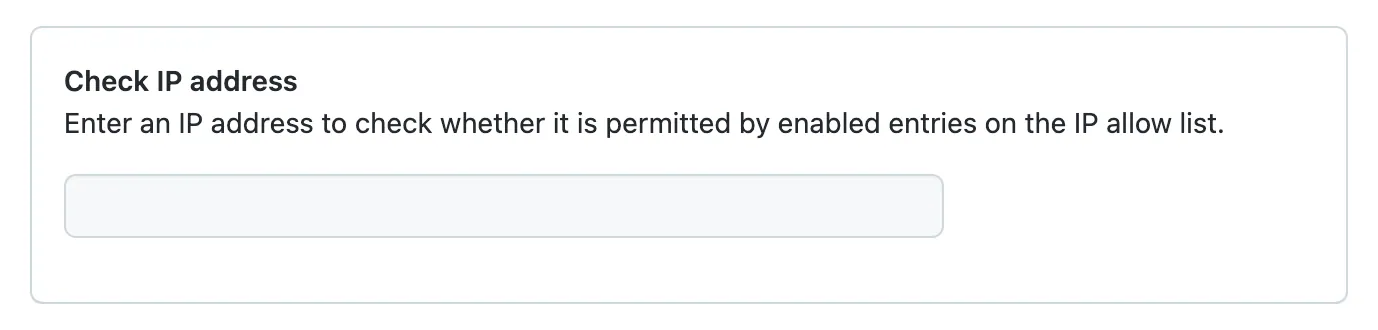
At the end of the "IP allow list" section, under "Check IP address", enter an IP address.

Deleting an allowed IP address
Note: Due to caching, adding or removing IP addresses can take a few minutes to fully take effect.
-
In the top-right corner of GitHub.com, click your profile photo, then click Your enterprises.
-
In the list of enterprises, click the enterprise you want to view.
-
In the enterprise account sidebar, click Settings.
-
Under Settings, click Authentication security.
-
Under "IP allow list", next to the entry you want to delete, click Delete.
-
To permanently delete the entry, click Yes, delete this IP allow list entry.
Using your identity provider's allow list
Note: Using your IdP's allow list is only supported for Enterprise Managed Users with Entra ID and OIDC.
-
In the upper-right corner of GitHub.com, select your profile photo, then click Your organizations.
-
Next to the organization, click Settings.
-
In the "Security" section of the sidebar, click Authentication security.
-
Under "IP allow list", select the IP allow list configuration dropdown menu and click Identity Provider.
-
Optionally, to allow installed GitHub and OAuth apps to access your enterprise from any IP address, select Skip IdP check for applications.
-
Click Save.
Using GitHub Actions with an IP allow list
Warning: If you use an IP allow list and would also like to use GitHub Actions, you must use self-hosted runners or GitHub-hosted larger runners with static IP address ranges. For more information, see "About self-hosted runners" or "About larger runners".
To allow your self-hosted or larger hosted runners to communicate with GitHub, add the IP address or IP address range of your runners to the IP allow list that you have configured for your enterprise.
Using GitHub Pages with an IP allow list
If you use a custom GitHub Actions workflow as a publishing source for your GitHub Pages site, to permit the runner to connect and build the site, you must configure a rule for your IP allow list.
If you don't use a custom workflow, the build runner will have access to the repository for the GitHub Pages site by default. For more information about publishing sources, see "Configuring a publishing source for your GitHub Pages site."