About personalizing Codespaces
When using any development environment, customizing the settings and tools to your preferences and workflows is an important step. GitHub Codespaces allows for two main ways of personalizing your codespaces.
- Settings Sync - You can synchronize your Visual Studio Code settings between the desktop application and the VS Code web client.
- Dotfiles – You can use a
dotfilesrepository to specify scripts, shell preferences, and other configurations.
GitHub Codespaces personalization applies to any codespace you create.
Project maintainers can also define a default configuration that applies to every codespace for a repository, created by anyone. For more information, see "Introduction to dev containers."
Settings Sync
Settings Sync allows you to synchronize configurations such as settings, keyboard shortcuts, snippets, extensions, and UI state across machines and instances of VS Code. For more information, see Settings Sync in the VS Code documentation.
Your synced settings are cached in the cloud. If Settings Sync is turned on in a codespace, any updates you make to your settings in the codespace are pushed to the cloud, and any updates you push to the cloud from elsewhere are pulled into your codespace.
For example, a common use of Settings Sync would be to sync your settings from your VS Code desktop application, which you use for local work, to codespaces you open in the browser. To do this, you would need to do the following things.
- Turn on Settings Sync in the desktop application. For more information, see Settings Sync in the VS Code documentation.
- Enable Settings Sync in your user preferences for GitHub Codespaces. For more information, see "Managing your preferences for Settings Sync."
- Optionally, if you want to sync settings changes back to your desktop application from a codespace, turn on Settings Sync in the codespace and add the repository from which you created the codespace to your list of trusted repositories. For more information, see "Turning on Settings Sync in a codespace."
Alternatively, you may want to use the same settings across all codespaces you open in the web client, while leaving your local VS Code application unaffected. To do this, you would need to do the following things.
- In a codespace, configure your settings as you want them, then turn on Settings Sync in the codespace to push the settings to the cloud. When you do this, Settings Sync is enabled automatically in your user preferences for GitHub Codespaces, so your settings will be pulled into all new codespaces. For more information, see "Turning on Settings Sync in a codespace."
- In the desktop application, leave Settings Sync turned off, or sync your settings to a different account.
About Settings Sync in codespaces
Whether Settings Sync is turned on by default in a codespace, and the relationship between your cached settings and the settings in a codespace, depend on several factors. These factors include the editor in which you open the codespace, your user preferences on GitHub, and your list of trusted repositories.
For codespaces opened in the VS Code desktop application, Settings Sync remains on if you have previously turned on Settings Sync in the application. If Settings Sync is on, your settings are synced both to and from the cloud.
For codespaces opened in the VS Code web client, Settings Sync is disabled by default. This means the VS Code instance in the codespace uses the default theme and settings.
If you use the web client and want your codespaces to use your cached synced settings, you can enable Settings Sync in your user preferences on GitHub. For more information, see "Managing your preferences for Settings Sync." Settings Sync is enabled in your user preferences automatically if you open a codespace in the web client and turn on Settings Sync in the codespace.
When Settings Sync is enabled in your user preferences, for codespaces opened in the web client, the behavior of Settings Sync depends on your list of trusted repositories.
-
If you create a codespace from a repository you trust, Settings Sync is turned on in the codespace by default, so your settings are synced both to and from the cloud.
-
If you create a codespace from a repository you haven't added to your list of trusted repositories, the sync takes place in one direction and at one time only. When you create the codespace, your settings are pulled into the codespace from your cached settings in the cloud, but from then on, Settings Sync is turned off in the codespace. This means updates you make to your settings in the codespace are not pushed back to the cloud, and any updates you make to your cached settings from elsewhere are not reflected in the codespace after you have created it.
If you turn on Settings Sync in a codespace, you will be prompted to add the repository to your list of trusted repositories. For more information, see "Turning on Settings Sync in a codespace."
Your list of trusted repositories for GitHub Codespaces is shared between the GPG verification and Settings Sync features. Assuming you have both features enabled, if you have added a selected list of trusted repositories for GPG verification, Settings Sync is turned on in codespaces created from these repositories. If you trust a new repository for Settings Sync, GPG verification is enabled for the same repository. Although the features share the same list of trusted repositories, you can enable or disable GPG verification and Settings Sync independently.
Note: If you have previously enabled GPG verification for all repositories, we recommend changing your preferences to use a selected list of trusted repositories. For more information, see "Security in GitHub Codespaces."
For more information on managing your preferences for GPG verification, see "Managing GPG verification for GitHub Codespaces."
Managing your preferences for Settings Sync
If you enable Settings Sync in your user preferences, codespaces opened in the VS Code web client will pull in your cached settings from the cloud, and codespaces created from trusted repositories will sync with your cached settings in both directions.
-
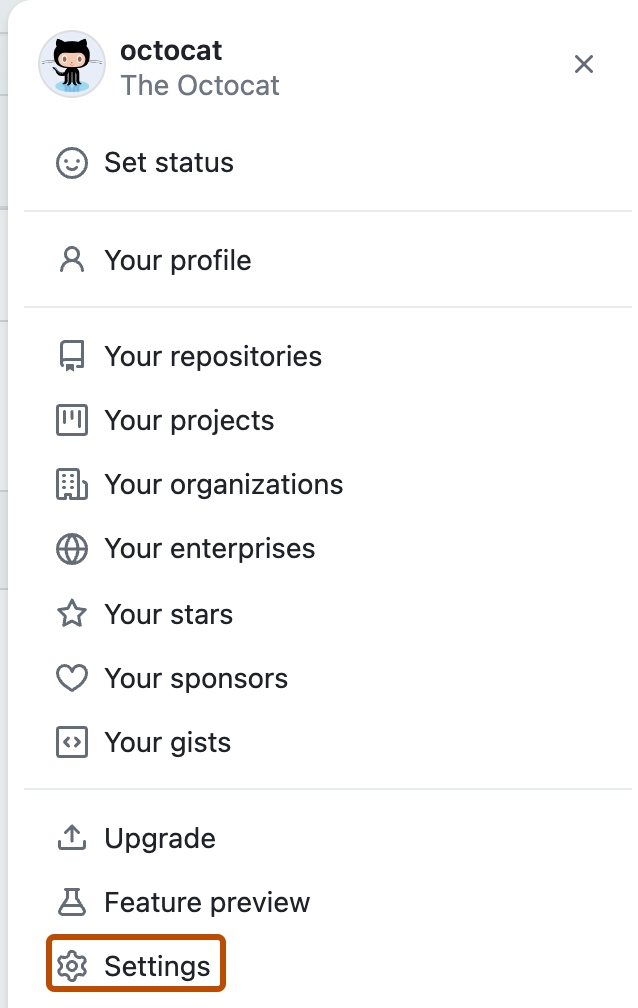
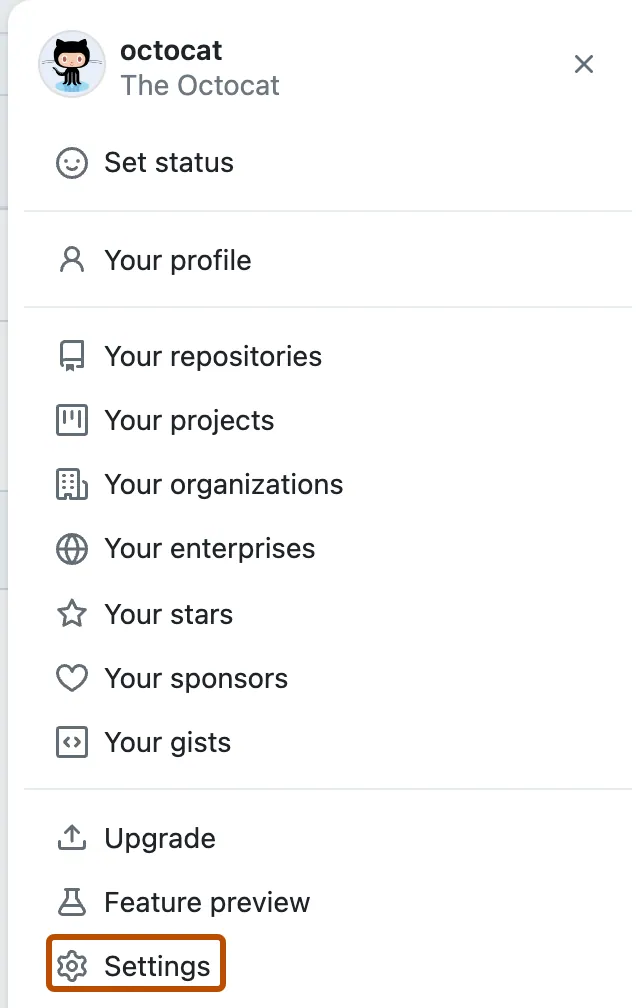
In the upper-right corner of any page, click your profile photo, then click Settings.
-
In the "Code, planning, and automation" section of the sidebar, click Codespaces.
-
To enable or disable Settings Sync, under "Settings Sync," select or deselect Enable.
-
To change your trusted repositories for GPG verification and Settings Sync, under "Trusted repositories," either select All repositories, or select Selected repositories and use the "Select repositories" dropdown to add repositories you trust.
Note: We recommend using a selected list of trusted repositories. For more information, see "Security in GitHub Codespaces."
Your updates will take effect in new codespaces. However, you can turn on Settings Sync in an existing codespace. For more information, see "Turning on Settings Sync in a codespace."
Turning on Settings Sync in a codespace
Note: You should only turn on Settings Sync in codespaces created from repositories you trust. For more information, see "Security in GitHub Codespaces."
The following procedure describes how to turn on Settings Sync in a codespace opened in the web client. For information about turning on Settings Sync in the VS Code desktop application, see Settings Sync in the VS Code documentation.
-
In VS Code, at the bottom of the Activity Bar, select , then click Sign in to Sync Settings.
-
If the repository from which you created the codespace is not in your list of trusted repositories, a browser window will open asking you to authorize additional permissions for Settings Sync. If you trust the repository, click Authorize, then close the browser window. The codespace will reload and display your latest synced settings.
Note: If you have Settings Sync disabled in your user preferences, and have set your trusted repositories to all repositories, you will see a warning about enabling Settings Sync for all repositories. Review the warning and choose whether to enable Settings Sync for all repositories or revise your list of trusted repositories.
-
To configure which settings you want to sync, open the Command Palette with Shift+Command+P (Mac) / Ctrl+Shift+P (Windows/Linux), then start typing "Settings Sync". Click Settings Sync: Configure....
-
Select the settings you want to sync, then click OK.


Turning off Settings Sync in a codespace
You can turn off Settings Sync to stop syncing settings to and from an instance of VS Code.
When you turn off Settings Sync in a codespace, new codespaces continue to use the settings cached from the last time your settings were pushed to the cloud. If you use the VS Code web client for codespaces, and want codespaces to use the default settings instead of your cached settings, you can disable Settings Sync. For more information, see "Managing your preferences for Settings Sync."
If you want to return to using the default VS Code settings in all instances of VS Code, including the desktop application, you can clear the cache in the cloud when you turn off Settings Sync.
-
If Settings Sync is currently turned off in your instance of VS Code, and you want to clear your cached settings, you must first turn it on. For instructions, see "Personalizing GitHub Codespaces for your account."
-
At the bottom of the Activity Bar, select and click Settings Sync is On.
-
In the dropdown, click Settings Sync: Turn Off.

-
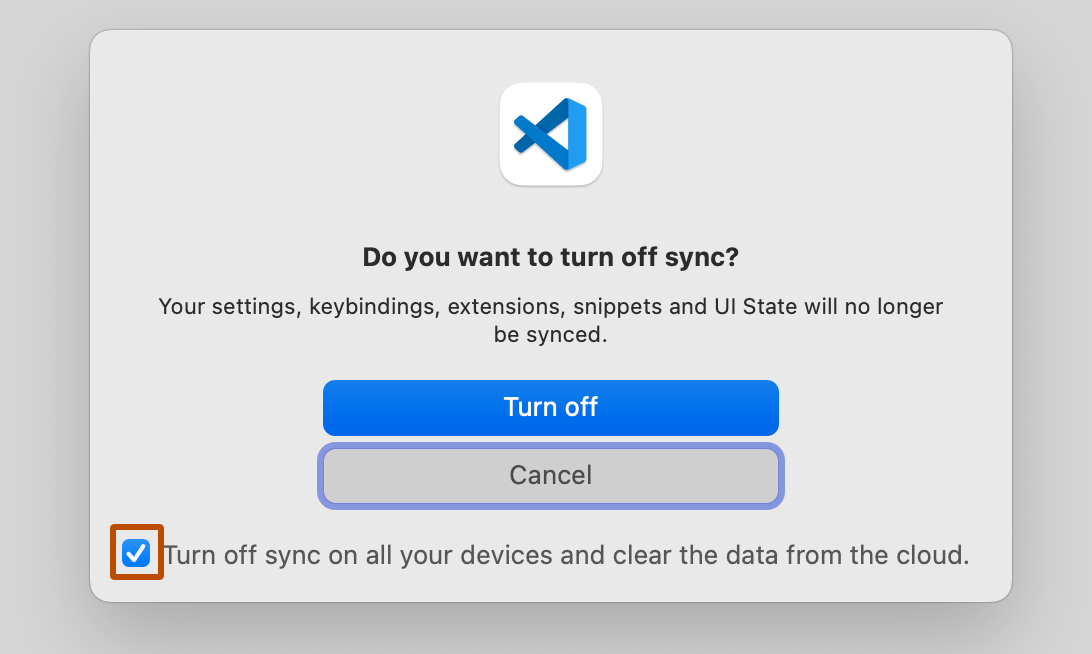
To clear your cached settings, in the dialog, select Turn off sync on all your devices and clear the data from the cloud.
-
Click Turn off.


Dotfiles
Dotfiles are files and folders on Unix-like systems starting with . that control the configuration of applications and shells on your system. You can store and manage your dotfiles in a repository on GitHub. For advice and tutorials about what to include in your dotfiles repository, see GitHub does dotfiles.
Your dotfiles repository might include your shell aliases and preferences, any tools you want to install, or any other codespace personalization you want to make.
You can configure GitHub Codespaces to use dotfiles from any repository you own by selecting that repository in your personal GitHub Codespaces settings.
When you create a new codespace, GitHub clones your selected dotfiles repository to the codespace environment, and looks for one of the following files to set up the environment.
- install.sh
- install
- bootstrap.sh
- bootstrap
- script/bootstrap
- setup.sh
- setup
- script/setup
If none of these files are found, then any files or folders in your selected dotfiles repository starting with . are symlinked to the codespace's ~ or $HOME directory.
Any changes to your selected dotfiles repository will apply only to each new codespace, and do not affect any existing codespace.
Note: Currently, Codespaces does not support personalizing the User-scoped settings for VS Code with your dotfiles repository. You can set default Workspace and Remote [Codespaces] settings for a specific project in the project's repository. For more information, see "Introduction to dev containers."
Enabling your dotfiles repository for Codespaces
You can use your selected dotfiles repository to personalize your GitHub Codespaces environment. Once you choose your dotfiles repository, you can add your scripts, preferences, and configurations to it. You then need to enable your dotfiles from your personal GitHub Codespaces settings page.
Warning: Dotfiles have the ability to run arbitrary scripts, which may contain unexpected or malicious code. Before installing a dotfiles repo, we recommend checking scripts to ensure they don't perform any unexpected actions.
-
In the upper-right corner of any page, click your profile photo, then click Settings.
-
In the "Code, planning, and automation" section of the sidebar, click Codespaces.
-
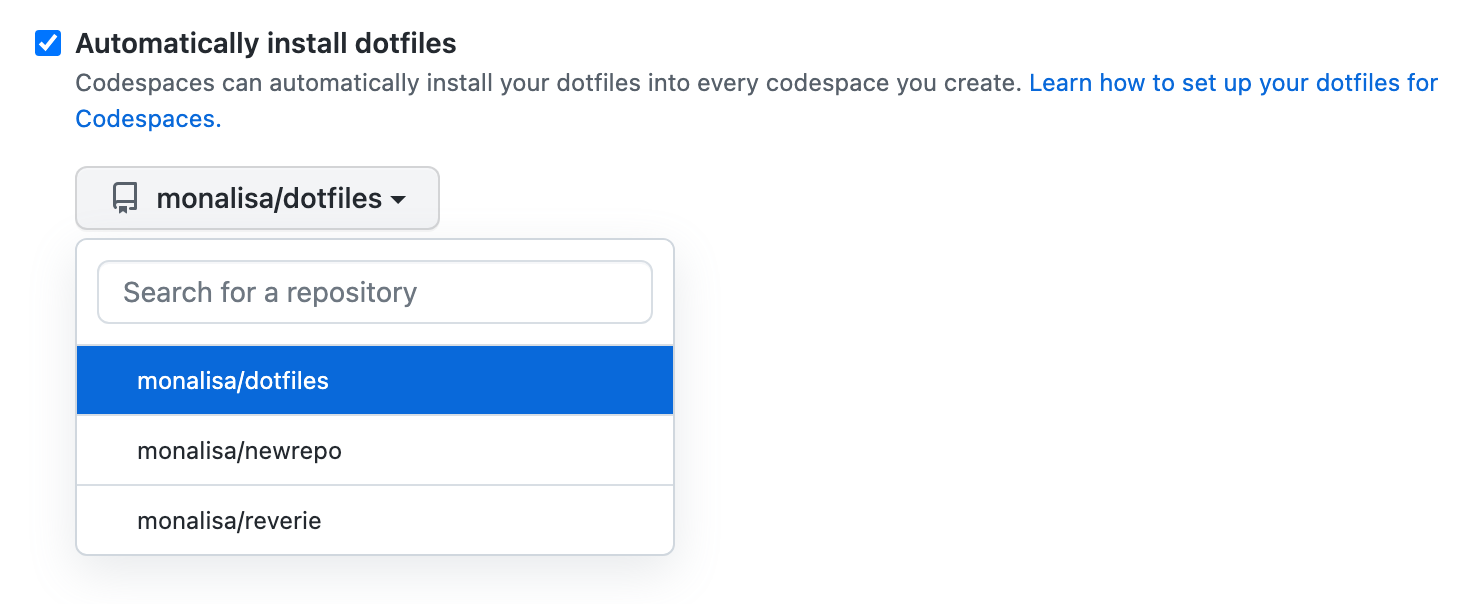
Under "Dotfiles", select Automatically install dotfiles so that GitHub Codespaces automatically installs your dotfiles into every new codespace you create.

-
Use the dropdown to choose the repository you want to install dotfiles from.


You can add further script, preferences, configuration files to your dotfiles repository or edit existing files whenever you want. Changes to settings will only be picked up by new codespaces.
If your codespace fails to pick up configuration settings from dotfiles, see "Troubleshooting personalization options for GitHub Codespaces."
Other available settings
You can also personalize GitHub Codespaces using additional options in your personal settings:
- To enable GPG verification, see "Managing GPG verification for GitHub Codespaces."
- To set your editor, see "Setting your default editor for GitHub Codespaces."
- To set how long a codespace can remain unused before it is automatically stopped, see "Setting your timeout period for GitHub Codespaces."
- To set the period for which your unused codespaces are retained, see "Configuring automatic deletion of your codespaces."
- To set your default region, see "Setting your default region for GitHub Codespaces."