# 끌어오기 요청 만들기
리포지토리에서 코드 변경 내용을 제안하는 끌어오기 요청을 만듭니다.
끌어오기 요청에 대한 새 분기를 만들지만 리포지토리에 대한 쓰기 권한이 없는 경우 먼저 리포지토리를 포크할 수 있습니다.
[Creating a pull request from a fork](/ko/enterprise-cloud@latest/pull-requests/how-tos/create-pull-requests/creating-a-pull-request-from-a-fork) 및 [포크들](/ko/enterprise-cloud@latest/pull-requests/reference/forks)을(를) 참조하세요.
끌어오기 요청을 만들 때 변경 내용을 병합할 분기를 지정할 수 있습니다. 풀 리퀘스트는 서로 다른 두 브랜치 사이에서만 생성할 수 있습니다.
> \[!NOTE]
> 퍼블릭 리포지토리에서 끌어오기 요청을 열려면 헤드나 소스 분기에 대한 쓰기 권한이 있어야 합니다. 또는 조직 소유 리포지토리의 경우 끌어오기 요청을 열려면 리포지토리를 소유하는 조직의 구성원이어야 합니다.
끌어오기 요청을 문제에 연결하여 수정이 진행 중임을 표시하고 끌어오기 요청이 병합될 때 자동으로 문제를 닫을 수 있습니다. 자세한 내용은 [끌어오기 요청을 이슈에 연결](/ko/enterprise-cloud@latest/issues/tracking-your-work-with-issues/using-issues/linking-a-pull-request-to-an-issue)을(를) 참조하세요.
## 끌어오기 요청 만들기
1. GitHub에서 리포지토리의 기본 페이지로 이동합니다.
2. “분기” 메뉴에서 커밋이 포함된 분기를 선택합니다.

3. 파일 목록 위의 노란색 배너에서 **비교 및 끌어오기 요청**을 클릭하여 연결된 분기에 대한 끌어오기 요청을 만듭니다.

4. *기본* 분기 드롭다운 메뉴를 사용하여 변경 내용을 병합할 분기를 선택합니다. 그런 다음 분기 *비교* 드롭다운 메뉴를 사용하여 변경한 토픽 분기를 선택합니다.
5. 끌어오기 요청의 제목과 설명을 입력합니다.
6. 검토할 준비가 된 끌어오기 요청을 만들려면 **끌어오기 요청 만들기**를 클릭합니다.
초안 끌어오기 요청을 만들려면 드롭다운을 사용하고 **초안 끌어오기 요청 만들기**를 선택한 다음, **초안 끌어오기 요청**을 클릭합니다. 조직의 구성원인 경우 조직 소유자 초안 끌어오기 요청에 대한 액세스를 요청해야 할 수도 있습니다. [끌어오기 요청](/ko/enterprise-cloud@latest/pull-requests/collaborating-with-pull-requests/proposing-changes-to-your-work-with-pull-requests/about-pull-requests#draft-pull-requests)을(를) 참조하세요.
> \[!TIP]
> 끌어오기 요청을 만든 후 특정 사용자에게 [제안된 변경 내용을 검토](/ko/enterprise-cloud@latest/pull-requests/collaborating-with-pull-requests/reviewing-changes-in-pull-requests/reviewing-proposed-changes-in-a-pull-request)하도록 요청할 수 있습니다. 자세한 내용은 [끌어오기 요청 검토 요청](/ko/enterprise-cloud@latest/pull-requests/collaborating-with-pull-requests/proposing-changes-to-your-work-with-pull-requests/requesting-a-pull-request-review)을(를) 참조하세요.
끌어오기 요청을 검토한 후 리포지토리에 병합할 수 있습니다.
[Merging a pull request](/ko/enterprise-cloud@latest/pull-requests/how-tos/merge-and-close-pull-requests/merging-a-pull-request)을(를) 참조하세요.
> \[!NOTE]
> GitHub CLI에 대한 자세한 내용은 [GitHub CLI 정보](/ko/enterprise-cloud@latest/github-cli/github-cli/about-github-cli)을(를) 참조하세요.
끌어오기 요청을 만들려면 `gh pr create` 하위 명령을 사용합니다.
```shell
gh pr create
```
개인에게 끌어오기 요청을 할당하려면 `--assignee` 또는 `-a` 플래그를 사용합니다.
`@me`을 사용하여 끌어오기 요청을 자체 할당할 수 있습니다.
```shell
gh pr create --assignee "@octocat"
```
끌어오기 요청을 병합할 분기를 지정하려면 `--base` 또는 `-B` 플래그를 사용합니다. 끌어오기 요청에 대한 커밋이 포함되어 있는 분기를 지정하려면 `--head` 또는 `-H` 플래그를 사용합니다.
```shell
gh pr create --base my-base-branch --head my-changed-branch
```
새 끌어오기 요청에 대한 제목과 본문을 포함하려면 `--title` 및 `--body` 플래그를 사용합니다.
```shell
gh pr create --title "The bug is fixed" --body "Everything works again"
```
끌어오기 요청을 초안으로 표시하려면 `--draft` 플래그를 사용합니다.
```shell
gh pr create --draft
```
새 풀 리퀘스트에 레이블 또는 마일스톤을 추가하려면 `--label` 및 `--milestone` 플래그를 사용합니다.
```shell
gh pr create --label "bug,help wanted" --milestone octocat-milestone
```
특정 프로젝트에 새 끌어오기 요청을 추가하려면 `--project` 플래그를 사용합니다.
```shell
gh pr create --project octocat-project
```
개인 또는 팀을 검토자로 할당하려면 `--reviewer` 플래그를 사용합니다.
```shell
gh pr create --reviewer monalisa,hubot --reviewer myorg/team-name
```
기본 웹 브라우저에서 끌어오기 요청을 만들려면 `--web` 플래그를 사용합니다.
```shell
gh pr create --web
```
1. \*\* 끌어오기 요청 미리 보기\*\*를 선택하세요.
GitHub Desktop 는 현재 분기와 기본 분기 간의 변경 내용을 보여 주는 미리 보기 대화 상자를 엽니다.
또는 끌어오기 요청을 만들려면 GitHub 드롭다운 아이콘을 선택하고 **끌어오기 요청 만들기**를 클릭합니다.
2. **base:** 드롭다운 메뉴에서 변경 사항을 병합하려는 브랜치가 선택되어 있는지 확인하세요.

GitHub Desktop 는 현재 분기를 기본 분기에 자동으로 병합할 수 있는지 여부를 알려줍니다.

1. **끌어오기 요청 만들기**를 클릭합니다.
GitHub Desktop 기본 브라우저를 열고 GitHub로 이동합니다.
2. 끌어오기 요청의 제목과 설명을 입력합니다.
3. 검토할 준비가 된 끌어오기 요청을 만들려면 **끌어오기 요청 만들기**를 클릭합니다.
초안 끌어오기 요청을 만들려면 드롭다운을 사용하고 **초안 끌어오기 요청 만들기**를 선택한 다음, **초안 끌어오기 요청**을 클릭합니다. 조직의 구성원인 경우 조직 소유자 초안 끌어오기 요청에 대한 액세스를 요청해야 할 수도 있습니다. [끌어오기 요청](/ko/enterprise-cloud@latest/pull-requests/collaborating-with-pull-requests/proposing-changes-to-your-work-with-pull-requests/about-pull-requests#draft-pull-requests)을(를) 참조하세요.
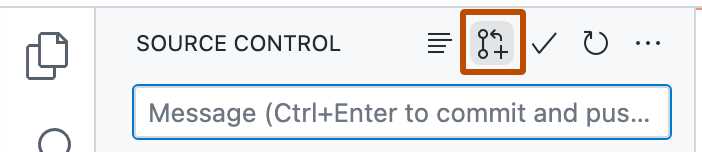
1. 리포지토리의 로컬 복사본에 변경 내용을 커밋한 후 **끌어오기 요청 만들기** 아이콘을 클릭합니다.
1. 병합하려는 로컬 분기 및 리포지토리와 병합하려는 원격 분기 및 리포지토리가 올바른지 확인합니다. 그런 다음 끌어오기 요청에 제목과 설명을 제공합니다.
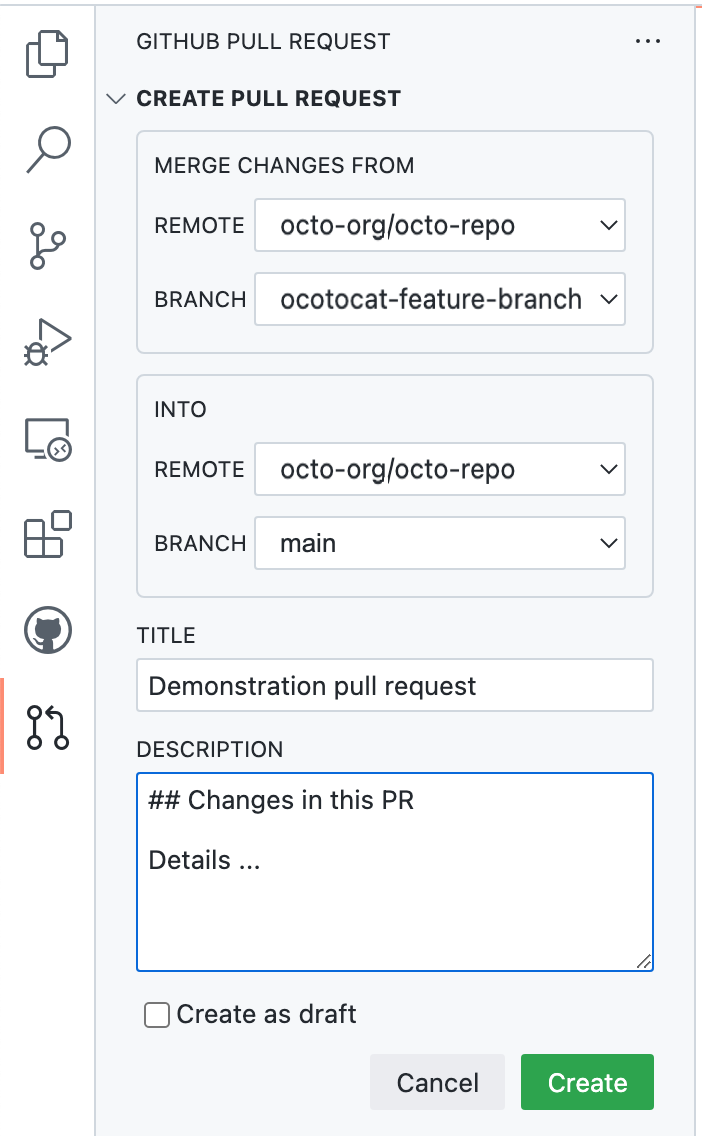
1. **만들기**를 클릭합니다.
끌어오기 요청을 GitHub Codespaces만드는 방법에 대한 자세한 내용은 [끌어오기 요청에 GitHub Codespace 사용](/ko/enterprise-cloud@latest/codespaces/developing-in-a-codespace/using-github-codespaces-for-pull-requests)을 참조하세요.
## 끌어오기 요청에서 파일 변경
끌어오기 요청을 연 후 헤드 분기에 새 커밋을 추가하여 파일을 계속 변경할 수 있습니다.
## 추가 읽기
* [Creating a pull request from a fork](/ko/enterprise-cloud@latest/pull-requests/how-tos/create-pull-requests/creating-a-pull-request-from-a-fork)
* [끌어오기 요청을 베이스 분기와 동기화 상태로 유지](/ko/enterprise-cloud@latest/pull-requests/how-tos/create-pull-requests/keeping-your-pull-request-in-sync-with-the-base-branch)
* [Changing the base branch of a pull request](/ko/enterprise-cloud@latest/pull-requests/how-tos/create-pull-requests/changing-the-base-branch-of-a-pull-request)
* [문제 만들기](/ko/enterprise-cloud@latest/issues/tracking-your-work-with-issues/using-issues/creating-an-issue)
* [다른 GitHub 사용자에게 문제 할당 및 끌어오기 요청](/ko/enterprise-cloud@latest/issues/tracking-your-work-with-issues/using-issues/assigning-issues-and-pull-requests-to-other-github-users)
* [GitHub에 쓰기](/ko/enterprise-cloud@latest/get-started/writing-on-github)