注: GitHub ホステッド ランナーは、現在 GitHub Enterprise Server でサポートされていません。 GitHub public roadmap で、今後の計画的なサポートの詳細を確認できます。
About GitHub Actions permissions for your repository
By default, after GitHub Actions is enabled on your GitHub Enterprise Server instance, it is enabled on all repositories and organizations. You can choose to disable GitHub Actions or limit it to actions in your enterprise. For more information about GitHub Actions, see "About GitHub Actions."
You can enable GitHub Actions for your repository. GitHub Actions を有効にすると、ワークフローは、リポジトリ内および他のパブリックまたは内部リポジトリに配置されているアクションを実行できます。 You can disable GitHub Actions for your repository altogether. GitHub Actionsを無効化すると、リポジトリでワークフローが実行されなくなります。
Alternatively, you can enable GitHub Actions in your repository but limit the actions a workflow can run.
Managing GitHub Actions permissions for your repository
You can disable GitHub Actions for a repository, or set a policy that configures which actions can be used in the repository.
Note: You might not be able to manage these settings if your organization has an overriding policy or is managed by an enterprise that has overriding policy. For more information, see "Disabling or limiting GitHub Actions for your organization" or "Enforcing policies for GitHub Actions in your enterprise."
-
On your GitHub Enterprise Server instance, navigate to the main page of the repository.
-
リポジトリ名の下の [ 設定] をクリックします。

-
In the left sidebar, click Actions.
-
Under "Actions permissions", select an option.
[Allow select actions](選択したアクションを許可する) を選択した� �合、エンタープライズ内のアクションが許可され、追� のオプションで、その他の特定のアクションも許可されます。 詳細については、「選択したアクションの実行の許可」を参照してく� さい。
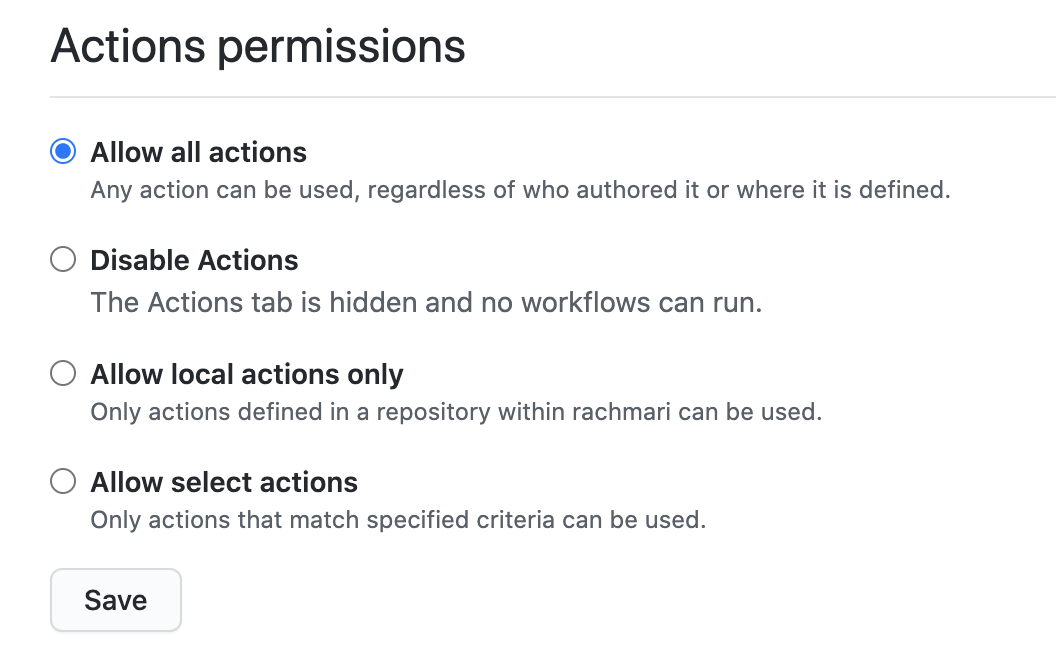
- Click Save.
選択したアクションの実行の許可
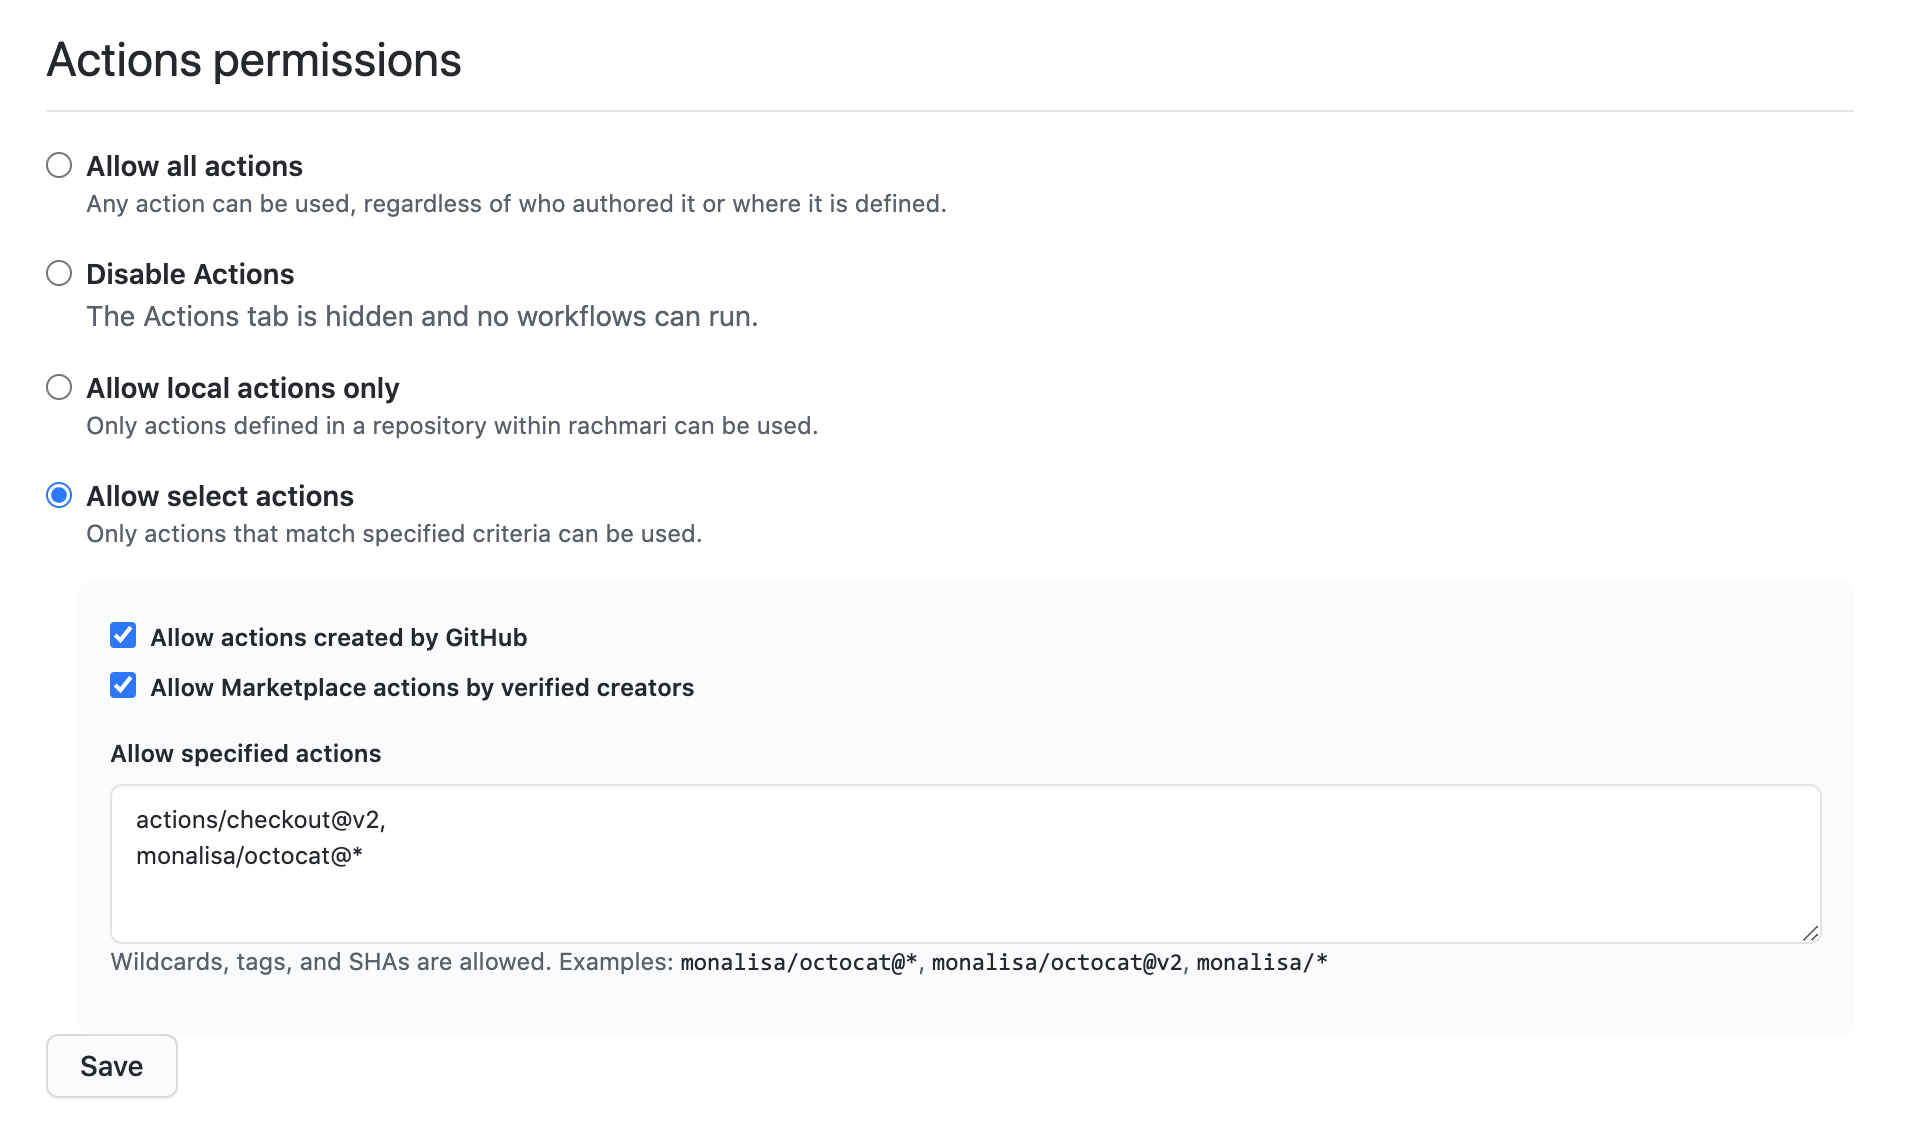
[ [Allow select actions](選択したアクションを許可する) ] を選ぶと、ローカル アクションが許可され、他の特定のアクションを許可するための追� のオプションがあります。
-
[GitHub によって作成されたアクションを許可する]: GitHub によって作成されたすべてのアクションを、ワークフローで使用できるようにします。 GitHub によって作成されたアクションは、
actionsおよびgithub組織にあります。 詳しくは、actionsおよびgithubの Organization をご覧く� さい。 -
[検証済みの作成者による Marketplace アクションを許可する]: このオプションは、GitHub Connect が有効になっていて、GitHub Actions で構成されている� �合に使用できます。 詳細については、「GitHub Connect を使用して GitHub.com アクションへの自動アクセスを有効にする」を参照してく� さい。検証済みの作成者によって作成されたすべての GitHub Marketplace アクションを、ワークフローで使用できるようにします。 GitHubがアクションの作者をパートナーOrganizationとして検証すると、GitHub Marketplaceでアクションの隣にバッジが表示されるようになります。
-
[指定したアクションを許可する]: ワークフローで使用できるアクションを、特定の組織とリポジトリのものに制限します。
アクションの特定のタグまたはコミット SHA へのアクセスを制限するには、ワークフローで使われているのと同じ構文を使って、アクションを選びます。
- アクションの� �合の構文は、
<OWNER>/<REPO>@<TAG OR SHA>です。 たとえば、タグを選択するにはactions/javascript-action@v1.0.1を使用し、SHA を選択するにはactions/javascript-action@172239021f7ba04fe7327647b213799853a9eb89を使用します。 詳細については、「アクションの検索とカスタマイズ」を参照してく� さい。
パターンのマッチには、ワイルドカード文字
*を使用できます。 たとえば、space-orgで始まる Organization のすべてのアクションを許可するには、space-org*/*と指定できます。 octocat で始まるリポジトリのすべてのアクションを許可するには、*/octocat**@*を使用できます。*ワイルドカードの使用の詳細については、「GitHub Actions のワークフロー構文」を参照してく� さい。 - アクションの� �合の構文は、
この手� �では、特定のアクションを許可リストに追� する方法を示します。
-
On your GitHub Enterprise Server instance, navigate to the main page of the repository.
-
リポジトリ名の下の [ 設定] をクリックします。
-
In the left sidebar, click Actions.
-
Under "Actions permissions", select [Allow select actions](選択したアクションを許可する) and add your required actions to the list.
-
Click Save.
Enabling workflows for forks of private repositories
プライベート リポジトリのフォークの利用に依存している� �合、pull_request イベントの際にユーザーがどのようにワークフローを実行できるかを制御するポリシーを構成できます。 プライベート リポジトリと内部リポジトリでのみ使用でき、エンタープライズ、組織、またはリポジトリに対してこれらのポリシー設定を構成できます。
If a policy is disabled for an enterprise or organization, it cannot be enabled for a repository.
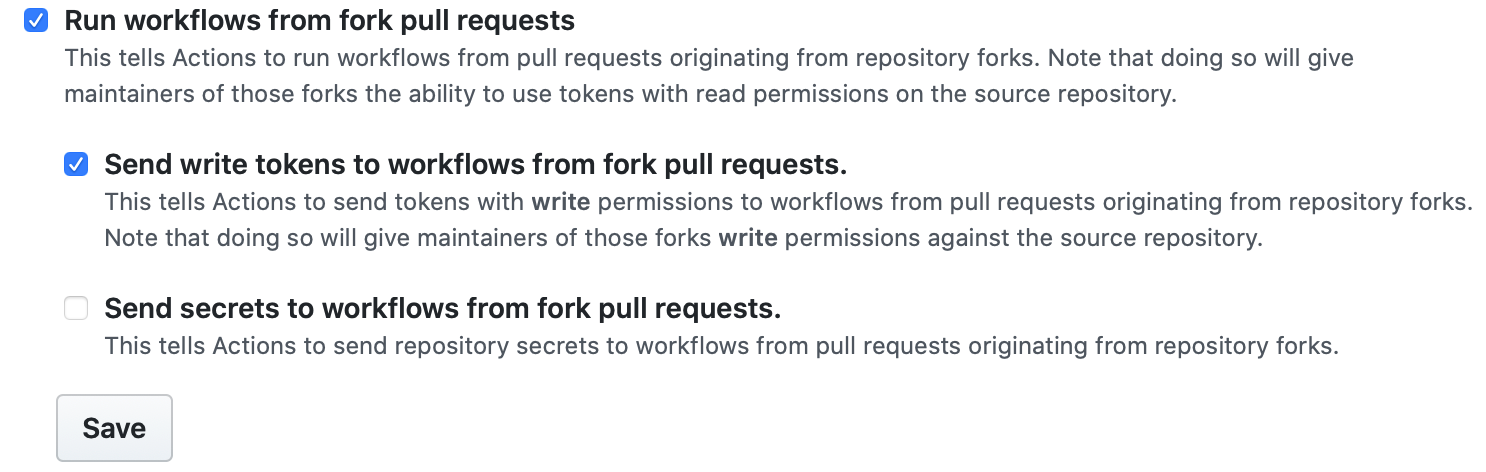
- フォーク pull request からワークフローを実行する - 読み取り専用権限を持ち、シークレットへのアクセス権を持たない
GITHUB_TOKENを使用して、フォーク pull request からワークフローを実行できます。 - pull request からワークフローに書き込みトークンを送信する - フォークからの pull request で書き込み権限を持つ
GITHUB_TOKENを使用できます。 - pull request からワークフローにシークレットを送信する - すべてのシークレットを pull request で利用できるようにします。
Configuring the fork policy for a private repository
- On your GitHub Enterprise Server instance, navigate to the main page of the repository.
- リポジトリ名の下の [ 設定] をクリックします。
- In the left sidebar, click Actions.
- [Fork pull request workflows](pull request ワークフローのフォーク) で、オプションを選択します。 例:
- [保存] をクリックして設定を適用します。
Setting the permissions of the GITHUB_TOKEN for your repository
GITHUB_TOKEN に付与される既定のアクセス許可を設定できます。 GITHUB_TOKEN の詳細については、「自動トークン認証」を参照してく� さい。 デフォルトとして制限付きアクセス許可セットを選択するか、より幅広く許可をする設定を適用できます。
The default permissions can also be configured in the organization settings. If your repository belongs to an organization and a more restrictive default has been selected in the organization settings, the same option is selected in your repository settings and the permissive option is disabled.
リポジトリへの書き込みアクセス権を持っている人は誰でも、ワークフロー ファイルの permissions キーを編集して、GITHUB_TOKEN に付与されたアクセス許可を変更でき、必要に応じて追� または削除できます。 詳細については、permissions をご覧く� さい。
Configuring the default GITHUB_TOKEN permissions
-
On your GitHub Enterprise Server instance, navigate to the main page of the repository.
-
リポジトリ名の下の [ 設定] をクリックします。
-
In the left sidebar, click Actions.
-
Under "Workflow permissions", choose whether you want the
GITHUB_TOKENto have read and write access for all scopes, or just read access for thecontentsscope.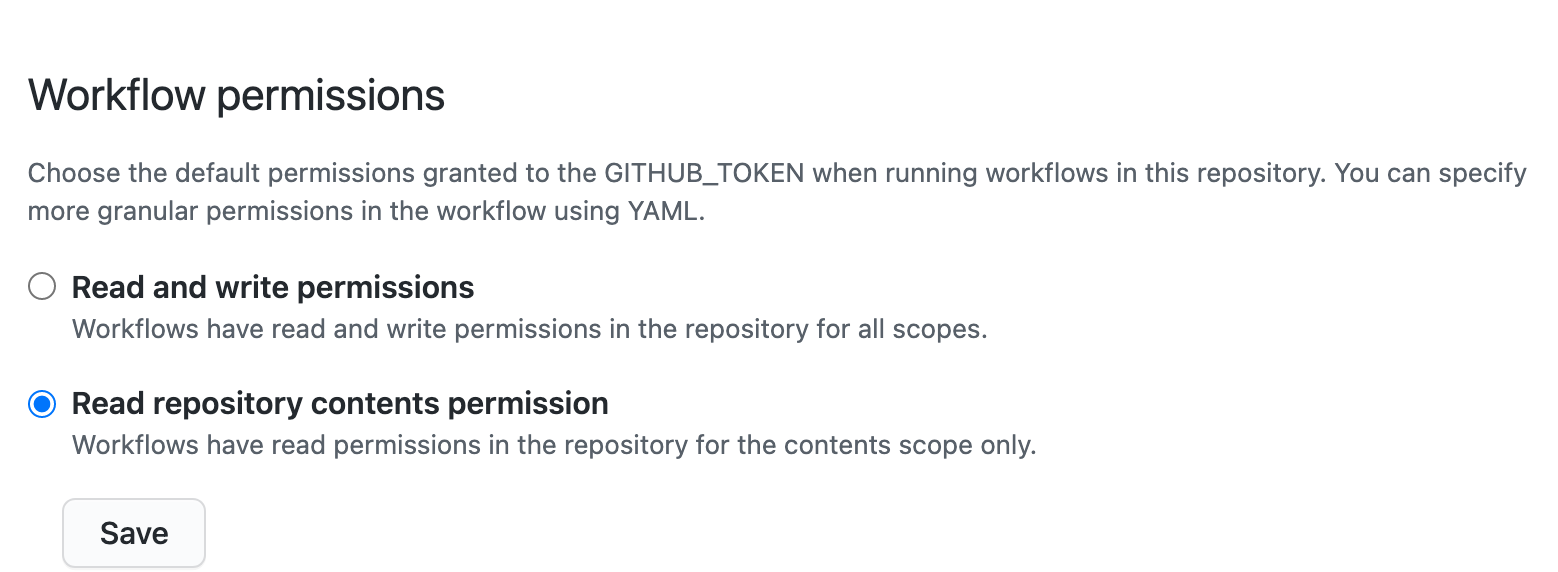
- Click Save to apply the settings.
Configuring the retention period for GitHub Actions artifacts and logs in your repository
You can configure the retention period for GitHub Actions artifacts and logs in your repository.
デフォルトでは、ワークフローによって生成された成果物とログファイルは、90日間保持された後自動的に削除されます。 この保持時間を 1 から 400 日の間で変更できます。
保持期間をカスタマイズした� �合、適用されるのは新しい成果物とログファイルに対してであり、既存のオブジェクトにさかのぼっては適用されません。 管理されたリポジトリ及びOrganizationについては、最大の保持期間は管理するOrganizationあるいはEnterpriseによって設定された上限を超えることはできません。
You can also define a custom retention period for a specific artifact created by a workflow. For more information, see "Setting the retention period for an artifact."
Setting the retention period for a repository
- On your GitHub Enterprise Server instance, navigate to the main page of the repository.
- リポジトリ名の下の [ 設定] をクリックします。
- In the left sidebar, click Actions.
- [成果物とログの保持] で、新しい値を入力します。
- [保存] をクリックして変更を適用します。