Introduction
Educators who teach a course on software development can use discounts, partnerships, training, and tools from GitHub Education to effectively teach relevant skills to students.
In this guide, you'll get started with GitHub, sign up for accounts and discounted services through GitHub Education, and create a space for your course and assignment on GitHub Classroom.
Tip: If you're a student and you'd like to take advantage of an academic discount, see "Apply to GitHub Global Campus as a student."
Creating accounts on GitHub
First, you'll need to create a free personal account on GitHub.
- Go to GitHub's Pricing page.
- Read the information about the different products and subscriptions that GitHub offers, then click the upgrade button under the subscription you'd like to choose.
- Follow the prompts to create your free personal account.
After you create your personal account, create a free organization account. You'll use this organization account to create and manage classrooms GitHub Classroom.
-
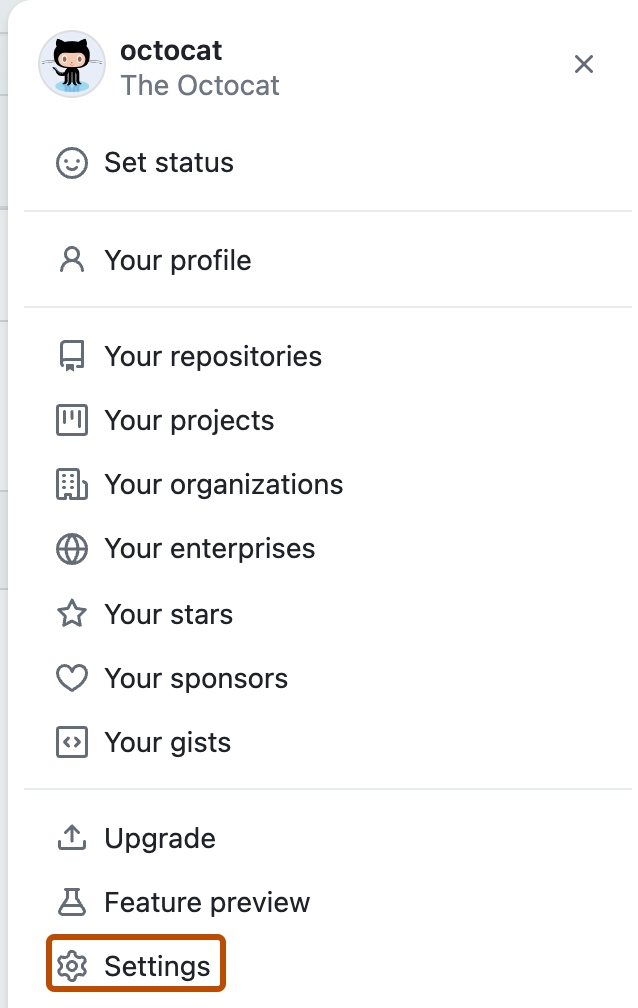
In the upper-right corner of any page, click your profile photo, then click Settings.
-
In the "Access" section of the sidebar, click Organizations.
-
Next to the "Organizations" header, click New organization.
-
Follow the prompts to create a free organization.
For more information, see "Types of GitHub accounts."
Applying for teacher benefits
Next, you'll sign up for teacher benefits and resources from GitHub by applying to GitHub Global Campus, a portal that allows you to access your education benefits all in one place. To apply for teacher benefits and GitHub Global Campus access, you must meet the following requirements.
- Be an educator, faculty member, or researcher.
- Have a verifiable school-issued email address.
- Upload documents that prove your school affiliation.
- Have a personal account on GitHub.
Tip In addition to individual discounts, GitHub offers partnerships with educational institutions through the GitHub Campus Program. For more information, see the GitHub Campus Program website.
-
Go to GitHub Education and, in the top navigation bar, click Benefits.
-
Under "Individuals", click Get teacher benefits.
-
Select or add the email address you use for school.
Tip: Selecting a school-issued email address, if you have one, gives you the best chance of a speedy review.
-
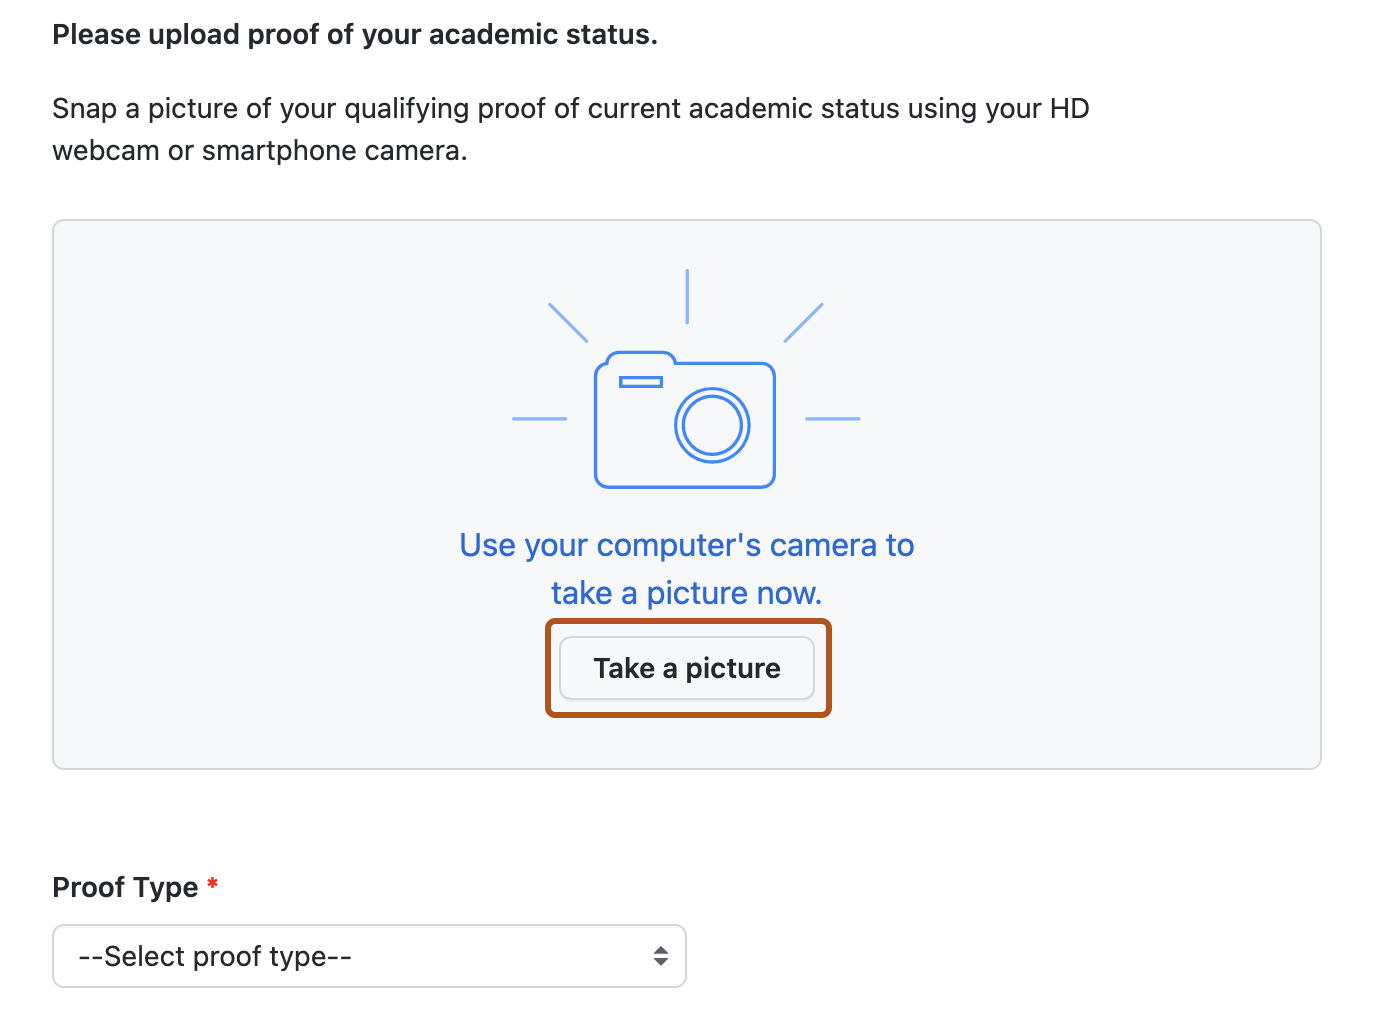
Click Continue, and then you will be prompted to upload proof of your academic status.
-
Click Take a picture to use your computer's camera to upload proof.
-
Optionally, use the camera drop-down menu to change the camera you want to use, if you have multiple cameras available.
-
Place your valid academic ID or other proof of current academic status in the frame, then click Take photo.
-
Under "Proof Type", use the dropdown to select the type of proof you are providing.
-
-
Enter your school's name.
-
Describe how you plan to use GitHub.
-
Verify your application details, then click Process my application.
Note: If, after clicking the Process my application button, you see a banner asking you to fix something in your application, you should fix it and then click Reprocess my application.
If your application is approved, you'll receive a confirmation email. Applications are usually processed within a few days, but it may take longer during peak times, such as during the start of a new semester.

Once you are a verified GitHub Global Campus educator, you can access GitHub Global Campus anytime by going to the GitHub Education website.
Set up GitHub Classroom
With your personal account and organization account, you're ready to get started with GitHub Classroom. GitHub Classroom is free to use. You can track and manage assignments, grade work automatically, and provide feedback to your students.
-
Sign into GitHub Classroom.
-
To authorize GitHub Classroom to access your personal account on GitHub, review the information, then click Authorize GitHub Classroom.
-
Review the information. To authorize GitHub Classroom to access your organization account on GitHub, click Grant.
Tip: If you see a Request button instead of a Grant button, you are a member of the organization, not an owner. An owner must approve your request for GitHub Classroom. You must be an organization owner to create and manage classrooms and assignments in GitHub Classroom. For more information, see "Authorizing OAuth apps."
-
Click Authorize github.
Create your classroom
A classroom in GitHub Classroom is where teachers and students interact during a course. Teachers can create a student roster for the classroom, then create, assign, review, and grade assignments within the classroom.
- Sign into GitHub Classroom.
- Click Create your first classroom or New classroom.
- In the list of organizations, click the organization you'd like to use for your classroom. Optionally, you can create a new organization. For more information, see "Creating a new organization from scratch."
- Under "Classroom name", type the name for your classroom.
- Click Create classroom.
Next steps
You've created a classroom, and you're ready to enrich your course with GitHub and GitHub Classroom! 🎉
- Manage your classrooms and classroom admins, and create a roster of students for your classroom. For more information, see "Manage classrooms."
- Use the Git and GitHub starter assignment to give students an overview of Git and GitHub fundamentals. For more information, see "Use the Git and GitHub starter assignment."
- Create an assignment for individual students or teams. For more information, see "Create an individual assignment" or "Create a group assignment."
- Write and implement automated tests to provide immediate feedback to students directly in assignment repositories. For more information, see "Use autograding."
- Participate in the GitHub Education Community.